

ROS下单目摄像头的Calibration
安装usb_cam包
sudo apt install ros-melodic-usb-cam*
该包将摄像头的图像通过sensor_msgs::Image消息发布。
启动摄像头
可以用默认的参数启动摄像头:
rosrun usb_cam usb_cam_node
当然也可以配置摄像头的参数。安装好usb_cam包后,在/opt/ros/melodic/share/usb_cam/launch中会存在usb_cam-test.launch文件,在该文件中启动两个ROS节点,usb_cam_node和image_view。在文件里就可以为usb_cam_node配置参数。
roslaunch
如果成功启动后,会发布一系列的topic。
rostopic list

/usb_cam/image_raw
/usb_cam/image_raw/compressed
...
/usb_cam/camera_info
这里usb_cam是一个名字空间。
显示摄像头图像
rosrun image_view image_view image:=/usb_camera/image_rawCalibration
运行如下命令进行Calibration:
rosrun camera_calibration cameracalibrator.py --size 8x6 --square 0.0254
image:=/usb_cam/image_raw camera:=/usb_cam
“–size"表示要识别的黑白格阵列的大小,”–square"指定方格的尺寸,我们使用的是A4纸打印的黑白格,尺寸为25.4 mm=0.0254 m。"image"表示使用的是来哪个Topic的图像数据。
校正文件
当校正完成后,校正数据文件会保存在/tmp/calibrationdata.tar.gz文件中,其中的ost.yaml文件便是我们需要关心的。ost.yaml文件可以提取出来改名为任意名称,例如left.yaml或right.yaml。
image_width: 640
image_height: 480
camera_name: narrow_stereo
camera_matrix:
  rows: 3
  cols: 3
  data: [592.094880, 0.000000, 325.609086, 0.000000, 588.924176, 237.070160, 0.000000, 0.000000, 1.000000]
distortion_model: plumb_bob
distortion_coefficients:
  rows: 1
  cols: 5
  data: [0.040292, -0.099853, -0.000439, -0.002026, 0.000000]
rectification_matrix:
  rows: 3
  cols: 3
  data: [1.000000, 0.000000, 0.000000, 0.000000, 1.000000, 0.000000, 0.000000, 0.000000, 1.000000]
projection_matrix:
  rows: 3
  cols: 4
  data: [594.086670, 0.000000, 324.612256, 0.000000, 0.000000, 591.877930, 236.914604, 0.000000, 0.000000, 0.000000, 1.000000, 0.000000]
图像的去畸变
有了校正数据后,可以使用image_proc包提供的功能来对摄像头图像进行去畸变。image_proc会从指定的topic上提取相机校正参数,这个topic默认为/xxx_camera/camera_info。这里xxx_camera是名字空间,可以指定。例如:
ROS_NAMESPACE=usb_cam rosrun image_proc image_proc
那么就要确保指定名字空间中有image_raw和camera_info的主题。image_proc会将处理后的图像发布到/xxx_camera/image_rect和image_rect_color。image_rect是灰度图像,image_rect_color是彩色图像。
现在需要解决的是怎么把校正得到的yaml数据文件发布到/xxx_camera/camera_info上去。 对于单目摄像头比较简单,在启动usb_cam时为其指定camera_info_url参数即可,camera_info_url参数则指向校正数据的yaml文件。可以通过修改usb_cam-test.launch文件完成,在其中添加如下:
<param name="camera_info_url" type="string" value="file://$(find usb_cam)/ost.yaml" />
#<param name="camera_info_url" type="string" value="file:///home/arczee/ost.yaml" />
这样在usb_camera启动时就会加载该相机参数文件。其实usb_camera是调用了camera_info_manager包提供的CameraInfoManager类来读取参数文件并发布的。在合成图像方式的双目摄像头处理时就需要用到该CameraInfoManager类。
双目摄像头的Calibration
独立图像的双目摄像头
如果使用的双目摄像头在计算机中是按两个独立的设备呈现的,那么就比较简单,可以分别使用ROS的方法进行Calibration。
合成图像的双目摄像头
如果使用的双目摄像头在计算机上是一个设备,即将两个摄像头的图像合成为了一副图像,则无法直接使用ROS方法进行校正。
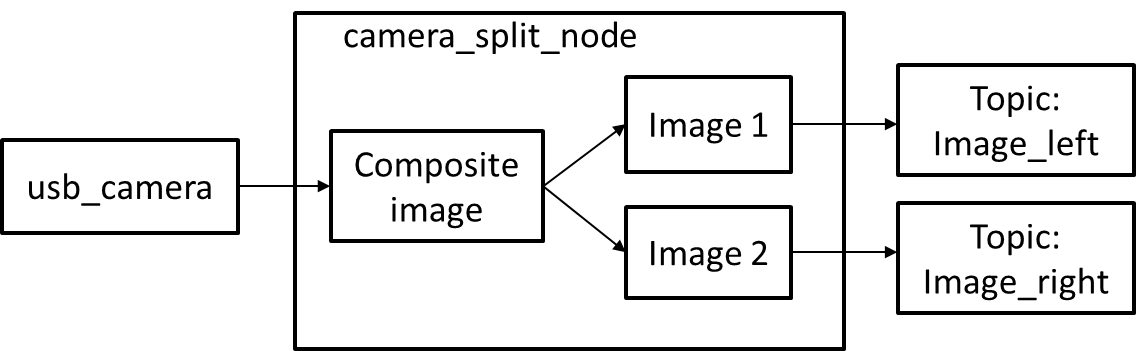
解决的方法: 创建一个ROS节点,名为camera_split,读取原始topic中的合成图像,然后将其分解为两个图像后再发布成两个独立的图像Topic。在做Calibration时分别指定不同摄像头图像对应的Topic即可。
但是还是会有一个问题,得到校正数据后,就需要对图像进行calibration的处理。虽然有image_proc包可以进行校正处理,但还是需要为其提供两个相机的参数(假设通过分别calibration得到了left.yaml和right.yaml)。因此camera_split节点还需要读取相机参数文件并将其发布到指定的camera_info Topic上。
创建ROS package
catkin_create_pkg camera_split cv_bridge image_transport roscpp sensor_msgs std_msgs camera_info_manager
其中指定了所依赖的包,这些也可以在CMakeLists.txt中进行修改
修改camera_split包的CMakeLists.txt文件#修改include_directories:
#修改include_directories:
include_directories (
    ${catkin_INCLUDE_DIRS}
    ${OpenCV_INCLUDE_DIRS}
)
#添加可执行文件
add_executable(camera_split_node src/camera_splid.cpp )
#指定链接库
target_link_libraries(camera_splid_node
    ${catkin_LIBRARIES}
    ${OpenCV_LIBRARIES}
)
创建源代码文件
#include <ros/ros.h>
#include <iostream>
#include <image_transport/image_transport.h>
#include <cv_bridge/cv_bridge.h>
#include <sensor_msgs/image_encodings.h>
#include <camera_info_manager/camera_info_manager.h>

#include <opencv2/opencv.hpp>
#include <opencv2/imgproc/imgproc.hpp>
#include <opencv2/highgui/highgui.hpp>

using namespace std;

class CameraSplitter
{
public:
	CameraSplitter():nh_("~"),it_(nh_)
	{
		image_sub_ = it_.subscribe("/usb_cam/image_raw", 1, &CameraSplitter::imageCallback, this);
		image_pub_left_ = it_.advertiseCamera("/left_cam/image_raw", 1);
		image_pub_right_ = it_.advertiseCamera("/right_cam/image_raw", 1);
		cinfo_ =boost::shared_ptr<camera_info_manager::CameraInfoManager>(new camera_info_manager::CameraInfoManager(nh_));

		//读取参数服务器参数,得到左右相机参数文件的位置
		string left_cal_file = nh_.param<std::string>("left_cam_file", "");
		string right_cal_file = nh_.param<std::string>("right_cam_file", "");
		if(!left_cal_file.empty())
		{
			if(cinfo_->validateURL(left_cal_file)) {
				cout<<"Load left camera info file: "<<left_cal_file<<endl;
				cinfo_->loadCameraInfo(left_cal_file);
				ci_left_ = sensor_msgs::CameraInfoPtr(new sensor_msgs::CameraInfo(cinfo_->getCameraInfo()));
			}
			else {
				cout<<"Can't load left camera info file: "<<left_cal_file<<endl;
				ros::shutdown()
			}
		}
		else {
			cout<<"Did not specify left camera info file." <<endl
			ci_left_=sensor_msgs::CameraInfoPtr(new sensor_msgs::CameraInfo());
		}
		if(!right_cal_file.empty())
		{
			if(cinfo_->validateURL(right_cal_file)) {
				cout<<"Load right camera info file: "<<right_cal_file<<endl;
				cinfo_->loadCameraInfo(right_cal_file);
				ci_right_ = sensor_msgs::CameraInfoPtr(new sensor_msgs::CameraInfo(cinfo_->getCameraInfo()));
			}
			else {
				cout<<"Can't load right camera info file: "<<left_cal_file<<endl;
				ros::shutdown()
			}
		}
		else {
			cout<<"Did not specify right camera info file." <<endl
			ci_right_=sensor_msgs::CameraInfoPtr(new sensor_msgs::CameraInfo());
		}
	}

	void imageCallback(const sensor_msgs::ImageConstPtr& msg)
	{
		cv_bridge::CvImageConstPtr cv_ptr;
		namespace enc= sensor_msgs::image_encodings;
		cv_ptr= cv_bridge::toCvShare(msg, enc::BGR8);
		//截取ROI(Region Of Interest),即左右图像,会将原图像数据拷贝出来。
		leftImgROI_=cv_ptr->image(cv::Rect(0,0,cv_ptr->image.cols/2, cv_ptr->image.rows));
		rightImgROI_=cv_ptr->image(cv::Rect(cv_ptr->image.cols/2,0, cv_ptr->image.cols/2, cv_ptr->image.rows ));
		//创建两个CvImage, 用于存放原始图像的左右部分。CvImage创建时是对Mat进行引用的,不会进行数据拷贝
		leftImgPtr_=cv_bridge::CvImagePtr(new cv_bridge::CvImage(cv_ptr->header, cv_ptr->encoding,leftImgROI_) );
		rightImgPtr_=cv_bridge::CvImagePtr(new cv_bridge::CvImage(cv_ptr->header, cv_ptr->encoding,rightImgROI_) );

		//发布到/left_cam/image_raw和/right_cam/image_raw
		ci_left_->header = cv_ptr->header 	//很重要,不然会提示不同步导致无法去畸变
		ci_right_->header = cv_ptr->header
		sensor_msgs::ImagePtr leftPtr =leftImgPtr_->toImageMsg();
		sensor_msgs::ImagePtr rightPtr =leftImgPtr_->toImageMsg();
		leftPtr->header=msg->header; 		//很重要,不然输出的图象没有时间戳
		rightPtr->header=msg->header;
		image_pub_left_.publish(leftPtr,ci_left_);
		image_pub_right_.publish(rightPtr,ci_right_);
	}

private:
	ros::NodeHandle nh_;
	image_transport::ImageTransport it_;
	image_transport::Subscriber image_sub_;
	image_transport::CameraPublisher image_pub_left_;
	image_transport::CameraPublisher image_pub_right_;
	boost::shared_ptr<camera_info_manager::CameraInfoManager> cinfo_;
	sensor_msgs::CameraInfoPtr ci_left_;
	sensor_msgs::CameraInfoPtr ci_right_;

	cv::Mat leftImgROI_;
	cv::Mat rightImgROI_;
	cv_bridge::CvImagePtr leftImgPtr_=NULL;
	cv_bridge::CvImagePtr rightImgPtr_=NULL;
};

int main(int argc,char** argv)
{
	ros::init(argc,argv, "camera_split");
	CameraSplitter cameraSplitter;
	ros::spin();
	return 0;
}
使用

启动USB摄像头
在手上有一个质量不太好的双目摄像头,本来有个USB3.0接口,但接上使用不久后就会死掉。所有只能使用它的USB2.0接口。由于传输速度的问题,采用分辨率为1280x480(图像输出),编码为mjpeg。可以将/opt/ros/melodic/share/usb_cam/launch/usb_cam-test.launch复制为binocular.launch进行相应的正确配置。例如
<launch>
  <node name="usb_cam" pkg="usb_cam" type="usb_cam_node" output="screen" >
    <param name="video_device" value="/dev/video0" />
    <param name="image_width" value="1280" />
    <param name="image_height" value="480" />
    <param name="pixel_format" value="mjpeg" />
    <param name="camera_frame_id" value="usb_cam" />
    <param name="io_method" value="mmap"/>
  </node>
  <node name="image_view" pkg="image_view" type="image_view" respawn="false" output="screen">
    <remap from="image" to="/usb_cam/image_raw"/>
    <param name="autosize" value="true" />
  </node>
</launch>
分割
rosrun camera_split camera_split_node
校正
使用camera_calibration分别对左右摄像头校正。得到left.yaml和right.yaml
重新运行分割
rosrun camera_split camera_split_node _left_cam_file:=file:///opt/left.yaml _right_cam_file:=file:///opt/right.yaml其中我们使用两个本地参数left_cam_file和right_cam_file来指定左右两个相机的参数文件
去畸变
ROS_NAMESPACE=left_cam rosrun image_proc image_proc
ROS_NAMESPACE=right_cam rosrun image_proc image_proc
执行此步后,会产生如下的topic:
/left_cam/image_rect
/left_cam/image_rect_color
/right_cam/image_rect
/right_cam_image_rect_color
launch文件
为了不用每次都要繁杂地输入各个命令,我们可以建立两个launch文件来自动地运行所需的程序。
1,camera_split_no_calibration.launch
<launch>
<node pkg="camera_split" type="camera_split_node" name="camera_split_node" output="screen" >
</node>
<node pkg="image_view" type="image_view" name="image_view_left" respawn="false" output="screen">
	<remap from="image" to="/left_cam/image_raw"/>
	<param name="autosize" value="true" />
</node>
<node pkg="image_view" type="image_view" name="image_view_right" respawn="false" output="screen">
	<remap from="image" to="/right_cam/image_raw"/>
	<param name="autosize" value="true" />
</node>
</launch>
2,camera_split_with_calibration.launch
<launch>
<node pkg="camera_split" type="camera_split_node" name="camera_split_node" output="screen" >
	<param name="left_cam_file" value="file:///opt/lifecam.yaml" />
	<param name="right_cam_file" value="file:///opt/lifecam.yaml" />
</node>
<node pkg="image_proc" type="image_proc" name="image_proc_left" ns="left_cam" />
<node pkg="image_proc" type="image_proc" name="image_proc_right" ns="right_cam" />
<node pkg="image_view" type="image_view" name="image_view_left" respawn="false" output="screen">
	<remap from="image" to="/left_cam/image_rect_color"/>
	<param name="autosize" value="true" />
</node>
<node pkg="image_view" type="image_view" name="image_view_right" respawn="false" output="screen">
	<remap from="image" to="/right_cam/image_rect_color"/>
	<param name="autosize" value="true" />
</node>
</launch>


评论(1)
您还未登录,请登录后发表或查看评论