

机械臂智能装配(一) ros中机械臂的工作空间规划,给定终端的姿态,规划运动过程(rviz,python)
一,前言
这是新的一个板块,专注于机械臂仿真的研究,上一个板块我写了关于小车,darknet_ros的yolo,机械臂这三者的融合,当然上一个板块依旧存在不少问题没解决,但是主线已经走通,时间上不允许,我只能直接开始这一板块,机械臂的运动板块。
从整体上来说,这一板块要实现的就是在狭小空间且光照较弱的环境下,让机械臂实现装配物体到指定位置的过程。
第一步,确定我们指定地方的坐标,这个坐标包含三个数据,x,y,z,即空间坐标,实现的话,就需要在机械臂上安装可检测深度的摄像机,当然,这个位置的确定不能是人工选择,要让机械臂自动寻找,比如我要让机械臂把烟头放到垃圾桶,垃圾桶的位置在哪里,不能由我告诉机械臂,要让机械臂在可视范围内寻找,那就要用到目标检测算法,这个目标检测算法要得到的就是目标的一个坐标。
第一步的补充,不仅要确定目标的位置,还要确定目标的一个方向,比如我们要把装饰品挂在钩子上,那么钩子的一个朝向也是要获得的数据。
第二步,我们不仅需要目标的位置,还需要周围环境的信息,即建立周围环境的模型,在机械臂移动过程中,不能让机械臂碰撞到东西啦,也是机械臂轴的路径要考虑的。
第三步,有了目标坐标,那么我们就采用moveit的工作空间规划来完成机械臂将物体送到指定位置的任务
第四步,机械臂膀到了指定位置,要让机械臂把物体放好,比如我们要将一个装饰品挂在挂钩上,那么机械臂拿着装饰品先到挂钩附近,然后挂上,挂上这一步就涉及机械臂前爪的前后左右移动。
以上就是我们这个板块要做的,后面会根据研究的进行来完善这些内容。
二,机械臂工作空间规划
我们先从已知目标的坐标,通过moveit来坐工作空间规划(即机械臂从起始点怎么运动到终点)
我们参考的项目资料是[ROS机器人开发实践](胡春旭)这本书,在这本书基础上进行。
在书中的10.9.2 工作空间规划章节中,我们先拷贝下它的代码到本地,代码地址
看看我们这篇所运行代码的树状结构(只显示1层文件):
tree -L 1 src
src├── CMakeLists.txt -> /opt/ros/kinetic/share/catkin/cmake/toplevel.cmake├── darknet_ros├── marm_description├── marm_gazebo├── marm_moveit_config└── marm_planning
三,机械臂运行
按照书上的步骤,我们直接运行:
roslaunch marm_planning arm_planning.launchrosrun marm_planning moveit_ik_demo.py
在运行moveit_ik_demo.py之前,需要先赋予权限,在moveit_ik_demo.py所在目录运行:
chmod +x moveit_ik_demo.py
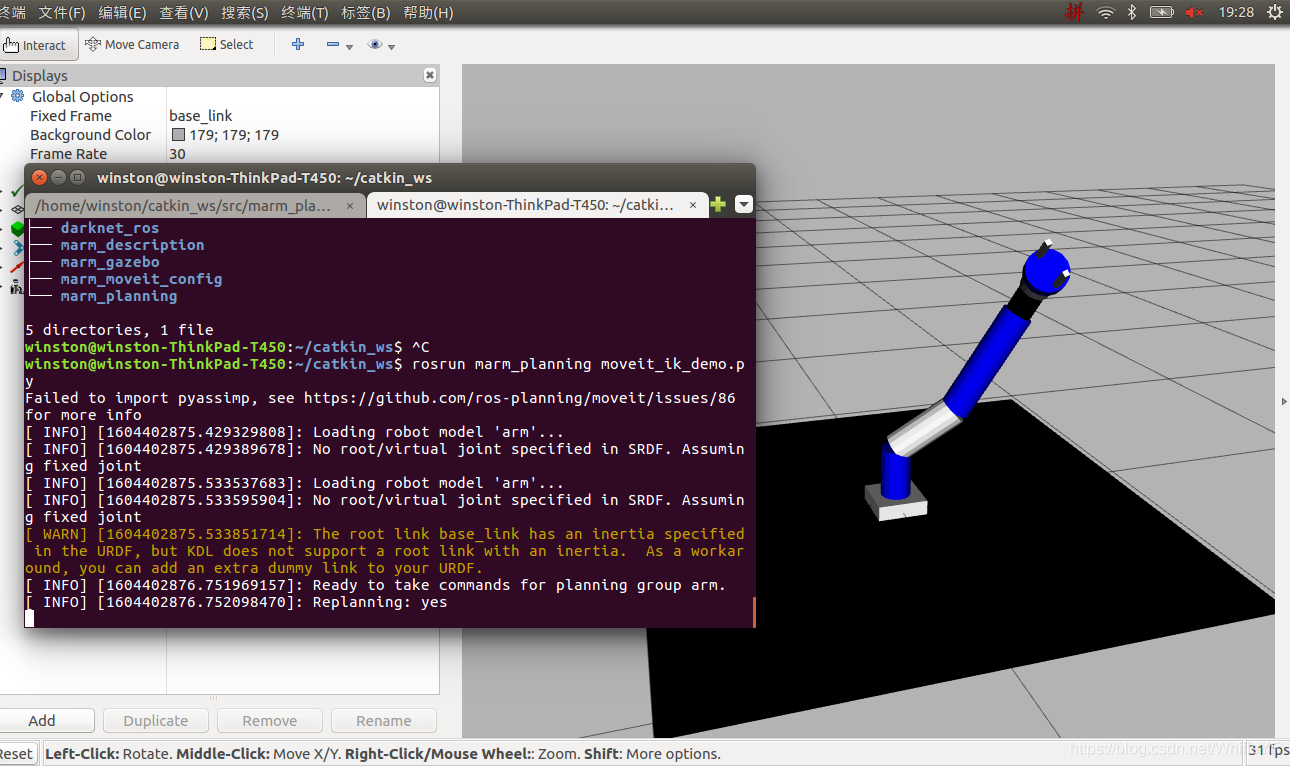
运行成功后,在rviz的界面中可以看到机械臂运动到了如图上所示的指定位姿。
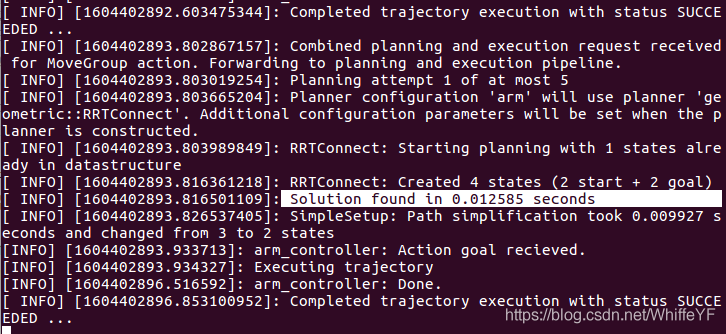
同时在终端中可以看到运动规划过程中的输出日志,其中包含KDL运动学求解器完成反向运动学求解的时间
四,机械臂仿真源码解析
4.1实现的功能是什么
机械臂关节空间的规划不需要考虑机器人终端的姿态。与之相对应的是工作空间规划,机械臂的目标位姿不再通过各轴位置给定,而是通过机器人终端的三维坐标位置和姿态给定,在运动规划时使用逆向运动学求解各轴位置。例如控制机器人终端在world坐标系下的x轴方向上移动10cm,同时围绕z轴旋转20°,就要将该位姿反解得到各轴位置,然后再进行规划、运动。
4.2 arm.yaml
代码如下:
joints: {
    joint1: {id: 1, neutral: 205, max_angle: 169.6, min_angle: -169.6, max_speed: 90},
    joint2: {id: 2, max_angle: 134.6, min_angle: -134.6, max_speed: 90},
    joint3: {id: 3, max_angle: 150.1, min_angle: -150.1, max_speed: 90},
    joint4: {id: 4, max_angle: 150.1, min_angle: -150.1, max_speed: 90},
    joint5: {id: 5, max_angle: 150.1, min_angle: -150.1, max_speed: 90},
    joint6: {id: 6, max_angle: 360, min_angle: -360, max_speed: 90},
    finger_joint1: {id: 7, max_speed: 90},
}
controllers: {
    arm_controller: {type: follow_controller, joints: [joint1, joint2, joint3, joint4, joint5, joint6], action_name: arm_controller/follow_joint_trajectory, onboard: False }
}
arm.yaml配置文件主要分成以下两个部分。
1)机器人关节属性的设置:包括每个驱动关节的最大/最小角度、最大速度等。
2)控制器插件的设置:包含机器人六轴本体的控制类型、关节,以及所接收的action消息名称等。
4.3 arm.xacro
这个文件位marm_description/urdf中,就是机械臂的urdf模型
4.4 move_group.launch
这个文件位于marm_moveit_config/launch
move_group是MoveIt!的核心节点,可以综合其他独立的功能组件为用户提供ROS中的动作指令和服务,如下图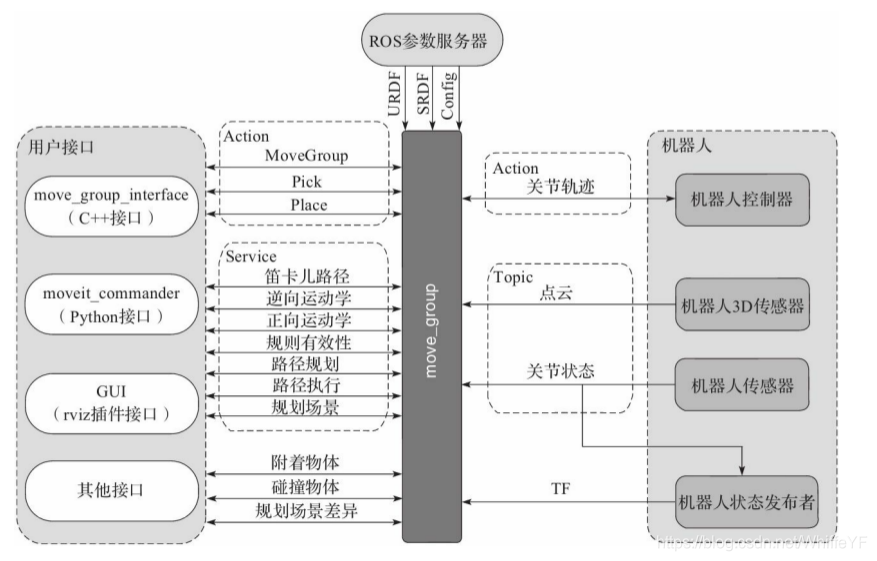
MoveIt!的核心节点——move_group
move_group本身并不具备丰富的功能,主要完成各功能包、插件的集成。它通过消息或服务的方式接收机器人发布的点云信息、关节状态消息,以及机器人的TF坐标变换;另外,还需要ROS参数服务器提供机器人的运动学参数,这些参数可根据机器人的URDF模型生成(SRDF和配置文件)。
(1)用户接口
MoveIt!提供三种可供调用的接口:
·C++:使用move_group_interface包提供的API。

·Python:使用moveit_commander包提供的API。

·GUI:使用MoveIt!的rviz插件。
(2)ROS参数服务器
ROS的参数服务器需要为move_group提供三种信息:
·URDF:从ROS参数服务器中查找robot_description参数,获取机器人模型的描述信息。

·SRDF:从ROS参数服务器中查找robot_description_semantic参数,获取机器人模型的一些配置信息,这些配置信息通过配置工具MoveIt!Setup Assistant生成。

·Config:机器人的其他配置信息,例如关节限位、运动学插件、运动规划插件等
(3)机器人
move_group和机器人之间通过Topic和Action通信。机器人传感器和机器人状态发布者将机器人的关节信息和坐标变换关系发送给move_group。如果需要加入机器人外部感知能力,还需要通过机器人3D传感器发布点云数据。另外还有一个很重要的模块——机器人控制器,通过Action的形式接收move_group的规划结果,并且将执行情况反馈给move_group。
move_group的结构很容易通过插件的形式进行扩展,已有的功能模块也是通过插件的形式集成在MoveIt!中,如图
MoveIt!的插件机制
在代码里看看具体的内容:
<launch>

  <include file="$(find marm_moveit_config)/launch/planning_context.launch" />

  <!-- GDB Debug Option -->
  <arg name="debug" default="false" />
  <arg unless="$(arg debug)" name="launch_prefix" value="" />
  <arg     if="$(arg debug)" name="launch_prefix"
	   value="gdb -x $(find marm_moveit_config)/launch/gdb_settings.gdb --ex run --args" />

  <!-- Verbose Mode Option -->
  <arg name="info" default="$(arg debug)" />
  <arg unless="$(arg info)" name="command_args" value="" />
  <arg     if="$(arg info)" name="command_args" value="--debug" />

  <!-- move_group settings -->
  <arg name="allow_trajectory_execution" default="true"/>
  <arg name="fake_execution" default="false"/>
  <arg name="max_safe_path_cost" default="1"/>
  <arg name="jiggle_fraction" default="0.05" />
  <arg name="publish_monitored_planning_scene" default="true"/>

  <!-- Planning Functionality -->
  <include ns="move_group" file="$(find marm_moveit_config)/launch/planning_pipeline.launch.xml">
    <arg name="pipeline" value="ompl" />
  </include>

  <!-- Trajectory Execution Functionality -->
  <include ns="move_group" file="$(find marm_moveit_config)/launch/trajectory_execution.launch.xml" if="$(arg allow_trajectory_execution)">
    <arg name="moveit_manage_controllers" value="true" />
    <arg name="moveit_controller_manager" value="arm" unless="$(arg fake_execution)"/>
    <arg name="moveit_controller_manager" value="fake" if="$(arg fake_execution)"/>
  </include>

  <!-- Sensors Functionality -->
  <include ns="move_group" file="$(find marm_moveit_config)/launch/sensor_manager.launch.xml" if="$(arg allow_trajectory_execution)">
    <arg name="moveit_sensor_manager" value="arm" />
  </include>

  <!-- Start the actual move_group node/action server -->
  <node name="move_group" launch-prefix="$(arg launch_prefix)" pkg="moveit_ros_move_group" type="move_group" respawn="false" output="screen" args="$(arg command_args)">
    <!-- Set the display variable, in case OpenGL code is used internally -->
    <env name="DISPLAY" value="$(optenv DISPLAY :0)" />

    <param name="allow_trajectory_execution" value="$(arg allow_trajectory_execution)"/>
    <param name="max_safe_path_cost" value="$(arg max_safe_path_cost)"/>
    <param name="jiggle_fraction" value="$(arg jiggle_fraction)" />

    <!-- load these non-default MoveGroup capabilities -->
    <!--
    <param name="capabilities" value="
                  a_package/AwsomeMotionPlanningCapability
                  another_package/GraspPlanningPipeline
                  " />
    -->

    <!-- inhibit these default MoveGroup capabilities -->
    <!--
    <param name="disable_capabilities" value="
                  move_group/MoveGroupKinematicsService
                  move_group/ClearOctomapService
                  " />
    -->

    <!-- Publish the planning scene of the physical robot so that rviz plugin can know actual robot -->
    <param name="planning_scene_monitor/publish_planning_scene" value="$(arg publish_monitored_planning_scene)" />
    <param name="planning_scene_monitor/publish_geometry_updates" value="$(arg publish_monitored_planning_scene)" />
    <param name="planning_scene_monitor/publish_state_updates" value="$(arg publish_monitored_planning_scene)" />
    <param name="planning_scene_monitor/publish_transforms_updates" value="$(arg publish_monitored_planning_scene)" />
  </node>

</launch>

4.5 arm_planning.launch
这个文件位于marm_planning/launch
代码如下:
<launch><!— 不使用仿真时间 —><param name=“/use_sim_time” value=“false” /><!— 启动 arbotix driver—><arg name=“sim” default=“true” /><param name=“robot_description” command=“$(f<launch> <!-- 不使用仿真时间 --> <param name="/use_sim_time" value="false" /> <!-- 启动 arbotix driver--> <arg name="sim" default="true" /> <param name="robot_description" command="$(find xacro)/xacro --inorder '$(find marm_description)/urdf/arm.xacro'" /> <node name="arbotix" pkg="arbotix_python" type="arbotix_driver" output="screen"> <rosparam file="$(find marm_description)/config/arm.yaml" command="load" /> <param name="sim" value="true"/> </node> <node name="gripper_controller" pkg="arbotix_controllers" type="gripper_controller"> <rosparam> model: singlesided invert: false center: 0.0 pad_width: 0.004 finger_length: 0.08 min_opening: 0.0 max_opening: 0.06 joint: finger_joint1 </rosparam> </node> <node pkg="robot_state_publisher" type="robot_state_publisher" name="rob_st_pub" /> <include file="$(find marm_moveit_config)/launch/move_group.launch" /> <!-- 启动rviz可视化界面 --> <node name="rviz" pkg="rviz" type="rviz" args="-d $(find marm_planning)/config/pick_and_place.rviz" required="true" /> </launch>
其中出现了仿真时间:
<!— 不使用仿真时间 —><param name=“/use_sim_time” value=“false” />
我们知道Gazebo和ROS各自有一套自己的时间体系。它们实际上都有两个时间概念:墙上时间和系统时间。所谓的墙上时间(wall-time)就相当于是我们的物理世界中的时间, 就好比挂在墙上的一块钟表,在没有调整的情况下它将按照物理时间一分一秒的走下去。而系统时间在ROS环境下称为ROS Time在Gazebo的环境下成为仿真时间(sim-time)。
更多参考:Gazebo的系统插件与ROS的仿真时间
<param name=“robot_description” command=“$(find xacro)/xacro —inorder ‘$(find marm_description)/urdf/arm.xacro’” />
这一行即加载我们写好的机械臂模型arm.xacro(在marm_description文件中)
<node name=“arbotix” pkg=“arbotix_python” type=“arbotix_driver” output=“screen”><rosparam file=“$(find marm_description)/config/arm.yaml” command=“load” /><param name=“sim” value=“true”/></node>
上面的代码是启动arbotix_driver节点的相关内容,arbotix_driver可以针对真实控制板进行控制,也可以在仿真环境中使用,需要配置“sim”参数为true。另外,该节点的启动还需要加载控制器相关的配置文件,该配置文件在功能包的config路径下。
这个ArbotiX节点会加载上一步中创建的配置文件,并且启动一个控制机器人六轴本体的控制器。ArbotiX还提供了一个夹爪控制器,可以支持控制一个或多个舵机组成的终端夹爪。MArm夹爪只有一个可动关节,虽然是直线运动,但依然可以使用ArbotiX中的
gripper_controller进行控制,且在输入数据上需要将直线运动的长度近似转换成角度旋转
<node name=“gripper_controller” pkg=“arbotix_controllers” type=“gripper_controller”><rosparam>model: singlesidedinvert: falsecenter: 0.0pad_width: 0.004finger_length: 0.08min_opening: 0.0max_opening: 0.06joint: finger_joint1</rosparam></node>
这个ArbotiX节点启动了控制MArm终端夹爪的gripper_controller,同时需要配置一些相关参数。
<node pkg=“robot_state_publisher” type=“robot_state_publisher” name=“rob_st_pub” />
robot_state_publisher节点的功能是将机器人各个link、joint之间的关系,通过TF的形式整理成三维姿态信息发布出去。
<include file=“$(find marm_moveit_config)/launch/move_group.launch” />
上面已经单独说了move_group.launch的作用
<!— 启动rviz可视化界面 —><node name=“rviz” pkg=“rviz” type=“rviz” args=“-d $(find marm_planning)/config/pick_and_place.rviz” required=“true” />
最后一个,这是启动rviz界面,我们看看其文件的部分内容:
Panels:- Class: rviz/DisplaysHelp Height: 0Name: DisplaysProperty Tree Widget:Expanded:- /Global Options1- /MotionPlanning1/Scene Geometry1- /MotionPlanning1/Scene Robot1- /MotionPlanning1/Planned Path1Splitter Ratio:Panels: - Class: rviz/Displays Help Height: 0 Name: Displays Property Tree Widget: Expanded: - /Global Options1 - /MotionPlanning1/Scene Geometry1 - /MotionPlanning1/Scene Robot1 - /MotionPlanning1/Planned Path1 Splitter Ratio: 0.397694528 Tree Height: 724 - Class: rviz/Help Name: Help - Class: rviz/Views Expanded: - /Current View1 Name: Views Splitter Ratio: 0.5 Visualization Manager: Class: "" Displays: - Alpha: 0.5 Cell Size: 0.5 Class: rviz/Grid Color: 0; 0; 0 Enabled: true Line Style: Line Width: 0.0299999993 Value: Lines Name: Grid Normal Cell Count: 0 Offset: X: 0 Y: 0 Z: 0 Plane: XY Plane Cell Count: 20 Reference Frame: <Fixed Frame>
这里有很多参数,这些参数都是对应rviz里的设置,比如
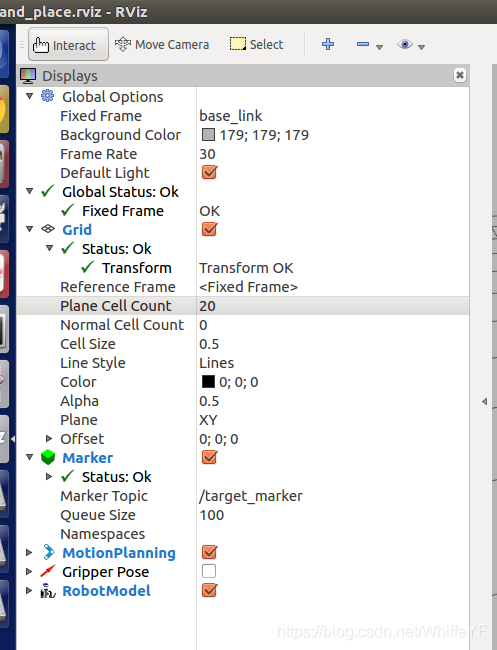
截图中的Plane cell Count:20,在rviz文件中有对应,截图中所有参数都在文件中有对应。
五,moveit_ik_demo.py 运动规划
5.1 代码
代码位于:marm_planning/scripts,内容如下:
-
#!/usr/bin/env python
# -*- coding: utf-8 -*-

import rospy, sys
import moveit_commander
from moveit_msgs.msg import RobotTrajectory
from trajectory_msgs.msg import JointTrajectoryPoint

from geometry_msgs.msg import PoseStamped, Pose
from tf.transformations import euler_from_quaternion, quaternion_from_euler

class MoveItIkDemo:
    def __init__(self):
        # 初始化move_group的API
        moveit_commander.roscpp_initialize(sys.argv)

        # 初始化ROS节点
        rospy.init_node('moveit_ik_demo')

        # 初始化需要使用move group控制的机械臂中的arm group
        arm = moveit_commander.MoveGroupCommander('arm')

        # 获取终端link的名称
        end_effector_link = arm.get_end_effector_link()

        # 设置目标位置所使用的参考坐标系
        reference_frame = 'base_link'
        arm.set_pose_reference_frame(reference_frame)

        # 当运动规划失败后,允许重新规划
        arm.allow_replanning(True)

        # 设置位置(单位:米)和姿态(单位:弧度)的允许误差
        arm.set_goal_position_tolerance(0.01)
        arm.set_goal_orientation_tolerance(0.05)

        # 控制机械臂先回到初始化位置
        arm.set_named_target('home')
        arm.go()
        rospy.sleep(2)

        # 设置机械臂工作空间中的目标位姿,位置使用x、y、z坐标描述,
        # 姿态使用四元数描述,基于base_link坐标系
        target_pose = PoseStamped()
        target_pose.header.frame_id = reference_frame
        target_pose.header.stamp = rospy.Time.now()
        target_pose.pose.position.x = 0.191995
        target_pose.pose.position.y = 0.213868
        target_pose.pose.position.z = 0.520436
        target_pose.pose.orientation.x = 0.911822
        target_pose.pose.orientation.y = -0.0269758
        target_pose.pose.orientation.z = 0.285694
        target_pose.pose.orientation.w = -0.293653

        # 设置机器臂当前的状态作为运动初始状态
        arm.set_start_state_to_current_state()

        # 设置机械臂终端运动的目标位姿
        arm.set_pose_target(target_pose, end_effector_link)

        # 规划运动路径
        traj = arm.plan()

        # 按照规划的运动路径控制机械臂运动
        arm.execute(traj)
        rospy.sleep(1)

        # 控制机械臂终端向右移动5cm
        arm.shift_pose_target(1, -0.05, end_effector_link)
        arm.go()
        rospy.sleep(1)

        # 控制机械臂终端反向旋转90度
        arm.shift_pose_target(3, -1.57, end_effector_link)
        arm.go()
        rospy.sleep(1)

        # 控制机械臂回到初始化位置
        arm.set_named_target('home')
        arm.go()

        # 关闭并退出moveit
        moveit_commander.roscpp_shutdown()
        moveit_commander.os._exit(0)

if __name__ == "__main__":
    MoveItIkDemo()
5.2 代码解析
下面详细分析代码的实现流程。
import rospy, sysimport moveit_commander
导入需要用到的包,moveit_commander包含控制机器人的命令行工具。
from moveit_msgs.msg import RobotTrajectoryfrom trajectory_msgs.msg import JointTrajectoryPoint
代码中未使用到
from geometry_msgs.msg import PoseStamped, Pose
使用ROS中的PoseStamped消息数据描述机器人的目标位姿。
from tf.transformations import euler_from_quaternion, quaternion_from_euler
代码中未发现使用
# 初始化move_group的APImoveit_commander.roscpp_initialize(sys.argv)
在使用MoveIt!的Python API之前,需要先对API进行初始化,初始化的底层依然使用roscpp接口,只是在上层做了Python封装。
# 初始化需要使用move group控制的机械臂中的arm grouparm = moveit_commander.MoveGroupCommander(‘arm’)
在moveit_commander中提供一个重要的类——MoveGroupCommander,可以创建针对规划组的控制对象。
# 获取终端link的名称end_effector_link = arm.get_end_effector_link()
MArm的终端是二指夹爪,也就是模型中的graspping_frame_link,可以使用get_end_effector_link()接口获取该link在模型文件中的名称,该名称在后续规划时要用到。
# 设置目标位置所使用的参考坐标系reference_frame = ‘base_link’arm.set_pose_reference_frame(reference_frame)
工作空间的位姿需要使用笛卡儿坐标值进行描述,所以必须声明该位姿所在的坐标系。set_pose_reference_frame()用于设置目标位姿所在的坐标系,这里设置为机器人的基坐标系——base_link。
# 当运动规划失败后,允许重新规划arm.allow_replanning(True)
机械臂反向运动学求解时存在无解或多解的情况,其中有些情况可能无法实现运动规划。这种情况下可以使用allow_replanning()设置是否允许规划失败之后的重新规划,如果设置为true,MoveIt!会尝试求解五次,否则只求解一次。
# 设置位置(单位:米)和姿态(单位:弧度)的允许误差arm.set_goal_position_tolerance(0.01)arm.set_goal_orientation_tolerance(0.05)
这两行代码用来设置运动控制的允许误差。因为是关节空间下的运动,所以需要设置关节运动的允许误差,这里都设置为0.01,单位为弧度,也就是说,机器人各轴都运动到目标位置为0.05弧度的范围内,即认为到达目标。
# 控制机械臂先回到初始化位置arm.set_named_target(‘home’)arm.go()rospy.sleep(2)
还记得在Setup Assistant中设置的“home”位姿吗?终于可以派上用场了。为了让机械臂的运动保持一致,首先让机械臂回到初始位姿,这个初始位姿可以使用set_named_target()接口并可设置为“home”。然后使用go()命令,即让机器人规划、运动到“home”。最后记得要保持一段时间的延时,以确保机械臂已经完成运动。
使用ROS中的PoseStamped消息数据描述机器人的目标位姿。首先需要设置位姿所在的参考坐标系;然后创建时间戳;接着设置目标位姿的x、y、z坐标值和四元数姿态值。
# 设置机器臂当前的状态作为运动初始状态arm.set_start_state_to_current_state()# 设置机械臂终端运动的目标位姿arm.set_pose_target(target_pose, end_effector_link)
在输入目标位姿前,需要设置运动规划的起始状态。一般情况下使用set_start_state_to_current_state()接口设置当前状态为起始状态。然后使用set_pose_target()设置目标位姿,同时需要设置该目标位姿描述的link,也就是之前获取的机器人终端link名称。
# 规划运动路径traj = arm.plan()# 按照规划的运动路径控制机械臂运动arm.execute(traj)rospy.sleep(1)
运动规划的第一步是规划路径,使用plan()完成,如果路径规划成功,则会返回一条规划好的运动轨迹;然后execute()会控制机器人沿轨迹完成运动。如果规划失败,则会根据设置项,重新进行规划,或者在终端中提示规划失败的日志信息。
        # 控制机械臂终端向右移动5cm
        arm.shift_pose_target(1, -0.05, end_effector_link)
        arm.go()
        rospy.sleep(1)

        # 控制机械臂终端反向旋转90度
        arm.shift_pose_target(3, -1.57, end_effector_link)
        arm.go()
        rospy.sleep(1)
除了使用PoseStamped数据描述目标位姿并进行运动规划外,也可以使用shift_pose_target()实现单轴方向上的目标设置和规划。
shift_pose_target()有以下三个参数。
1)第一个参数用于描述机器人需要在哪个轴向上进行运动:0、1、2、3、4、5分别对应于x、y、z、r、p、y,即xyz方向上的平移和围绕xyz三个轴的旋转。
2)第二个参数用于描述运动尺度,如果是平移运动,则单位为米;如果是旋转运动,则单位为弧度。
3)第三个参数用于描述运动针对的终端link。
该例程首先让机器人终端在y轴的负方向上平移0.05米,然后围绕z轴反向旋转90度。
# 关闭并退出moveitmoveit_commander.roscpp_shutdown()moveit_commander.os._exit(0)
现在机械臂已经完成关节空间的运动,可以关闭接口,退出程序。


评论(0)
您还未登录,请登录后发表或查看评论