

TIM系列激光扫描传感器原理:
激光发射器发出激光脉冲,当激光碰到物体后,部分激光反射回激光接收器。通过计算发射/接收脉冲时间差,可以计算出距离值。激光扫描器连续不停的发射激光脉冲,由旋转的光学机构将激光脉冲按一定角度间隔(角度分辨率)发射至扫描角度内的各个方向而形成一个二维扫描面。


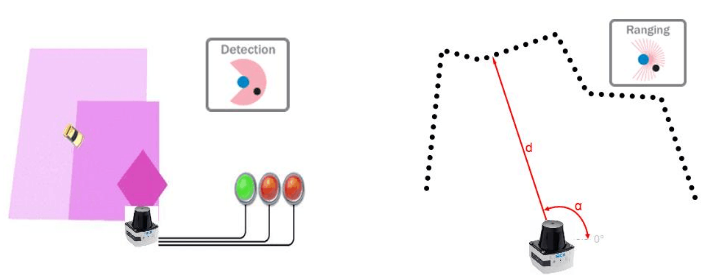
SICK激光传感器按用途主要分两种:
- 检测(Detection):在扫描器的扫描范围内,设置不同形状的检测区域,当扫描器检测到有物体进入该区域时,通过开关量信号输出检测结果。通常用于设备防撞、物体检测、区域安防等。
- 测量(Ranging):在扫描器的扫描范围内,通过数据接口输出每个激光脉冲测量点的距离及对应角度值,据此获得二维轮廓值。通常用于测量物体的外型轮廓及体积。
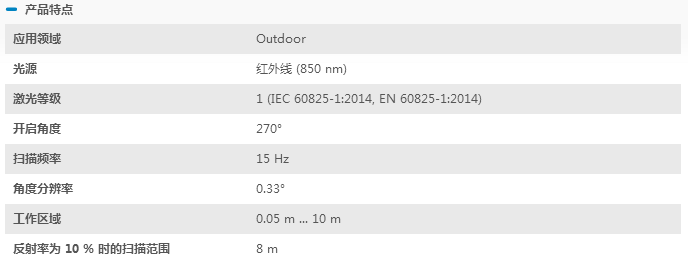
 室外型迷你激光扫描器 TiM561(测量型)是西克(SICK)2014年下半年发布的TiM551产品的升级版本。检测距离达到10米,防护等级为IP67。角度分辨率从1°提升到了0.33°,测量点更密,可检测更细小的物体。可应用于自行小车/机器人等的防撞、导航及周边环境检测,以及安防领域用于区域监控等。IP67防护等级:防护灰尘吸入(整体防止接触,防护灰尘渗透);防护短暂浸泡(防浸)。
TiM系列产品命名规则:
- 第一位数字表示工作模式分类 :3表示检测型,5表示测量型
- 第二位数字表示检测距离分类 :1/2表示检测距离4米,5/6表示检测距离10米
- 第三位数字表示应用环境分类 :0表示室内型, 1表示室外型

TiM561的主要技术参数如下:

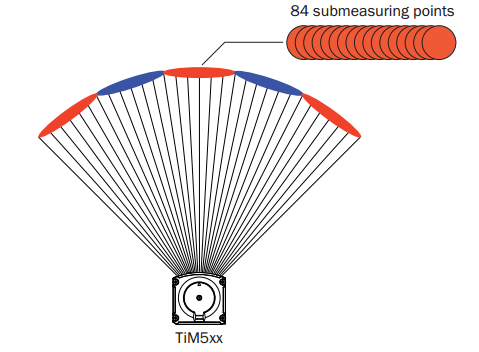
The TiM5xx uses HDDM technology (High Definition Distance Measurement), a SICK own-development. Using this measurement method, a measured value is formed by the average value for several individual pulses. The measurement method forms an average value from several pulses to determine individual measured values. At an angle resolution of 1°(TiM55x) and 0.3°(TiM56x/TiM57x), a measuring point is formed from the average of 84 measurements. TiM561使用SICK的HDDM专利技术,对每个角度对应输出点周围的84个子测量点求平均值作为该点的输出值。相比于传统单脉冲测量方式,HDDM技术的每个测量点由多次激光脉冲的测量值取均值组成。HDDM的优势如下:
- 激光测量点之间无间隙
- 对低反射率物体的检测能力更强
- 抗环境粉尘及烟雾的干扰能力更强
- 抗环境光干扰能力更强
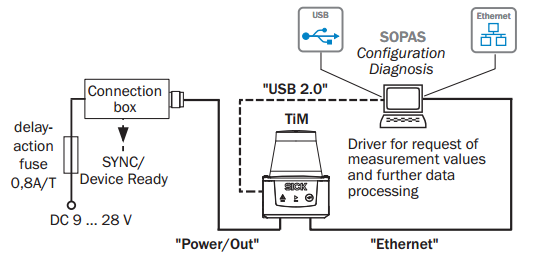
 TiM561可以使用Ethernet或者USB 2.0(辅助)接口传输数据。After switching on the supply voltage, the TiM5xx initializes and the green LED will light up to indicate its readiness for operation. The TiM5xx begins its readiness to measure automatically. It continuously scans the surrounding contour in its field of vision at a frequency of 15 Hz. It continuously saves the values determined in each measuring process (scan) in its measured value memory by overwriting the previous values.

传感器的安装对准:
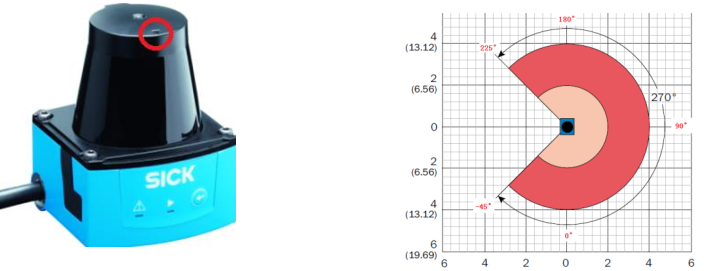
将TIM扫描角的90°轴对准需要监控的区域中心。设备光学外罩上的“▸”标记指示了90°的位置。 (TIM扫描范围: -45~225度)

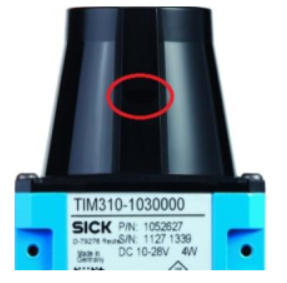
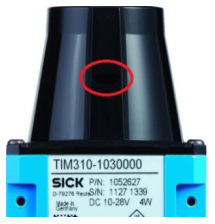
在 TIM 外壳上红圈的位置,有个菱形标记,表示扫描平面的水平位置:
SOPAS Engineering Tool
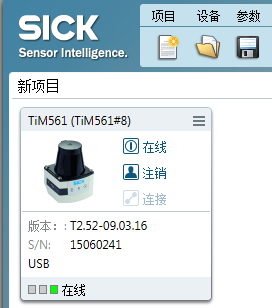
SOPAS Engineering Tool V3 软件可以用于配置传感器参数,或者进行测试。在Windows上装好软件后通过USB接口连接TiM561,第一次会提示安装对应的SOPAS驱动SDD (SOPAS device driver) 。下图为装好驱动后连上传感器的新项目:

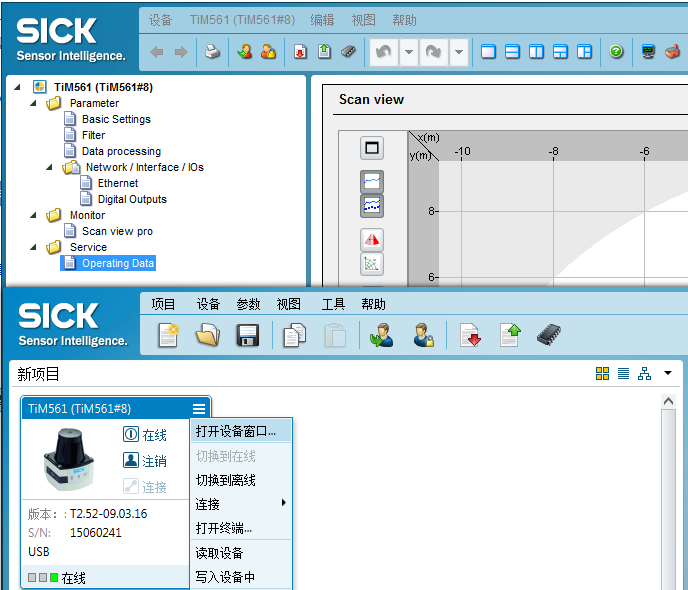
在下拉菜单中选择“打开设备窗口”,将会弹出TiM561设备的界面,可以在这个界面中对传感器的参数进行一些配置,或是查看激光数据:

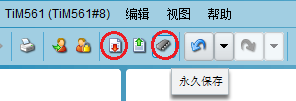
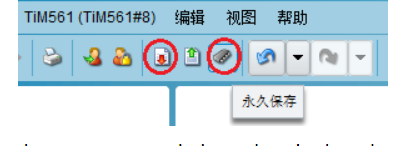
当我们更改了某些参数后有两种保存方式:点击SOPAS工具栏上的“Download all parameters to device” ,将设置保存到设备RAM中(掉电丢失,用于调试时使用)。点击“Save Permanently” (第二个画圈的图标), 将参数设置保存到设备中非易失性存储器中,掉电不丢失。
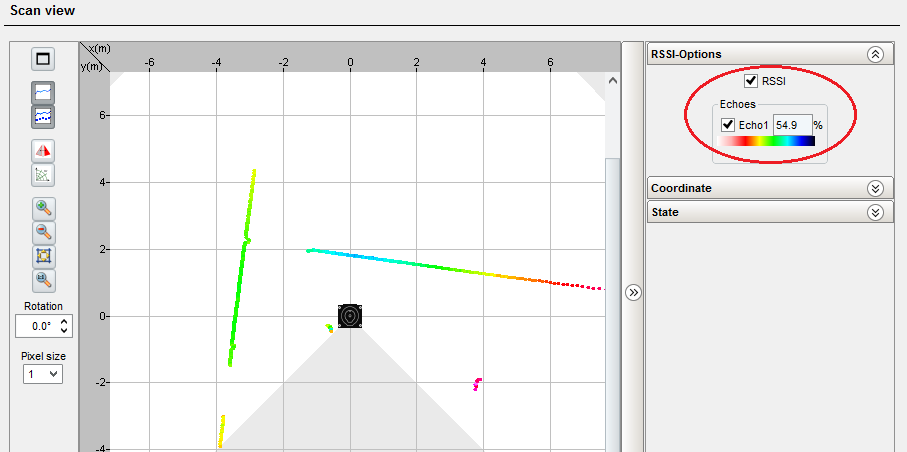
TIM561除了能输出距离值,还可以将反射率数据输出。In order to output remission values in the telegram, select the RSSI checkbox:


To display the remission values in the scan as well, select the RSSI checkbox.

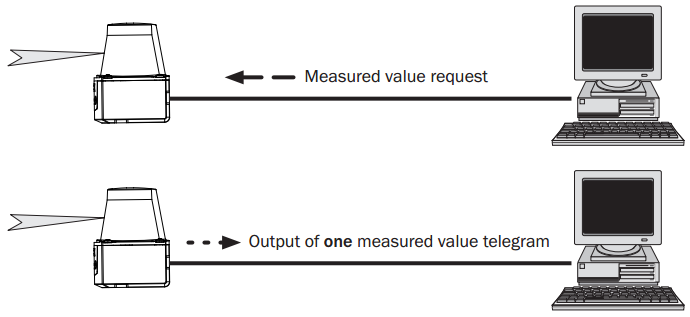
Output of measured values
If the TiM receives one of the two following commands by telegram over the Ethernet or USB interface, it will start the output of measured values in real time over these data interfaces.
- Single measured value output(单次数据输出)
If the data from a measuring process are required, the TiM5xx sends the measured values from the most recent scan.

通过Ethernet或者USB发送的请求数据如下(以ASCII方式发送或显示时数据之间以空格间隔):
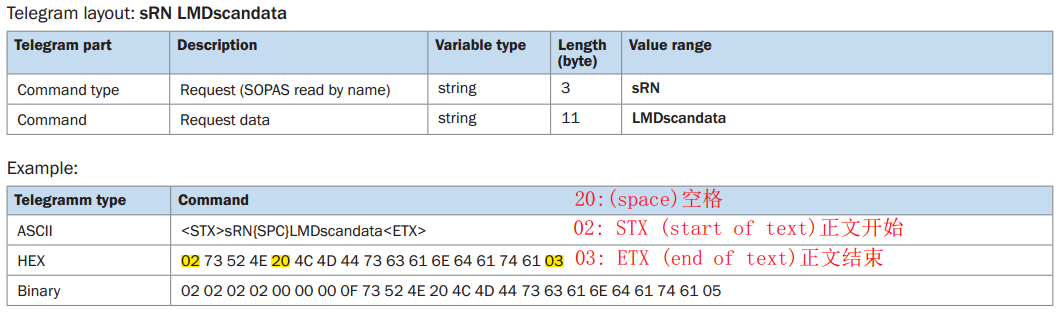

返回数据如下。Answer of TiM5xx:

其中,contents代表的具体内容可以查看文档:Technical information TiM561 Ranging Laser Scanner Chapter 5.3 Measured value output fomat, Page 24
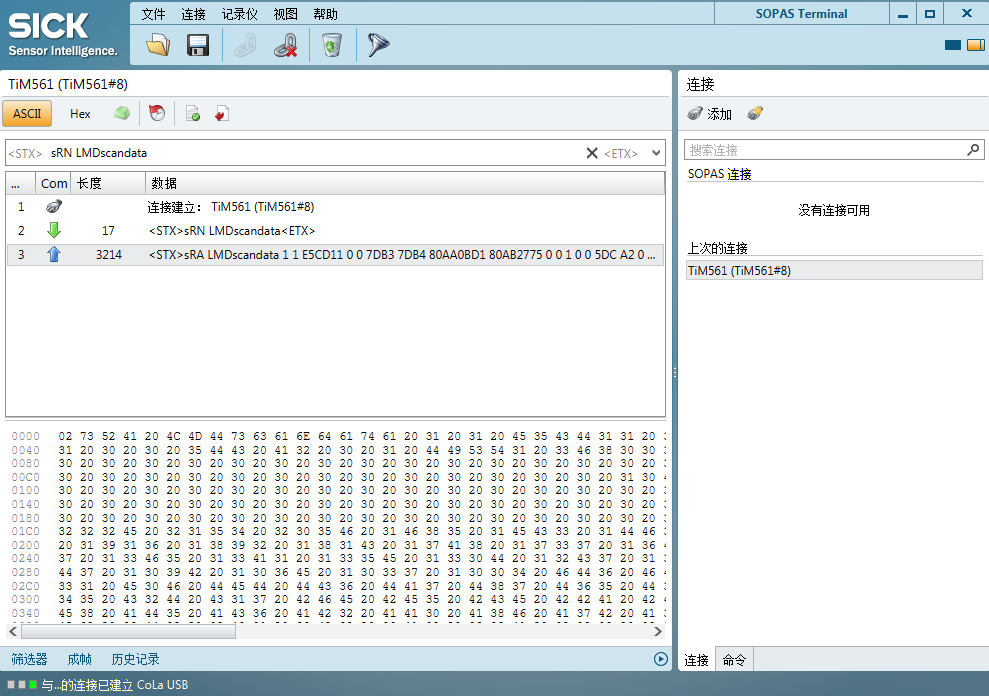
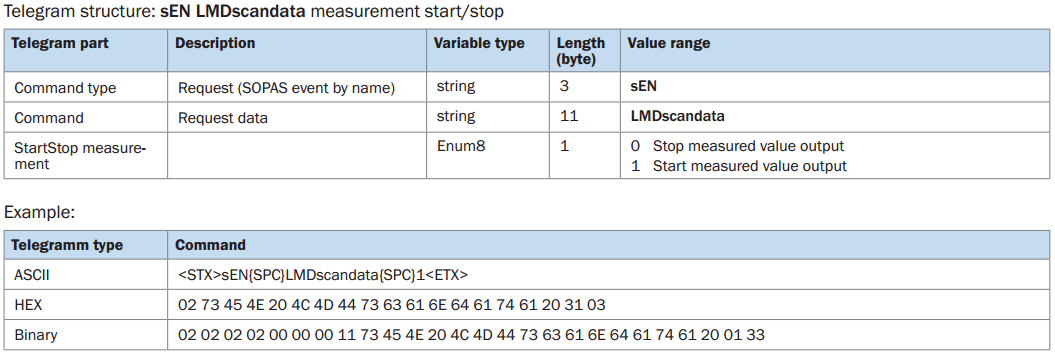
点击设备页面工具栏上的终端按钮,可以在弹出的终端中输入命令进行测试。按ASCII码方式输入单次数据请求命令,发出和收到的数据如下图所示:

- Continuous measured value output(连续数据输出)


连续数据请求指令的格式如下:
- 开始数据输出:
Request:
<STX>sEN LMDscandata 1<ETX>
Answer of TiM5xx (acknowledgement of request):
<STX>sEA LMDscandata 1<ETX>
Answer of TiM5xx (measured value output):
<STX>sSN LMDscandata (contents) <ETX>
- 停止数据输出:
Request:
<STX>sEN LMDscandata 0<ETX>
Answer of TiM5xx (acknowledgement of request):
<STX>sEA LMDscandata 0<ETX>
在终端中测试如下图所示,发出连续数据请求后会先返回一条应答响应,然后才开始输出测量数据:

ROS中使用sick Tim561
ros indigo 上安装sick_tim(Sick 公司TIM系列产品在ROS的接口实现)步骤:
cd ~/catkin_ws/src
git clone -b indigo https://github.com/uos/sick_tim.git
cd ~/catkin_ws
catkin_make
roslaunch sick_tim sick_tim551_2050001.launch
这时会遇到错误,按照udev文件夹中的README文档操作可以解决这个问题:
To give all members of the plugdev group write access to the Sick TiM devices, run the following commands:
sudo cp 81-sick-tim3xx.rules /etc/udev/rules.d/
sudo udevadm control --reload-rulesNow unplug your USB cable and plug it in again. This will allow you to communicate with the laser scanner without running the node as root and fix the following error:
LIBUSB - Cannot open device; please read sick_tim/udev/README
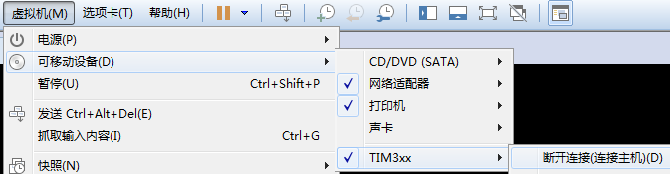
由于我在虚拟机中运行ROS,因此在插入USB后要在可移动设备中选择将其连接到虚拟机:

如果是使用Ethernet接口通过TCP协议进行通信就需要修改sick_tim551_2050001.launch文件:去掉最后几行注释,将IP地址改为自己传感器的地址。

<?xml version="1.0"?>
<launch>
  <param name="robot_description" command="$(find xacro)/xacro.py '$(find sick_tim)/urdf/example.urdf.xacro'" />
  <node name="robot_state_publisher" pkg="robot_state_publisher" type="state_publisher" />

  <node name="sick_tim551_2050001" pkg="sick_tim" type="sick_tim551_2050001" respawn="false" output="screen">
    <!-- default values: -->
    <!--
      <param name="min_ang" type="double" value="-2.35619449019" />
      <param name="max_ang" type="double" value="2.35619449019" />
      <param name="intensity" type="bool" value="True" />
      <param name="skip" type="int" value="0" />
      <param name="frame_id" type="str" value="laser" />
      <param name="time_offset" type="double" value="-0.001" />
      <param name="publish_datagram" type="bool" value="False" />
      <param name="subscribe_datagram" type="bool" value="false" />
      <param name="device_number" type="int" value="0" />
      <param name="time_increment" type="double" value="0.000061722" />
      <param name="range_min" type="double" value="0.05" />
      <param name="range_max" type="double" value="10.0" />
    -->

    <!-- Uncomment this to enable TCP instead of USB connection; 'hostname' is the host name or IP address of the laser scanner
    In cases where a race condition exists and the computer boots up before the TIM is ready, increase 'timelimit.'
         <param name="hostname" type="string" value="192.168.1.43" />
         <param name="port" type="string" value="2112" />
         <param name="timelimit" type="int" value="5" />
    -->
  </node>
</launch>

launch文件执行成功后可以打开rviz查看激光数据,注意正确设置Topic名称以及参考坐标系。注意只有在配置中勾选输出反射率数据,才能在rviz中以不同颜色查看到:


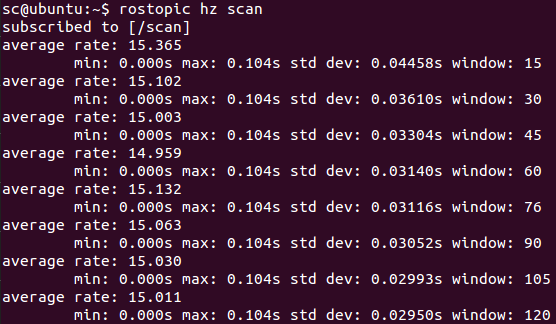
另外可以使用rostopic hz指令查看激光扫描数据发布的频率,从下图可以看出频率确实为15Hz

参考:


评论(0)
您还未登录,请登录后发表或查看评论