

一、什么是多任务
一个任务可以看作一个任务函数的执行流,如在一些简单的单片机系统中,只有一个任务,即main函数:
int main(void)
{
  /* 初始化 */
  while(1)
  {
    /* 循环处理多项事情 */
  }
}
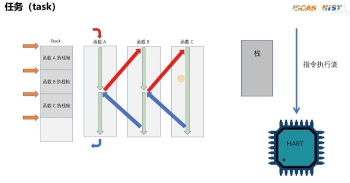
那么,什么是多任务呢?百度百科是这样解释的:
当多任务操作系统使用某种任务调度策略允许两个或更多任务并发共享一个处理器时,事实上处理器在某一时刻只会给一件任务提供服务。因为任务调度机制保证不同任务之间的切换速度十分迅速,因此给人多个任务同时运行的错觉。
因此,多任务可以看作多个任务函数的执行流,但光有多个任务还不够,还要实现任务的并发执行: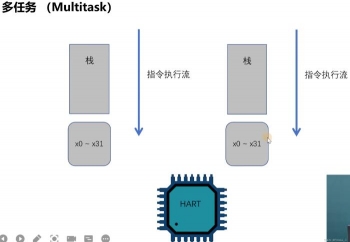
并发可以理解为分时复用,就像把一段时间切成多个小段,每个任务轮流执行一个小段的时间,在宏观上这段时间内有多个任务同时执行,在微观上某一时刻只有一个任务在执行,这就是任务的并发执行,要实现任务的并发就涉及到一个非常重要的操作——任务的切换。
任务的切换的步骤为,保存当前任务的上下文,找到下一个任务,恢复下一个任务的上下文,开始执行下一个任务。那么什么是任务的上下文呢?
任务的上下文简单来说就是任务的执行时环境,对于简单的多任务操作系统(我们这里就是),任务的上下文仅仅包含一些通用寄存器,我们将当前任务的各个通用寄存器保存起来,等待再次执行时先恢复各个通用寄存器的内容,再开始执行,从而实现任务的切换。如果是复杂一点的操作系统的话上下文还包含一些进程打开的文件、内存信息等等。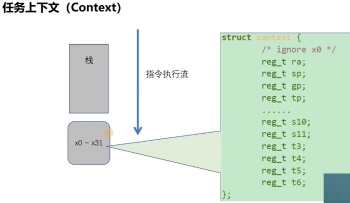
多任务系统分为协作式多任务和抢占式多任务,我们这里要实现的是协作式多任务,即任务自己主动放弃处理器的模式: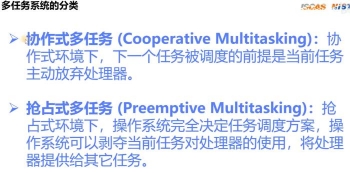
二、代码实现
先来讲解一下协作式多任务系统切换流程。
如下图所示,TASK A 和 TASK B是两个任务,Context A 和 Context B为对应任务的上下文,中间的switch_to为切换函数: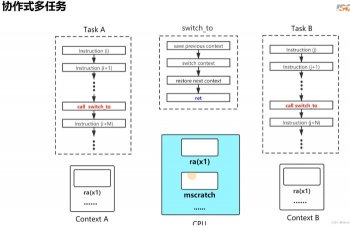
开始执行任务A时,csr寄存器mscratch指向任务A的上下文: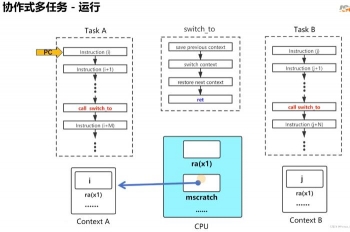
执行到call switch_to时,代表任务A让出cpu,调用任务切换函数switch_to: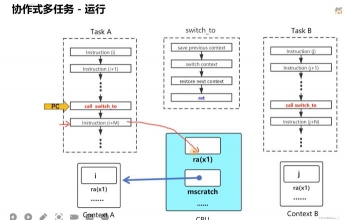
首先要保存任务A的上下文(保存到 Context A 结构体中),其中ra寄存器中保存的是当前任务A执行的位置: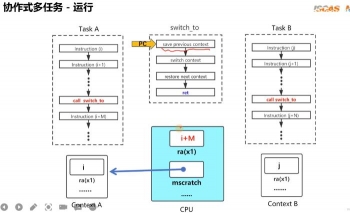
然后再切换上下文,mscratch寄存器指向 Context B,再取任务B的上下文(从 Context B 结构体中获取),然后将上下文恢复到对应的寄存器中,这里ra寄存器的内容为任务B上次执行的位置, 当我们恢复ra寄存器内容后,再调用ret指令后,PC就会跳转到任务B上一次执行的位置继续执行,从而实现任务的切换: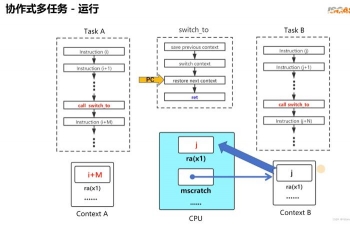
下面是切换函数switch_to的代码,是使用汇编写的,在 03_MUTI_TASK/entry.S文件中:
# Save all General-Purpose(GP) registers to context.
# struct context *base = &ctx_task;
# base->ra = ra;
# ......
# These GP registers to be saved don't include gp
# and tp, because they are not caller-saved or
# callee-saved. These two registers are often used
# for special purpose. For example, in RVOS, 'tp'
# (aka "thread pointer") is used to store hartid,
# which is a global value and would not be changed
# during context-switch.
.macro reg_save base
        sw ra, 0(\base)
        sw sp, 4(\base)
        sw t0, 16(\base)
        sw t1, 20(\base)
        sw t2, 24(\base)
        sw s0, 28(\base)
        sw s1, 32(\base)
        sw a0, 36(\base)
        sw a1, 40(\base)
        sw a2, 44(\base)
        sw a3, 48(\base)
        sw a4, 52(\base)
        sw a5, 56(\base)
        sw a6, 60(\base)
        sw a7, 64(\base)
        sw s2, 68(\base)
        sw s3, 72(\base)
        sw s4, 76(\base)
        sw s5, 80(\base)
        sw s6, 84(\base)
        sw s7, 88(\base)
        sw s8, 92(\base)
        sw s9, 96(\base)
        sw s10, 100(\base)
        sw s11, 104(\base)
        sw t3, 108(\base)
        sw t4, 112(\base)
        sw t5, 116(\base)
        # we don't save t6 here, due to we have used
        # it as base, we have to save t6 in an extra step
        # outside of reg_save
.endm

# restore all General-Purpose(GP) registers from the context
# except gp & tp.
# struct context *base = &ctx_task;
# ra = base->ra;
# ......
.macro reg_restore base
        lw ra, 0(\base)
        lw sp, 4(\base)
        lw t0, 16(\base)
        lw t1, 20(\base)
        lw t2, 24(\base)
        lw s0, 28(\base)
        lw s1, 32(\base)
        lw a0, 36(\base)
        lw a1, 40(\base)
        lw a2, 44(\base)
        lw a3, 48(\base)
        lw a4, 52(\base)
        lw a5, 56(\base)
        lw a6, 60(\base)
        lw a7, 64(\base)
        lw s2, 68(\base)
        lw s3, 72(\base)
        lw s4, 76(\base)
        lw s5, 80(\base)
        lw s6, 84(\base)
        lw s7, 88(\base)
        lw s8, 92(\base)
        lw s9, 96(\base)
        lw s10, 100(\base)
        lw s11, 104(\base)
        lw t3, 108(\base)
        lw t4, 112(\base)
        lw t5, 116(\base)
        lw t6, 120(\base)
.endm

# Something to note about save/restore:
# - We use mscratch to hold a pointer to context of current task
# - We use t6 as the 'base' for reg_save/reg_restore, because it is the
#   very bottom register (x31) and would not be overwritten during loading.
#   Note: CSRs(mscratch) can not be used as 'base' due to load/restore
#   instruction only accept general purpose registers.

.text

# void switch_to(struct context *next);
# a0: pointer to the context of the next task
.globl switch_to
.align 4
switch_to:
        csrrw   t6, mscratch, t6        # swap t6 and mscratch
        beqz    t6, 1f                  # Note: the first time switch_to() is
                                        # called, mscratch is initialized as zero
                                        # (in sched_init()), which makes t6 zero,
                                        # and that's the special case we have to
                                        # handle with t6
        reg_save t6                     # save context of prev task

        # Save the actual t6 register, which we swapped into
        # mscratch
        mv      t5, t6          # t5 points to the context of current task
        csrr    t6, mscratch    # read t6 back from mscratch
        sw      t6, 120(t5)     # save t6 with t5 as base

1:
        # switch mscratch to point to the context of the next task
        csrw    mscratch, a0

        # Restore all GP registers
        # Use t6 to point to the context of the new task
        mv      t6, a0
        reg_restore t6

        # Do actual context switching.
        ret

.end
.macro 定义两个宏函数,reg_save base 和 reg_restore base,reg_save base 作用是把通用寄存器内容存储到以base为基地址的空间中,即保存上下文;而 reg_restore base 则是把以base为基地址的通用寄存器内容取出放到各个寄存器中,即恢复上下文。
下面是任务创建、调度相关的函数,在 03_MUTI_TASK/sched.c 文件中:
#include "inc/os.h"

/* defined in entry.S */
extern void switch_to(context *next);

#define MAX_TASKS 4
#define STACK_SIZE 128
/*
 * In the standard RISC-V calling convention, the stack pointer sp
 * is always 16-byte aligned.
 */
uint8_t __attribute__((aligned(16))) task_stack[MAX_TASKS][STACK_SIZE];

context ctx_tasks[MAX_TASKS];

/*
 * _top is used to mark the max available position of ctx_tasks
 * _current is used to point to the context of current task
 */
static uint8_t _top = 0;
static uint8_t _current = -1;

static void w_mscratch(reg_t x)
{
        asm volatile("csrw mscratch, %0" : : "r" (x));
}

void sched_init()
{
        w_mscratch(0);
}

/*
 * implment a simple cycle FIFO schedular
 */
void schedule()
{
        if (_top <= 0) {
            panic("Num of task should be greater than zero!");
            return;
        }
        _current = (_current + 1) % _top;
        context *next = &(ctx_tasks[_current]);
        switch_to(next);
}

/*
 * DESCRIPTION
 *     Create a task.
 *     - start_routin: task routine entry
 * RETURN VALUE
 *     0: success
 *    -1: if error occured
 */
uint8_t task_create(void (*start_routin)(void))
{
        if (_top < MAX_TASKS) {
                ctx_tasks[_top].sp = (reg_t) &task_stack[_top][STACK_SIZE];
                ctx_tasks[_top].ra = (reg_t) start_routin;
                _top++;
                return 0;
        } else {
                return -1;
        }
}

/*
 * DESCRIPTION
 *      task_yield()  causes the calling task to relinquish the CPU and a new
 *      task gets to run.
 */
void task_yield()
{
        schedule();
}

/*
 * a very rough implementaion, just to consume the cpu
 */
void task_delay(volatile int count)
{
        count *= 50000;
        while (count--);
}
1、sched_init() 函数用于初始化mscratch寄存器。
2、schedule() 函数则用于切换任务。
3、task_create(void (*start_routin)(void)) 函数用于创建任务,传入的参数为任务函数的入口地址。
下面是任务的定义,在 03_MUTI_TASK/user.c 文件中:
#include "inc/os.h"

#define DELAY 1000

void user_task0(void)
{
        uart_puts("Task 0: Created!\n");
        while (1) {
                uart_puts("Task 0: Running...\n");
                task_delay(DELAY);
                task_yield();
        }
}

void user_task1(void)
{
        uart_puts("Task 1: Created!\n");
        while (1) {
                uart_puts("Task 1: Running...\n");
                task_delay(DELAY);
                task_yield();
        }
}

/* NOTICE: DON'T LOOP INFINITELY IN main() */
void os_main(void)
{
        task_create(user_task0);
        task_create(user_task1);
}
其中,os_main函数仅仅用于创建两个任务,之后不会执行。两个任务执行的内容为,先打印信息,然后delay,最后让出cpu给另外一个任务执行,依此循环。
三、测试
为了测试多任务执行效果,03_MUTI_TASK/kernal.c 的内容如下:
#include "inc/os.h"

extern void os_main(void);

void start_kernel(void){

    uart_init();
        uart_puts("Hello World!\n");

        page_init();

        sched_init();
        os_main();
        schedule();

        uart_puts("Would not go here!\n");

        while(1){}; // stop here!
}
然后编译烧录程序到RISC-V处理器上执行(这一步看我前面的文章),运行效果如下: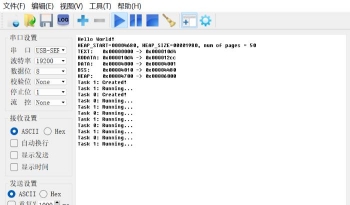
可以看到 task 1 和 task 0 分时执行,这样我们的多任务部分就验证成功啦!


评论(0)
您还未登录,请登录后发表或查看评论