
查看了app文件夹下,从01-07一共七个案例文件夹,分别是 01-基础图片分类,到图片分割,USB摄像头以及MIPI Camera 案例以及Yolov3和Yolov5检测模型
利用SSH连接,在VScode上远程开发(这里其实不用管很多,主要自己板子ip和主机PC连接一个网络,SSH 连接ip地址也写这个,连接就很简单)
由于我的目录只有home/sunrise,无法直接查看/app文件下图片,所以我把app文件夹copy了一份到、home/sunrise目录下,我觉得这个方法不错
sunrise@ubuntu:/$ ls
app  bin  boot  dev  etc  home  lib  lost+found  media  mnt  opt  proc  root  run  sbin  srv  sys  tftpboot  tmp  userdata  usr  var
sunrise@ubuntu:/$ sudo cp -r app/ /home/sunrise/

1.图像分割算法
由于我们是对板子性能进行分析,所以这里不对代码进行过多解释,只展示了代码
from hobot_dnn import pyeasy_dnn
import numpy as np
import cv2
from PIL import Image
from matplotlib import pyplot as plt

def bgr2nv12_opencv(image):
    height, width = image.shape[0], image.shape[1]
    area = height * width
    yuv420p = cv2.cvtColor(image, cv2.COLOR_BGR2YUV_I420).reshape((area * 3 // 2,))
    y = yuv420p[:area]
    uv_planar = yuv420p[area:].reshape((2, area // 4))
    uv_packed = uv_planar.transpose((1, 0)).reshape((area // 2,))

    nv12 = np.zeros_like(yuv420p)
    nv12[:height * width] = y
    nv12[height * width:] = uv_packed
    return nv12

def get_hw(pro):
    if pro.layout == "NCHW":
        return pro.shape[2], pro.shape[3]
    else:
        return pro.shape[1], pro.shape[2]


def plot_image(origin_image, onnx_output):
    def get_pallete():
        pallete = [
            128,
            64,
            128,
            244,
            35,
            232,
            70,
            70,
            70,
            102,
            102,
            156,
            190,
            153,
            153,
            153,
            153,
            153,
            250,
            170,
            30,
            220,
            220,
            0,
            107,
            142,
            35,
            152,
            251,
            152,
            0,
            130,
            180,
            220,
            20,
            60,
            255,
            0,
            0,
            0,
            0,
            142,
            0,
            0,
            70,
            0,
            60,
            100,
            0,
            80,
            100,
            0,
            0,
            230,
            119,
            11,
            32,
        ]
        return pallete

    onnx_output = onnx_output.astype(np.uint8)
    onnx_output = np.squeeze(onnx_output)

    image_shape = origin_image.shape[:2][::-1]

    onnx_output = np.expand_dims(onnx_output, axis=2)
    onnx_output = cv2.resize(onnx_output,
                             image_shape,
                             interpolation=cv2.INTER_NEAREST)
    out_img = Image.fromarray(onnx_output)
    out_img.putpalette(get_pallete())
    plt.imshow(origin_image)
    plt.imshow(out_img, alpha=0.6)
    fig_name = 'segment_result.png'
    print(f"Saving predicted image with name {fig_name} ")
    plt.savefig(fig_name)


def postprocess(model_output, origin_image):
    pred_result = np.argmax(model_output[0], axis=-1)
    print("=" * 10, "Postprocess successfully.", "=" * 10)
    print("=" * 10, "Waiting for drawing image ", "." * 10)
    plot_image(origin_image, pred_result)
    print("=" * 10, "Dump result image segment_result.png successfully.", "=" * 10)

if __name__ == '__main__':
    # test classification result
    models = pyeasy_dnn.load('../models/mobilenet_unet_1024x2048_nv12.bin')
    print("=" * 10, "Model load successfully.", "=" * 10)
    h, w = get_hw(models[0].inputs[0].properties)
    img_file = cv2.imread('./segmentation.png')
    des_dim = (w, h)
    resized_data = cv2.resize(img_file, des_dim, interpolation=cv2.INTER_AREA)
    nv12_data = bgr2nv12_opencv(resized_data)
    outputs = models[0].forward(nv12_data)
    print("=" * 10, "Model forward finished.", "=" * 10)
    postprocess(outputs[0].buffer, img_file)
图像分割结果:
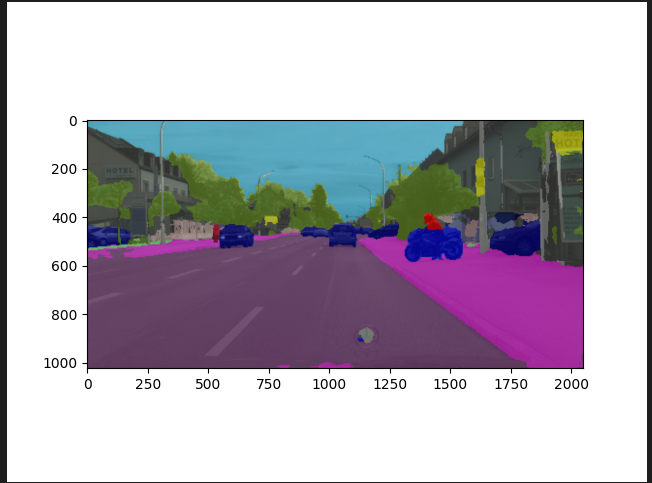
对比原图,分割效果还可以

2.Yolov3 模型算法
这里也是对现成Sample进行的测试。查看文件,Yolov3和Yolov5都分了80个类,如下
person
bicycle
car
motorbike
aeroplane
bus
train
truck
boat
traffic light
fire hydrant
stop sign
parking meter
bench
bird
cat
dog
horse
sheep
cow
elephant
bear
zebra
giraffe
backpack
umbrella
handbag
tie
suitcase
frisbee
skis
snowboard
sports ball
kite
baseball bat
baseball glove
skateboard
surfboard
tennis racket
bottle
wine glass
cup
fork
knife
spoon
bowl
banana
apple
sandwich
orange
broccoli
carrot
hot dog
pizza
donut
cake
chair
sofa
pottedplant
bed
diningtable
toilet
tvmonitor
laptop
mouse
remote
keyboard
cell phone
microwave
oven
toaster
sink
refrigerator
book
clock
vase
scissors
teddy bear
hair drier
toothbrush
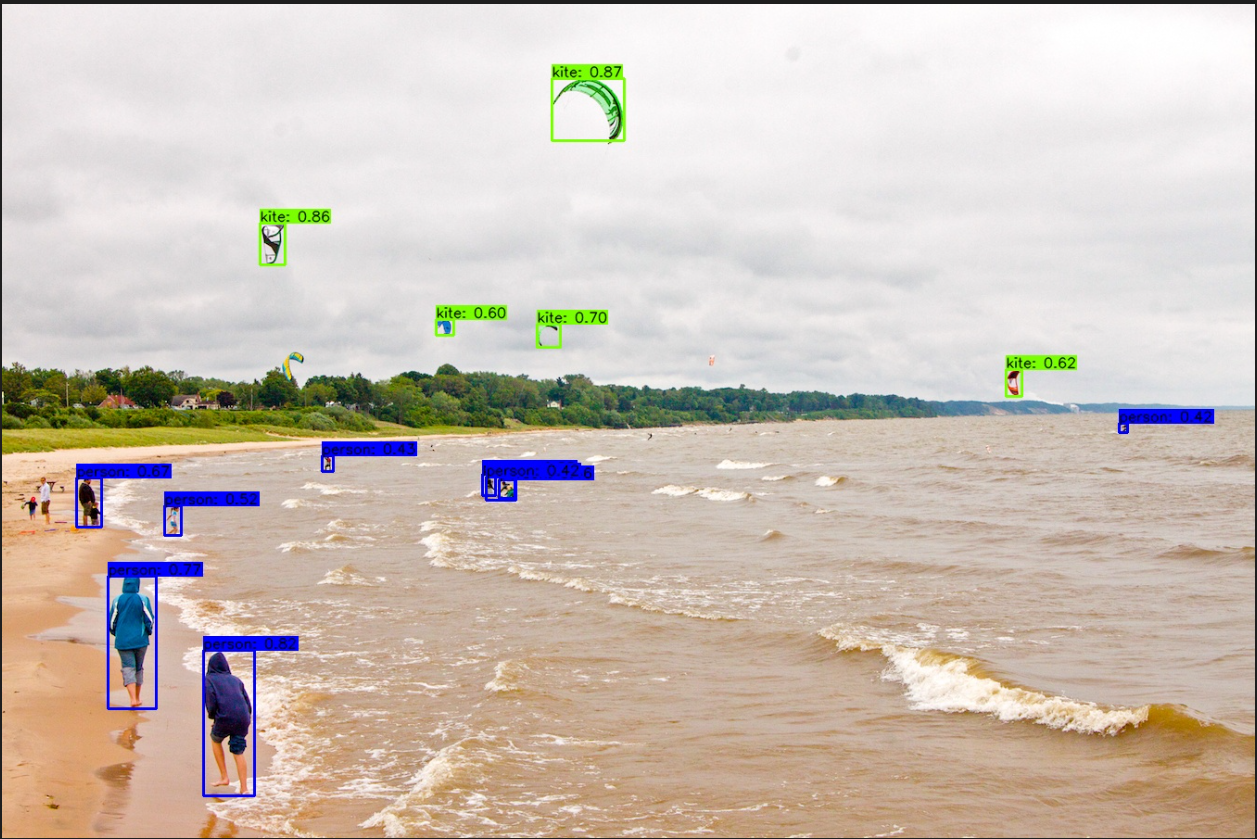
Yolov3源码和识别效果分别如下:
#!/usr/bin/env python3

import numpy as np
import cv2
from postprocess import postprocess

from hobot_dnn import pyeasy_dnn as dnn


def bgr2nv12_opencv(image):
    height, width = image.shape[0], image.shape[1]
    area = height * width
    yuv420p = cv2.cvtColor(image, cv2.COLOR_RGB2YUV_I420).reshape((area * 3 // 2,))
    y = yuv420p[:area]
    uv_planar = yuv420p[area:].reshape((2, area // 4))
    uv_packed = uv_planar.transpose((1, 0)).reshape((area // 2,))

    nv12 = np.zeros_like(yuv420p)
    nv12[:height * width] = y
    nv12[height * width:] = uv_packed
    return nv12


def get_hw(pro):
    if pro.layout == "NCHW":
        return pro.shape[2], pro.shape[3]
    else:
        return pro.shape[1], pro.shape[2]


def print_properties(pro):
    print("tensor type:", pro.tensor_type)
    print("data type:", pro.dtype)
    print("layout:", pro.layout)
    print("shape:", pro.shape)


if __name__ == '__main__':
    models = dnn.load('../models/yolov3_darknet53_416x416_nv12.bin')
    # 打印输入 tensor 的属性
    print_properties(models[0].inputs[0].properties)
    # 打印输出 tensor 的属性
    print(len(models[0].outputs))
    for output in models[0].outputs:
        print_properties(output.properties)

    img_file = cv2.imread('./kite.jpg')
    h, w = get_hw(models[0].inputs[0].properties)
    des_dim = (w, h)
    resized_data = cv2.resize(img_file, des_dim, interpolation=cv2.INTER_AREA)
    nv12_data = bgr2nv12_opencv(resized_data)

    outputs = models[0].forward(nv12_data)

    prediction_bbox = postprocess(outputs, model_hw_shape=(416, 416), origin_image=img_file)
    print(prediction_bbox)
这里可以将./kite.jpg图片替换为其他你想测试的图片。
3.Yolov5 模型算法
Yolov3源码和识别效果分别如下
#!/usr/bin/env python3

import numpy as np
import cv2
from postprocess import postprocess

from hobot_dnn import pyeasy_dnn as dnn


def bgr2nv12_opencv(image):
    height, width = image.shape[0], image.shape[1]
    area = height * width
    yuv420p = cv2.cvtColor(image, cv2.COLOR_RGB2YUV_I420).reshape((area * 3 // 2,))
    y = yuv420p[:area]
    uv_planar = yuv420p[area:].reshape((2, area // 4))
    uv_packed = uv_planar.transpose((1, 0)).reshape((area // 2,))

    nv12 = np.zeros_like(yuv420p)
    nv12[:height * width] = y
    nv12[height * width:] = uv_packed
    return nv12


def get_hw(pro):
    if pro.layout == "NCHW":
        return pro.shape[2], pro.shape[3]
    else:
        return pro.shape[1], pro.shape[2]


def print_properties(pro):
    print("tensor type:", pro.tensor_type)
    print("data type:", pro.dtype)
    print("layout:", pro.layout)
    print("shape:", pro.shape)


if __name__ == '__main__':
    models = dnn.load('../models/yolov5s_672x672_nv12.bin')
    # 打印输入 tensor 的属性
    print_properties(models[0].inputs[0].properties)
    # 打印输出 tensor 的属性
    print(len(models[0].outputs))
    for output in models[0].outputs:
        print_properties(output.properties)

    img_file = cv2.imread('./kite.jpg')
    h, w = get_hw(models[0].inputs[0].properties)
    des_dim = (w, h)
    resized_data = cv2.resize(img_file, des_dim, interpolation=cv2.INTER_AREA)
    nv12_data = bgr2nv12_opencv(resized_data)

    outputs = models[0].forward(nv12_data)

    prediction_bbox = postprocess(outputs, model_hw_shape=(672, 672), origin_image=img_file)
    print(prediction_bbox)

")


评论(0)
您还未登录,请登录后发表或查看评论