

本篇的硬件环境一样,跟着官方的教程来深度体验下角蜂鸟的人工智能的实力。根据官方介绍,角蜂鸟内置的几种深度神经网络模型如下,包括数字识别、人脸识别和物体识别等。
MNIST 数字识别模型
Mobilenet-SSD 人脸检测模型
Mobilenet-SSD VOC物体检测模型
SqueezeNet 图像分类模型
GoogleNet 图像识别模型(特征提取)
FaceNet 人脸识别模型(特征提取)
SketchGraph 手绘识别模型
OCR 中文文字识别模型 (Work in progress)
https://hornedsungem.github.io/Docs/cn/workflow/
由于在第一讲中已经体验过入门的MNIST手写数字识别了,这里就不做介绍了,官网也有详细解释。
1. 人脸检测
使用角蜂鸟和Python调用内置部署的SSD-Mobilenet人脸检测卷积神经网络。检测器分析图片并找出目标的位置和尺寸。
cd ~/hornedSungemSDK/examples/python/
sudo python3 FaceDetector.py
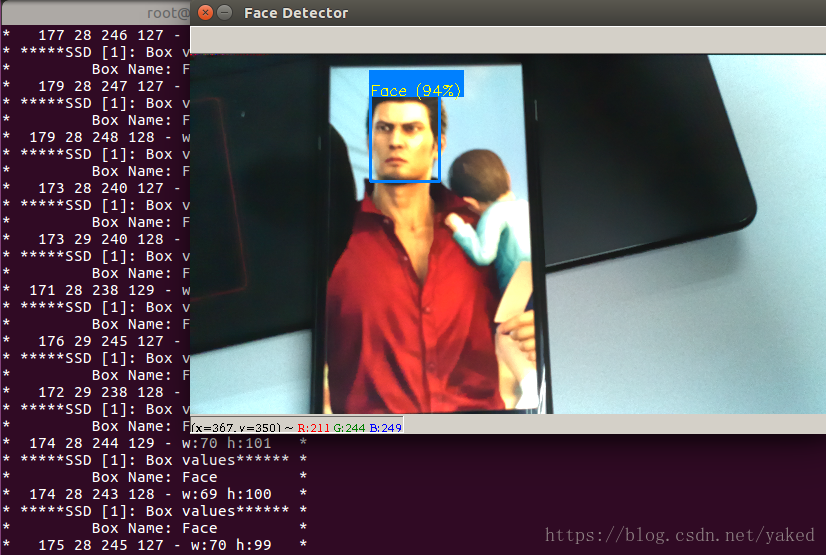
其中SSD [N]中N为检测人脸个数,下一行为人脸检测框Bounding Box的左上角和右下角坐标以及窗的宽高。比如最后一行的几个数表示检测框的左上角在图片坐标系的(175,28),右下角在(245,127),width为245-175=70个像素,height为127-28=99个像素。图片坐标系的原点在图片窗口左上角,横轴为x,纵轴为y。
#! /usr/bin/env python3
# Copyright(c) 2018 Senscape Corporation.
# License: Apache 2.0
import numpy as np, cv2, sys
sys.path.append('../../api/')
import hsapi as hs
WEBCAM = False # Set to True if use Webcam
net = hs.HS('FaceDetector', zoom = True, verbose = 2, threshSSD=0.55)
if WEBCAM: video_capture = cv2.VideoCapture(0)
try:
while True:
if WEBCAM: _, img = video_capture.read()
else: img = None
result = net.run(img)
img = net.plotSSD(result)
cv2.imshow("Face Detector", img)
cv2.waitKey(1)
finally:
net.quit()
来看代码,加上注释,一共二十多行就实现了人脸识别,实时性也很不错,真的很出乎我的意料。这里要给角蜂鸟的程序猿们奖个大香蕉 O(∩_∩)O哈哈~
再来细看一下
人脸识别Python:hornedSungemSDK/examples/python/FaceDetector.py
模型文件:hornedSungemSDK/examples/graphs/graph_face_SSD
模型文件名称 Filename: graph_face_SSD
描述 Description: Mobilenet + Single-shot detector 人脸检测模型。
属性 Properties:
Channel: 3 (RGB图)
Scale: 0.007843
Mean: [1.0, 1.0, 1.0]
Image Size: [300,300]
Type: SSD检测
为什么可以这么简洁呢?设置net参数,调用net.run传入图片,然后就是结果了。在hornedSungemSDK/api/hsapi.py可以看到run函数里确实是加载神经网络模型self.graph.LoadTensor
def run(self, img=None, **kwargs):
if img is None:
image = self.graph.GetImage(self.zoom)
else:
if self.isGray:
image = cv2.cvtColor(img,cv2.COLOR_RGB2GRAY)
else:
image = cv2.cvtColor(img,cv2.COLOR_BGR2RGB)
img2load = cv2.resize(image,self.netSize).astype(float)
img2load *= self.scale
img2load -= self.mean
self.graph.LoadTensor(img2load.astype(numpy.float16), None)
self.imgSize = image.shape[:2]
output, _ = self.graph.GetResult()
#print(output)
for k,v in kwargs.items():
exec('self.'+k+'=v')
if self.type in [1,7] : # Classification
output = numpy.argmax(output)
elif self.type is 2: # SSD Face
output = self.getBoundingBoxFromSSDResult(output, self.imgSize)
我们一起在hornedSungemSDK/api/hsapi.py中分析下源码,L485行
def plotSSD(self, result, labels=None):
if labels is None:
labels = self.labels
display_image = result[0]
boxes = result[1]
source_image_width = display_image.shape[1]
source_image_height = display_image.shape[0]
self.msg_debug('SSD [%d]: Box values' % len(boxes),'*')
for box in boxes:
class_id = box[0]
percentage = int(box[1] * 100)
label_text = self.labels[int(class_id)] + " (" + str(percentage) + "%)"
box_w = box[4]-box[2]
box_h = box[5]-box[3]
if (box_w > self.imgSize[0]*0.8) or (box_h > self.imgSize[1]*0.8):
continue
self.msg_debug('Box Name: %s' % self.labels[int(class_id)])
self.msg_debug('%d %d %d %d - w:%d h:%d' %(box[2],box[3],box[4],box[5],box_w,box_h))
.
.
.
打印识别结果。
2. 物体检测
介绍如何使用角蜂鸟在Python调用内置部署的SSD-Mobilenet物体检测卷积神经网络。检测器分析图片并找出目标的位置和尺寸。
cd ~/hornedSungemSDK/examples/python/
sudo python3 ObjectDetector.py

-
文件名称 Filename: graph_object_SSD
-
描述 Description: Mobilenet + Single-shot detector 物体检测模型,VOC数据集训练,共20种物体。
-
实例 Example:
-
属性 Properties:
- Channel: 3 (RGB图)
- Scale: 0.007843
- Mean: [1.0, 1.0, 1.0]
- Image Size: [300,300]
- Type: SSD检测
3. 情景记录器
简单来说就是利用神经网络进行特征提取,分类器,目前最多支持五个。
cd ~/hornedSungemSDK/examples/python/
sudo python3 SceneRecorder.py
GoogleNet 图像识别模型(特征提取)
版本 Version: 0.1.0
文件名称 Filename: graph_g
描述 Description: GoogleNet 图像识别模型(输出层用于特征提取)。
实例 Example:
情景记录器
属性 Properties:
Channel: 3 (RGB图)
Scale: 0.007843
Mean: [1.0, 1.0, 1.0]
Image Size: [224,224]
Type: 特征提取
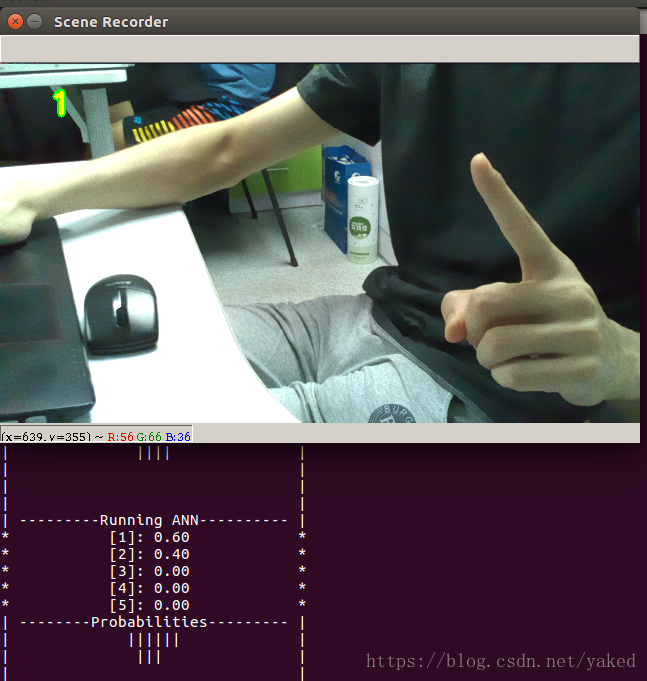

这里我是设置两个手势,伸出1根手指和伸出两根手指,分别为场景1和场景2。
按 ‘r’ 将筛选去除每个存档中的冗余图像特征,并生成模型。
按 ’s’ 将存档录入至 /misc/record.dat 文件中。按 ‘l’ 可读档
按 ‘p’ 将重置删除所有存档。
路径和文件
情景记录器Python:hornedSungemSDK/examples/python/SceneRecorder.py
模型文件:hornedSungemSDK/examples/graphs/graph_g - GoogleNet
模型文件(备选):hornedSungemSDK/examples/graphs/graph_fn - FaceNet
4.图像识别器(底层API教程)
图像识别器,比起检测器,识别器可从图片分析得到较细的分类类别,例如猫、狗的某个品种。
cd ~/hornedSungemSDK/examples/python/
sudo python3 ImageRecognition.py
- 人脸识别Python:SungemSDK/examples/python/ImageRecognition.py
- 模型文件:SungemSDK/examples/graphs/graph_sz
SqueezeNet 图像分类模型
版本 Version: 0.1.0
文件名称 Filename: graph_sz
描述 Description: SqueezeNet 图像分类模型,由ImageNet数据集训练,共1000种物体。
实例 Example:
SqueezeNet 图像识别器(底层API教程)
属性 Properties:
Channel: 3 (BGR)
Scale: 1
Mean: [104, 117, 123]
Image Size: [227,227]
Type: 识别

按W和S可以相应的增大或减小ROI区域,这点官网没有提哦。
5. 你画我猜
cd ~/hornedSungemSDK/examples/python/
sudo python3 SketchGuess.py
https://mp.weixin.qq.com/s?__biz=MzA4MzAwNzcyOA==&mid=2650049516&idx=1&sn=bac2233b5e6c8f04e1183e56fe1f1ad1&chksm=87fd2a73b08aa365e5c199926a299382198a9d3cb15c36c22c75b76e1a1a2ae1f9da4f0ef7c3&mpshare=1&scene=23&srcid=07278ZPfI7lINKxvWcwbzmZq#rd
这篇博客详细介绍了整个实现过程
https://blog.csdn.net/weixin_40986174/article/details/80223626


评论(0)
您还未登录,请登录后发表或查看评论