我们在旭日x3派中部署实现人脸检测,主要使用了百度智能云API和opencv目标检测。百度智能云API是一种云计算服务,提供多种人工智能和大数据分析功能的API接口,包括人脸识别、图像识别、语音识别、自然语言处理、OCR识别、智能推荐等,可应用于多个领域,如金融、医疗、教育、娱乐等行业。这些API为开发者提供了便利的工具,可以轻松地实现各种机器学习和人工智能功能。
百度智能云API的网址为:人脸对比_人脸对比识别_人脸对比相似度-百度AI开放平台 (baidu.com)
百度智能云创建人脸数据库请参考:http://t.csdn.cn/EZYCL。这里不过多赘述。
一.环境的配置
1.安装opencv
pt-get install python3-opencv
sudo apt-get install python3-opencv
sudo apt-get install python3-opencv
2.安装python SDK
- 如果已安装pip,执行
pip install baidu-aip即可。
- 如果已安装setuptools,执行
python setup.py install即可
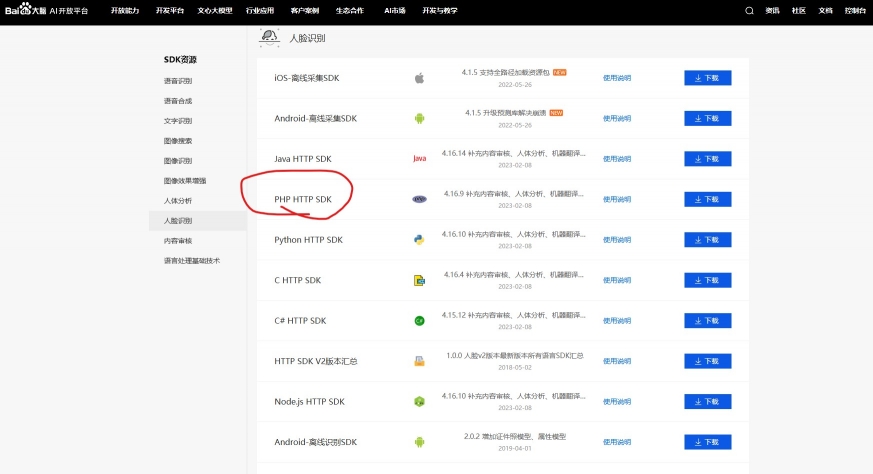
在SDK下载_文字识别SDK_语音识别SDK-百度AI开放平台 (baidu.com)中下载python HTTPSDK SDK,并把他解压到主目录中。
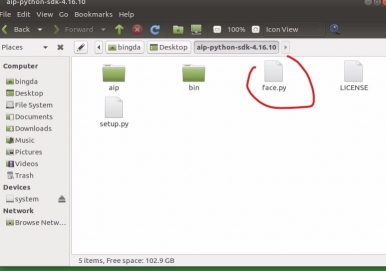
在python HTTPSDK SDK功能包下创建一个人脸识别的python文件,我将其命名为face.py。使用python face.py运行,或使用sudo python face.py
sudo python face.py
二.代码解读
1.导入模块
from aip import AipFace         # 百度的API库
import cv2
import time
import urllib.request
import base64
from aip import AipFace # 百度的API库 import cv2 import time import urllib.request import base64
from aip import AipFace # 百度的API库 import cv2 import time import urllib.request import base64
from aip import AipFace # 百度的API库 import cv2 import time import urllib.request import base64
from aip import AipFace # 百度的API库 import cv2 import time import urllib.request import base64
from aip import AipFace # 百度的API库 import cv2 import time import urllib.request import base64
base64模块:由于某些系统中只能使用ASCII字符。Base64就是用来将非ASCII字符的数据转换成 ASCII字符的一种方法。
2.调用摄像头
video = cv2.VideoCapture(8) # 调用摄像头 使用ls /dev/video*插拔usb摄像头来查看设备端口号,本设备为0或8
video = cv2.VideoCapture(8) # 调用摄像头 使用ls /dev/video*插拔usb摄像头来查看设备端口号,本设备为0或8
video = cv2.VideoCapture(8) # 调用摄像头 使用ls /dev/video*插拔usb摄像头来查看设备端口号,本设备为0或8 judge = video.isOpened() # 判断video是否打开
video = cv2.VideoCapture(8) # 调用摄像头 使用ls /dev/video*插拔usb摄像头来查看设备端口号,本设备为0或8 judge = video.isOpened() # 判断video是否打开
video = cv2.VideoCapture(8) # 调用摄像头 使用ls /dev/video*插拔usb摄像头来查看设备端口号,本设备为0或8 judge = video.isOpened() # 判断video是否打开
video = cv2.VideoCapture(0) # 调用摄像头 使用ls /dev/video*插拔usb摄像头来查看设备端口号,本设备为0或8 judge = video.isOpened() # 判断video是否打开
3.输入百度API账号信息,创建百度API账号信息可参考http://t.csdn.cn/EZYCL
""" 你的 APPID AK SK """
APP_ID = '你的 App ID'
API_KEY = '你的 Api Key'
SECRET_KEY = '你的 Secret Key'
IMAGE_TYPE='BASE64'              # 图像编码类型

client = AipFace(APP_ID, API_KEY, SECRET_KEY)
""" 你的 APPID AK SK """ APP_ID = '你的 App ID' API_KEY = '你的 Api Key' SECRET_KEY = '你的 Secret Key' IMAGE_TYPE='BASE64' # 图像编码类型 client = AipFace(APP_ID, API_KEY, SECRET_KEY)
""" 你的 APPID AK SK """ APP_ID = '你的 App ID' API_KEY = '你的 Api Key' SECRET_KEY = '你的 Secret Key' IMAGE_TYPE='BASE64' # 图像编码类型 client = AipFace(APP_ID, API_KEY, SECRET_KEY)
""" 你的 APPID AK SK """ APP_ID = '你的 App ID' API_KEY = '你的 Api Key' SECRET_KEY = '你的 Secret Key' IMAGE_TYPE='BASE64' # 图像编码类型 client = AipFace(APP_ID, API_KEY, SECRET_KEY)
""" 你的 APPID AK SK """ APP_ID = '你的 App ID' API_KEY = '你的 Api Key' SECRET_KEY = '你的 Secret Key' IMAGE_TYPE='BASE64' # 图像编码类型 client = AipFace(APP_ID, API_KEY, SECRET_KEY)
""" 你的 APPID AK SK """ APP_ID = '你的 App ID' API_KEY = '你的 Api Key' SECRET_KEY = '你的 Secret Key' IMAGE_TYPE='BASE64' # 图像编码类型 client = AipFace(APP_ID, API_KEY, SECRET_KEY)
4.把opencv采集到的图像传到百度智能云API实现人脸检测
def go_api(image):
    result = client.search(str(image, 'utf-8'), IMAGE_TYPE);#在百度云人脸库中寻找有没有匹配的人脸

    if result['error_msg'] == 'SUCCESS':#如果成功了
        name = result['result']['user_list'][0]['user_id']#获取名字
        score = result['result']['user_list'][0]['score']#获取相似度

        if score > 80:#如果相似度大于80
            if name == 'XXX':#此处的XXX就是你在GROUP下面设置的人物
                print("欢迎%s !" % name)
        else:
            print("人脸不匹配!")
            name = 'Unknow'
            return 0
        curren_time = time.asctime(time.localtime(time.time()))#获取当前时间

        #将人员出入的记录保存到Log.txt中
        f = open('Log.txt','a')
        f.write("Person: " + name + "     " + "Time:" + str(curren_time)+'\n')
        f.close()
        return 1


    elif result['error_msg'] == 'pic not has face':
        print('检测不到人脸')
        time.sleep(2)
        return 0

    else:
        print(result['error_code']+' ' + result['error_code'])

def getimage():
  while (video.isOpened()):  # 摄像头开启后执行
        ret, frame = video.read()  # 读取图像;ret是布尔值,摄像头拍摄成功便返回True,img是摄像头所拍的图像对象
        cv2.imshow("frame", frame)       # 我在这个地方把摄像头获取到的东西放出来了
                                         # 便于调试,但是每个while需要手动把小窗口关掉

        cv2.waitKey(300)                   # 输入图像时长
        cv2.imwrite('face.jpg', frame)      # 保存图片
  cap.release()  # 关闭摄像头
def go_api(image): result = client.search(str(image, 'utf-8'), IMAGE_TYPE);#在百度云人脸库中寻找有没有匹配的人脸 if result['error_msg'] == 'SUCCESS':#如果成功了 name = result['result']['user_list'][0]['user_id']#获取名字 score = result['result']['user_list'][0]['score']#获取相似度 if score > 80:#如果相似度大于80 if name == 'XXX':#此处的XXX就是你在GROUP下面设置的人物 print("欢迎%s !" % name) else: print("人脸不匹配!") name = 'Unknow' return 0 curren_time = time.asctime(time.localtime(time.time()))#获取当前时间 #将人员出入的记录保存到Log.txt中 f = open('Log.txt','a') f.write("Person: " + name + " " + "Time:" + str(curren_time)+'\n') f.close() return 1 elif result['error_msg'] == 'pic not has face': print('检测不到人脸') time.sleep(2) return 0 else: print(result['error_code']+' ' + result['error_code']) def getimage(): while (video.isOpened()): # 摄像头开启后执行 ret, frame = video.read() # 读取图像;ret是布尔值,摄像头拍摄成功便返回True,img是摄像头所拍的图像对象 cv2.imshow("frame", frame) # 我在这个地方把摄像头获取到的东西放出来了 # 便于调试,但是每个while需要手动把小窗口关掉 cv2.waitKey(300) # 输入图像时长 cv2.imwrite('face.jpg', frame) # 保存图片
def go_api(image): result = client.search(str(image, 'utf-8'), IMAGE_TYPE);#在百度云人脸库中寻找有没有匹配的人脸 if result['error_msg'] == 'SUCCESS':#如果成功了 name = result['result']['user_list'][0]['user_id']#获取名字 score = result['result']['user_list'][0]['score']#获取相似度 if score > 80:#如果相似度大于80 if name == 'XXX':#此处的XXX就是你在GROUP下面设置的人物 print("欢迎%s !" % name) else: print("人脸不匹配!") name = 'Unknow' return 0 curren_time = time.asctime(time.localtime(time.time()))#获取当前时间 #将人员出入的记录保存到Log.txt中 f = open('Log.txt','a') f.write("Person: " + name + " " + "Time:" + str(curren_time)+'\n') f.close() return 1 elif result['error_msg'] == 'pic not has face': print('检测不到人脸') time.sleep(2) return 0 else: print(result['error_code']+' ' + result['error_code']) def getimage(): if judge: ret, frame = video.read() # 获取摄像头 cv2.imshow("人脸识别", frame) # cv2.imshow()之后必须加cv2.waitKey(),否则打开时间过短会报错 cv2.waitKey(300) # 输入图像时长 cv2.imwrite('随便起个名字.jpg', frame) # 保存图片
def go_api(image): result = client.search(str(image, 'utf-8'), IMAGE_TYPE);#在百度云人脸库中寻找有没有匹配的人脸 if result['error_msg'] == 'SUCCESS':#如果成功了 name = result['result']['user_list'][0]['user_id']#获取名字 score = result['result']['user_list'][0]['score']#获取相似度 if score > 80:#如果相似度大于80 if name == 'XXX':#此处的XXX就是你在GROUP下面设置的人物 print("欢迎%s !" % name) else: print("人脸不匹配!") name = 'Unknow' return 0 curren_time = time.asctime(time.localtime(time.time()))#获取当前时间 #将人员出入的记录保存到Log.txt中 f = open('Log.txt','a') f.write("Person: " + name + " " + "Time:" + str(curren_time)+'\n') f.close() return 1 elif result['error_msg'] == 'pic not has face': print('检测不到人脸') time.sleep(2) return 0 else: print(result['error_code']+' ' + result['error_code']) def getimage(): if judge: ret, frame = video.read() # 获取摄像头 cv2.imshow("人脸识别", frame) # cv2.imshow()之后必须加cv2.waitKey(),否则打开时间过短会报错 cv2.waitKey(300) # 输入图像时长 cv2.imwrite('随便起个名字.jpg', frame) # 保存图片
def go_api(image): result = client.search(str(image, 'utf-8'), IMAGE_TYPE);#在百度云人脸库中寻找有没有匹配的人脸 if result['error_msg'] == 'SUCCESS':#如果成功了 name = result['result']['user_list'][0]['user_id']#获取名字 score = result['result']['user_list'][0]['score']#获取相似度 if score > 80:#如果相似度大于80 if name == 'XXX':#此处的XXX就是你在GROUP下面设置的人物 print("欢迎%s !" % name) else: print("人脸不匹配!") name = 'Unknow' return 0 curren_time = time.asctime(time.localtime(time.time()))#获取当前时间 #将人员出入的记录保存到Log.txt中 f = open('Log.txt','a') f.write("Person: " + name + " " + "Time:" + str(curren_time)+'\n') f.close() return 1 elif result['error_msg'] == 'pic not has face': print('检测不到人脸') time.sleep(2) return 0 else: print(result['error_code']+' ' + result['error_code']) def getimage(): if judge: ret, frame = video.read() # 获取摄像头 cv2.imshow("人脸识别", frame) # cv2.imshow()之后必须加cv2.waitKey(),否则打开时间过短会报错 cv2.waitKey(300) # 输入图像时长 cv2.imwrite('随便起个名字.jpg', frame) # 保存图片
def go_api(image): result = client.search(str(image, 'utf-8'), IMAGE_TYPE, GROUP);#在百度云人脸库中寻找有没有匹配的人脸 if result['error_msg'] == 'SUCCESS':#如果成功了 name = result['result']['user_list'][0]['user_id']#获取名字 score = result['result']['user_list'][0]['score']#获取相似度 if score > 80:#如果相似度大于80 if name == 'XXX':#此处的XXX就是你在GROUP下面设置的人物 print("欢迎%s !" % name) else: print("人脸不匹配!") name = 'Unknow' return 0 curren_time = time.asctime(time.localtime(time.time()))#获取当前时间 #将人员出入的记录保存到Log.txt中 f = open('Log.txt','a') f.write("Person: " + name + " " + "Time:" + str(curren_time)+'\n') f.close() return 1 elif result['error_msg'] == 'pic not has face': print('检测不到人脸') time.sleep(2) return 0 else: print(result['error_code']+' ' + result['error_code']) def getimage(): if judge: ret, frame = video.read() # 获取摄像头 cv2.imshow("frame", frame) # 输入图像 cv2.waitKey(300) # 输入图像时长 cv2.imwrite('b.jpg', frame) # 保存图片
5.转换图片格式
def transimage():
    f = open('face.jpg','rb')
    img = base64.b64encode(f.read())
    return img
def transimage(): f = open('face.jpg','rb') img = base64.b64encode(f.read()) return img
def transimage(): f = open('b.jpg','rb') img = base64.b64encode(f.read()) return img
def transimage(): f = open('b.jpg','rb') img = base64.b64encode(f.read()) return img
def transimage(): f = open('b.jpg','rb') img = base64.b64encode(f.read()) return img
def transimage(): f = open('b.jpg','rb') img = base64.b64encode(f.read()) return img
6.主函数
if __name__ == '__main__':
    while True:
        getimage()
        img = transimage()#转换照片格式
        res=go_api(img)
        if(res==1):
            print("yes")
        else:
            print("no")
# 释放窗口
video.release()
cv2.destroyAllWindows()
if __name__ == '__main__': while True: getimage() img = transimage()#转换照片格式 res=go_api(img) if(res==1): print("yes") else: print("no") # 释放窗口 video.release() cv2.destroyAllWindows()
if __name__ == '__main__': while True: getimage() img = transimage()#转换照片格式 res=go_api(img) if(res==1): print("yes") else: print("no") # 释放窗口 video.release() cv2.destroyAllWindows()
if __name__ == '__main__': while True: getimage() img = transimage()#转换照片格式 res=go_api(img) if(res==1): print("yes") else: print("no") # 释放窗口 video.release() cv2.destroyAllWindows()
if __name__ == '__main__': while True: getimage() img = transimage()#转换照片格式 res=go_api(img) if(res==1): print("yes") else: print("no") # 释放窗口 video.release() cv2.destroyAllWindows()
if __name__ == '__main__': while True: getimage() img = transimage()#转换照片格式 res=go_api(img) if(res==1): print("yes") else: print("no") # 释放窗口 video.release() cv2.destroyAllWindows()
三.参考链接
http://t.csdn.cn/EZYCL
人脸识别_人脸检测_人脸对比_人脸搜索_活体检测_百度智能云 (baidu.com)


评论(0)
您还未登录,请登录后发表或查看评论