
引言
今天我们主要了解3D摄像头是如何跟机械臂应用相结合的。我们最近准备推出一款新的机械臂套装,熟悉我们的老用户应该知道,我们之前的套装使用的是2D摄像头。
随着技术进步,市场需求和领域的扩大,2D的摄像头已经不能够满足很多场景。3D摄像头也在近些年间火了起来。随着我们的步伐,一起来认识一下3D摄像头带给我们的应用。
产品介绍
3D摄像头。可以从图片中看出来,这个相机有四个镜头,它们分别是一个红外激光投影仪,两个红外摄像头和一个彩色摄像头。这几个镜头具体有啥作用:
红外激光投影仪:
投射一个红外光点网格到场景中,然后这些光点被红外摄像头捕获。因为投影仪和摄像头的位置是固定的,所以通过计算光点在摄像头中的位置偏移,可以推算出每个光点对应的物体距离摄像头的距离,从而得到场景的深度信息。
红外摄像头:
红外摄像头是一种能够捕获红外光谱的摄像头。红外光谱是电磁谱中的一部分,其波长长于可见光,但短于微波。红外摄像头的主要作用是能够在无可见光照明的条件下进行成像,因为许多物体会发射、反射或透过红外光。
彩色摄像头:
通常用于捕获场景的常规视觉信息,而其他的摄像头则用于捕获额外的信息,如场景的深度信息或在低光照条件下的图像。这些信息可以与彩色摄像头捕获的图像相结合,以提供更丰富的视觉数据,支持更高级的功能,如面部识别、增强现实或3D建模等。
结合这四个摄像头的功能,能够获取一个物体的三维信息,这种技术可以用于人脸识别、手势识别、物体识别、测量物体的深度等多种应用。 机械臂套装
机械臂套装
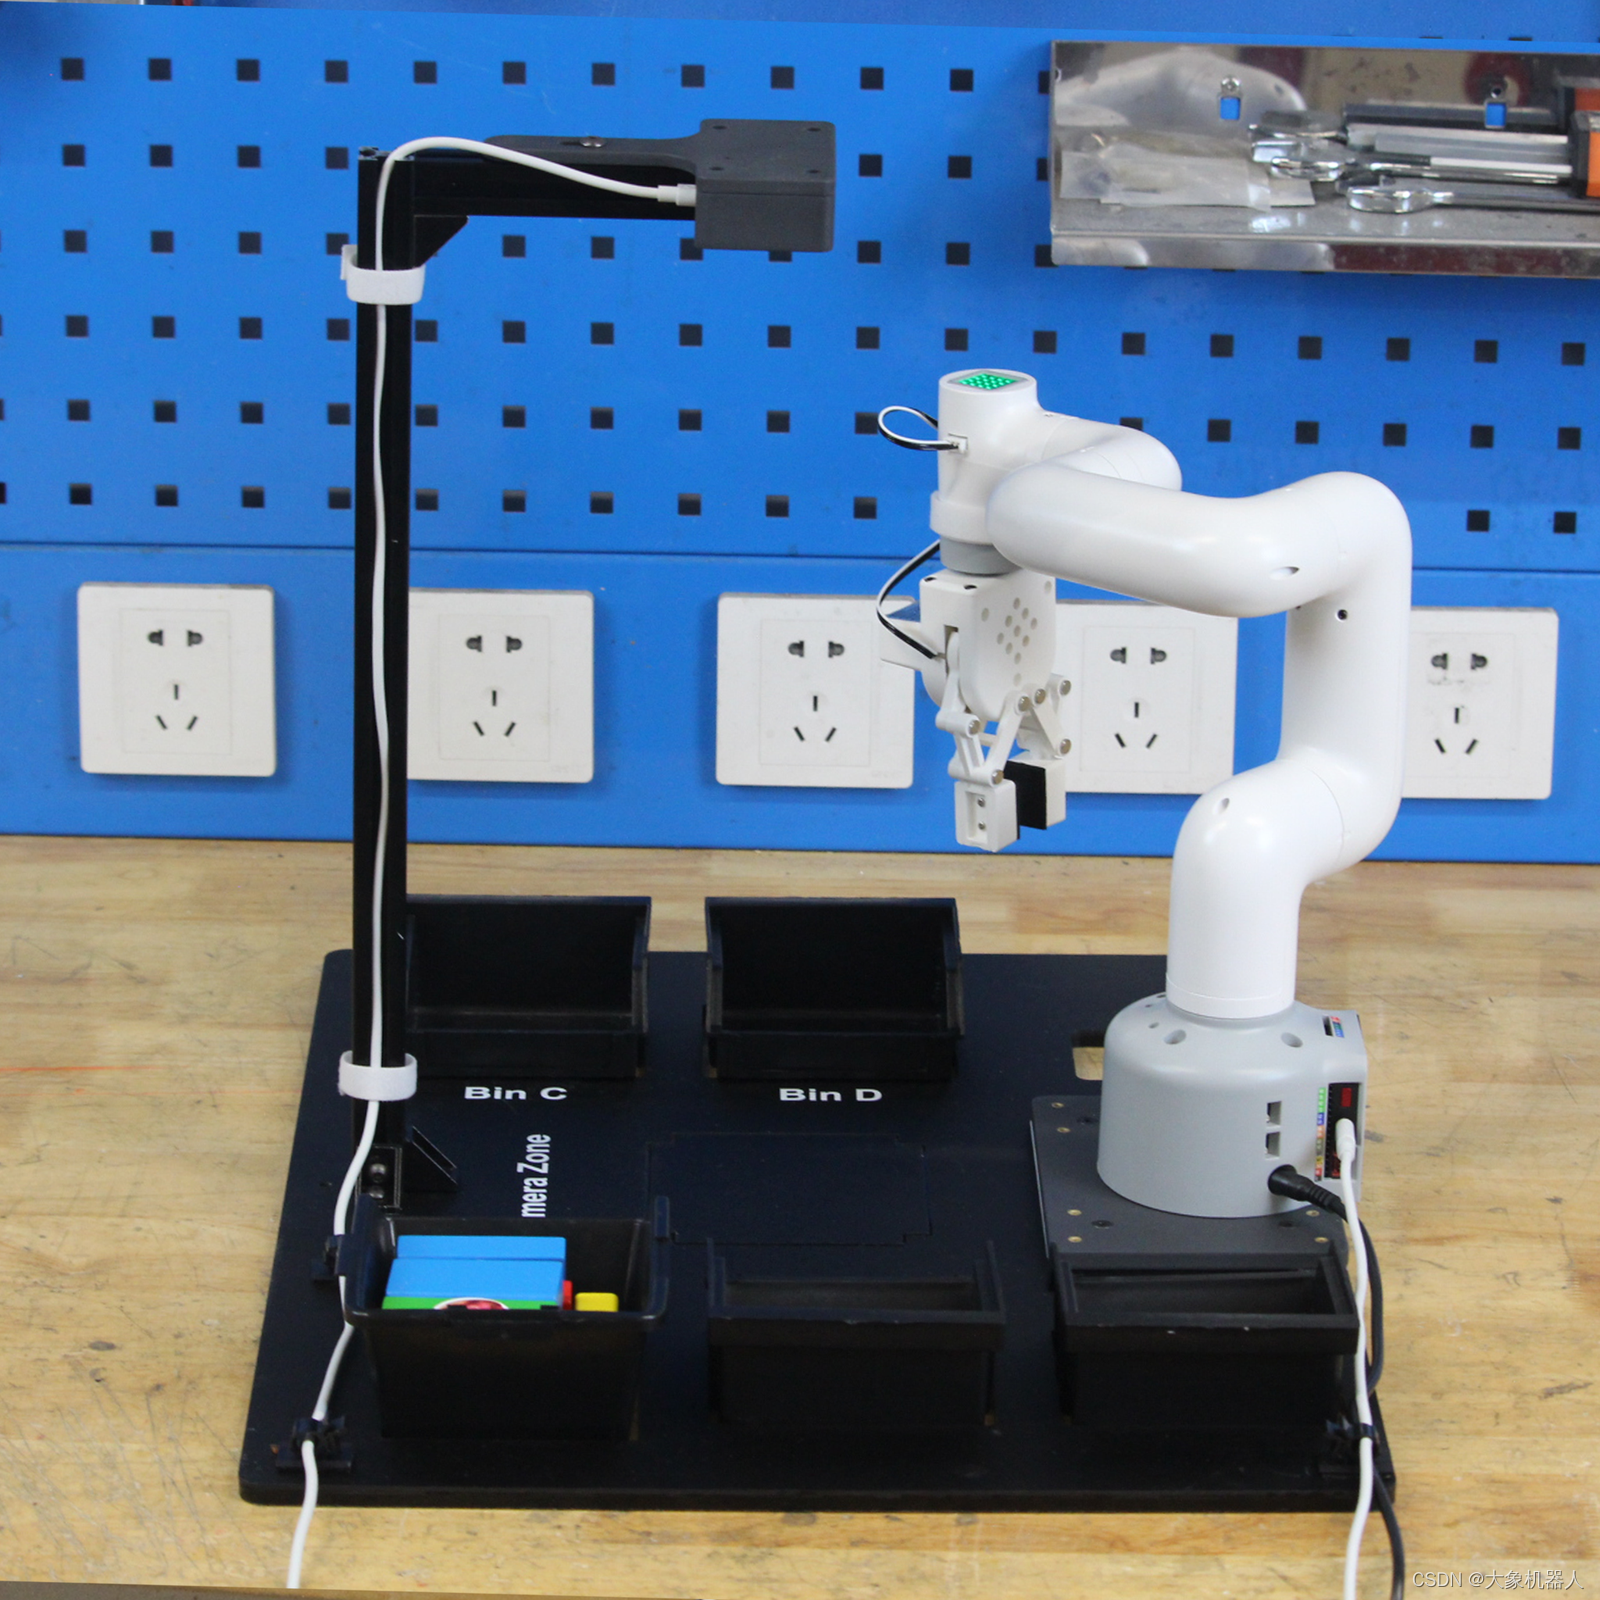
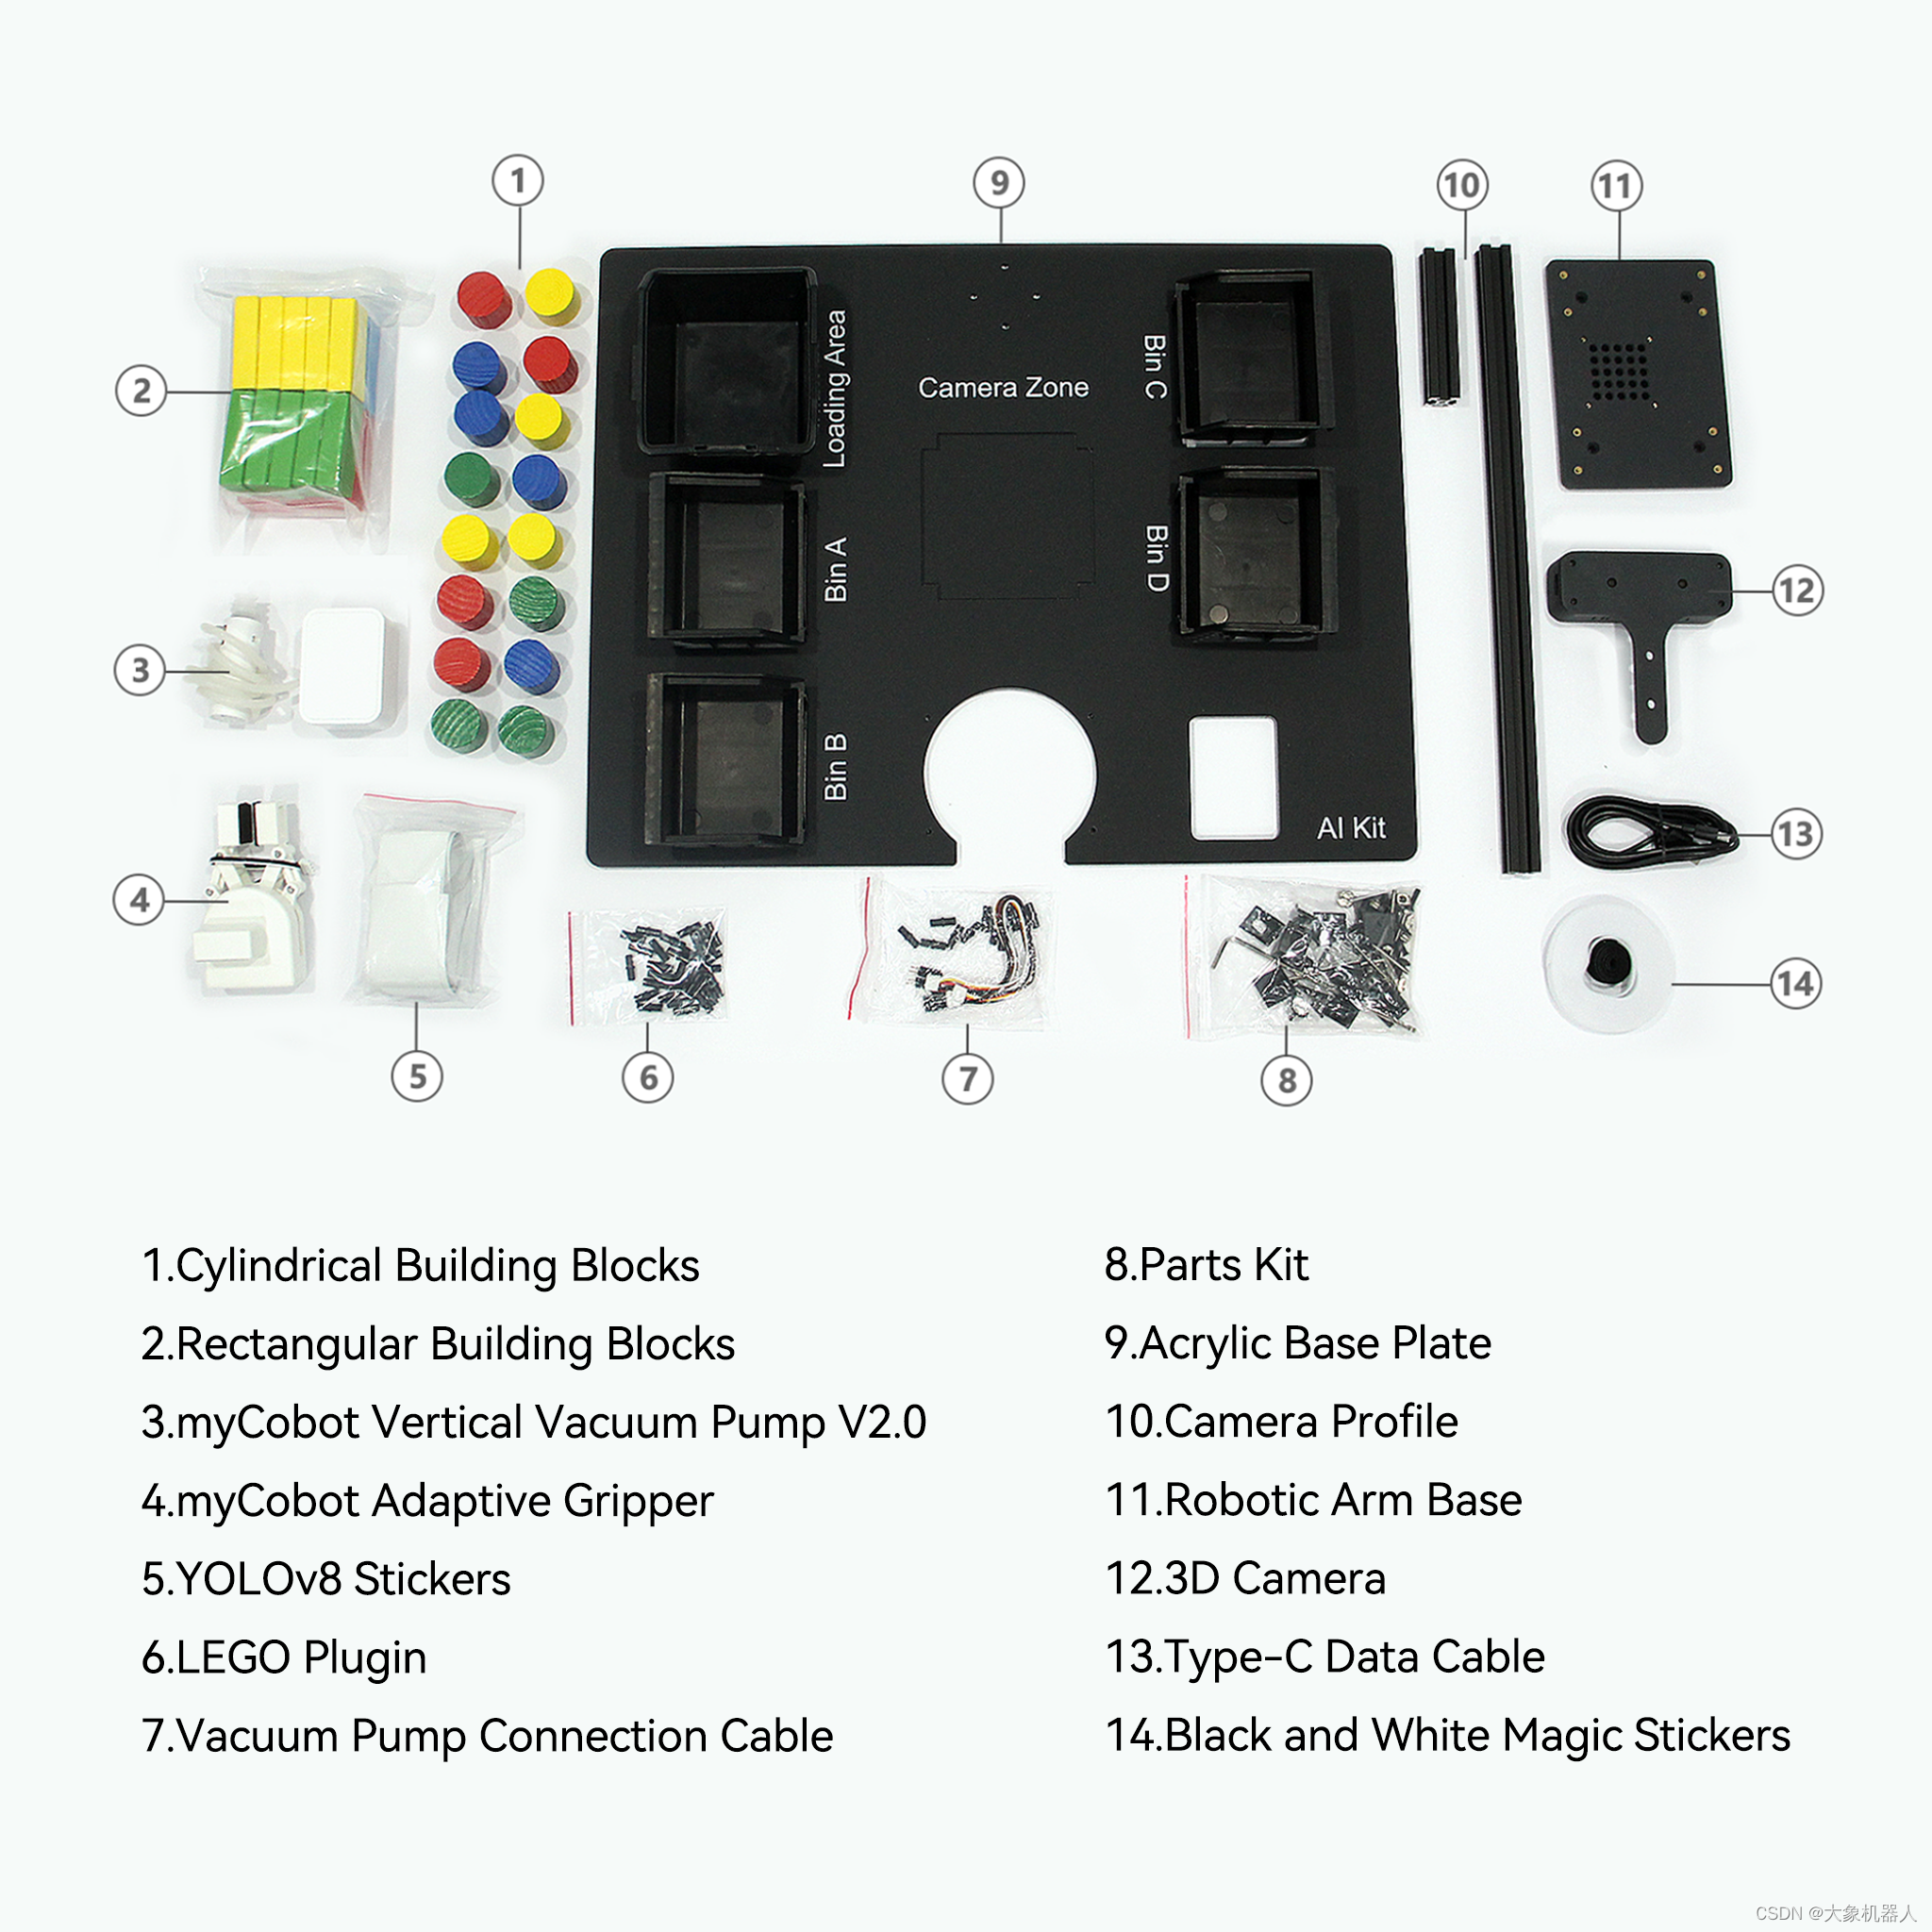
机械臂
3D摄像头应用领域
如果在同一个应用领域中,用2D摄像头和3D摄像头它们的表型性能会怎样。从我们身边常见的来了解: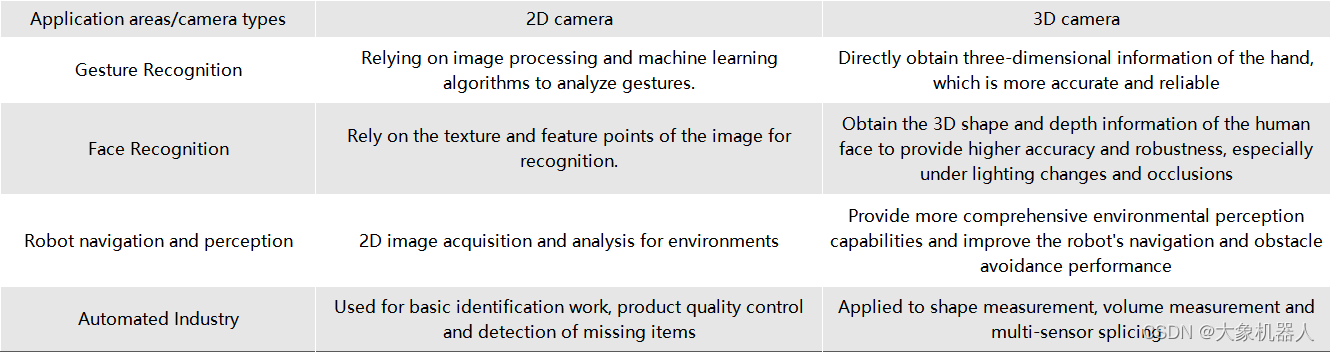
从图标中可以知道,2D摄像头需要通过特定的算法来得到一些参数,而3D摄像头能够直接获取较多的信息,在同一应用领域下的性能更加精准。在未来的,3D摄像头的趋势必然是飞速增长的!
算法介绍
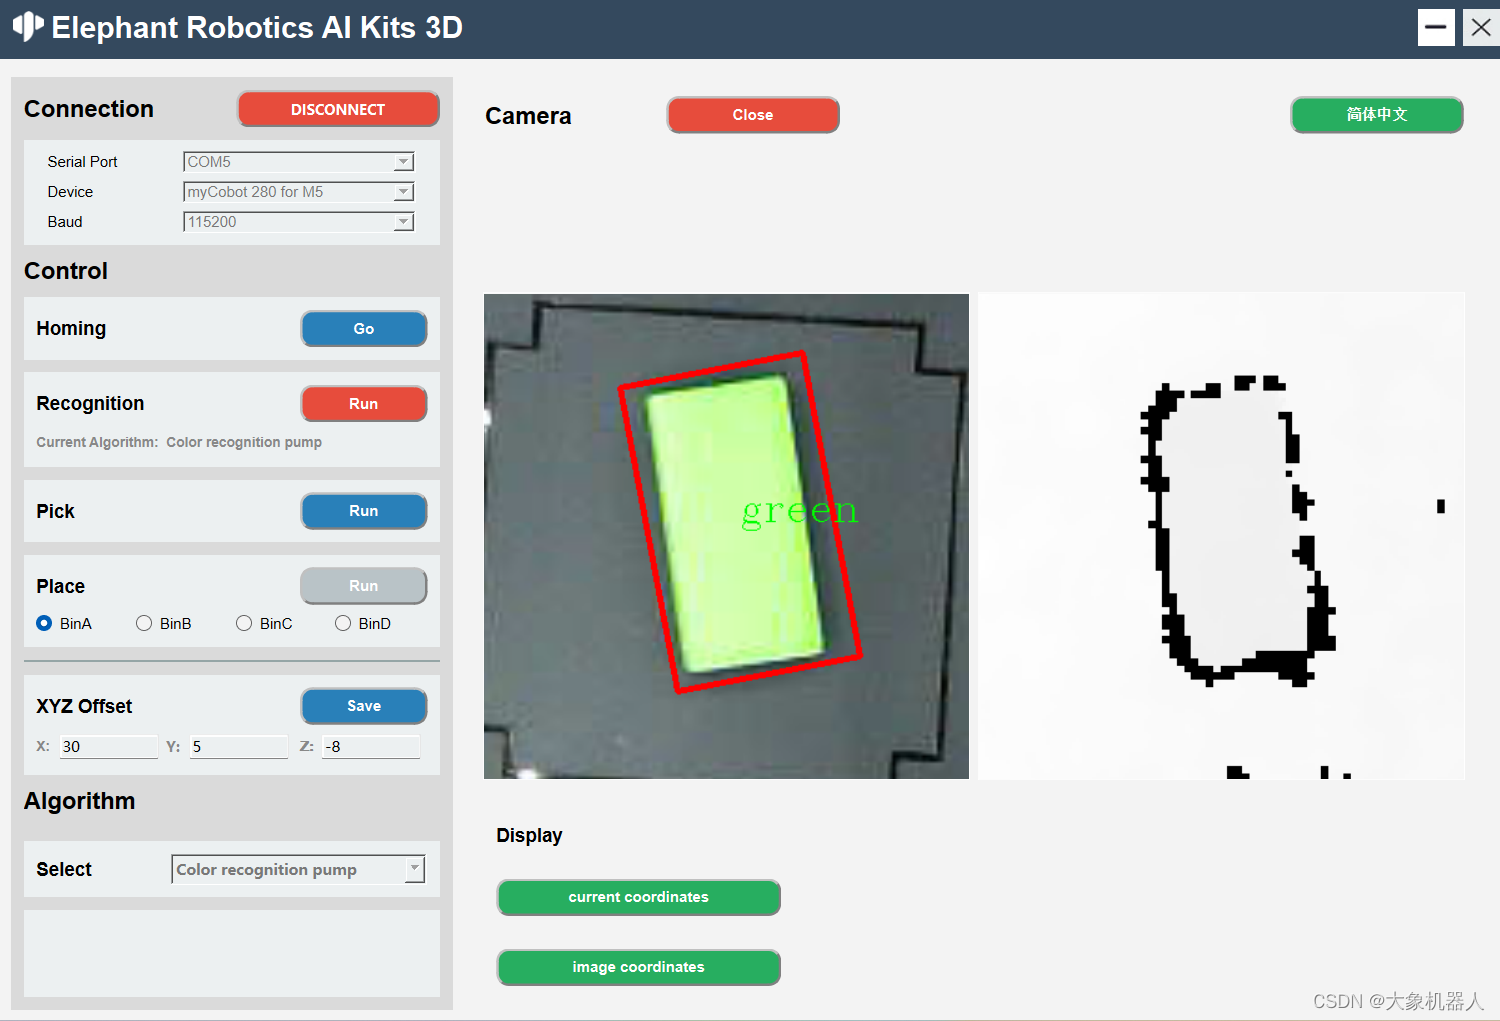
机械臂视觉识别,一定会涉及手眼标定。虽然两种版本的手眼标定的流程是一样的,但是他们在计算中还是会有一些差别,我们先看它们的识别区。
从中间的是被区域可以看到,3D版本已经没有了二维码的标识,在2D版本上二维码的标识的主要功能是确定识别的区域,以及提供一个固定高度的值。在获取了三维数据之后,就不需要用到二维码进行标识了,可以直接获取到相机距离平面高度的值。
这一点体现了3D摄像头能够直接获取深度的信息。
如何使用 realsence 在python中
<pre class="line-numbers language-python" style="box-sizing: border-box; padding: 1em 1em 1em 3.8em; -webkit-tap-highlight-color: transparent; text-wrap: wrap; overflow-wrap: normal; outline: 0px; border: 0px; background-color: rgb(245, 242, 240); vertical-align: baseline; text-shadow: rgb(255, 255, 255) 0px 1px; font-family: Consolas, Monaco, " andale="" mono",="" "ubuntu="" monospace;="" word-break:="" normal;="" line-height:="" 1.5;="" tab-size:="" 4;="" hyphens:="" none;="" overflow:="" auto;="" position:="" relative;="" counter-reset:="" linenumber="" 0;"=""># 初始化要识别的颜色 def __init__(self) -> None: self.area_low_threshold = 15000 self.detected_name = None self.hsv_range = { "green": ((40, 50, 50), (90, 256, 256)), # "blueA": ((91, 100, 100), (105, 256, 256)), # "yellow": ((20, 240, 170), (30, 256, 256)), "yellow": ((15, 46, 43), (30, 256, 256)), "redA": ((0, 100, 100), (6, 256, 256)), "redB": ((170, 100, 100), (179, 256, 256)), # "orange": ((8, 100, 100), (15, 256, 256)), "blue": ((100, 43, 46), (124, 256, 256)), }# 对图像的处理result = [] for color, (hsv_low, hsv_high) in self.hsv_range.items(): hsv_frame = cv2.cvtColor(frame, cv2.COLOR_BGR2HSV) in_range = cv2.inRange(hsv_frame, hsv_low, hsv_high) # 对颜色区域进行膨胀和腐蚀 kernel = np.ones((5, 5), np.uint8) in_range = cv2.morphologyEx(in_range, cv2.MORPH_CLOSE, kernel) in_range = cv2.morphologyEx(in_range, cv2.MORPH_OPEN, kernel) contours, hierarchy = cv2.findContours( in_range, cv2.RETR_EXTERNAL, cv2.CHAIN_APPROX_SIMPLE ) contours = list( filter(lambda x: cv2.contourArea(x) > self.area_low_threshold, contours) ) rects = list(map(cv2.minAreaRect, contours)) boxes = list(map(cv2.boxPoints, rects)) boxes = list(map(np.int32, boxes)) if len(boxes) != 0: if color.startswith("red"): color = "red" for box in boxes: result.append(ColorDetector.DetectResult(color, box)) # self.detected_name = result self.detected_name = result[0].color return result
YOLOv8 和拆码垛
我们在这个套装里面还使用到了目前比较火的一款识别模型YOLOv8,此模型还涉及到深度学习和模型训练等功能。
YOLOv8是一种目标检测算法,它是基于深度学习的YOLO(You Only Look Once)系列算法的最新版本。YOLO算法是一种实时目标检测算法,其特点是能够在一次前向传播中同时完成目标检测和定位,速度非常快。Home - Ultralytics YOLOv8 Docs
主要特点:
高性能:YOLOv8在目标检测任务中具有较高的准确性和速度。它能够在实时或接近实时的速度下进行目标检测,适用于各种应用场景。
简单而有效的设计:YOLOv8采用了简单而有效的设计,通过使用更深的网络结构和更多的特征层来提高检测性能。它还使用了一种自适应的训练策略,可以在不同的目标检测任务上进行快速训练和调整。
多种规模的检测:YOLOv8提供了不同的模型大小,包括小型、中型和大型模型,以满足不同场景下的需求。这些模型可以在不同的硬件设备上进行部署和使用。
开源和易用性:YOLOv8是开源的,代码和预训练模型都可以在GitHub上获得。它还提供了简单易用的API,使得用户可以方便地进行模型训练、推理和部署。
要使用YOLOv8是需要进行自定义训练模型的,在进行目标检测任务是,根据具体应用场景和需求,通过在自定义数据集上进行训练得到模型。
为什么要训练模型呢?训练模型的目的是让计算机能够自动识别和定位图像或视频中的目标物体。通过训练模型,我们可以让计算机学会如何识别不同种类的物体,并且能够准确地定位它们的位置。这对于许多应用场景非常重要,比如自动驾驶、安防监控、智能交通等。
对此我们的源码文件中已经包含了我们自己训练的模型,如果你对YOLOv8的技术很熟练了,你可以自己对识别物体进行训练。
下面的代码是程序中使用的代码
<pre class="line-numbers language-python" andale="" mono",="" "ubuntu="" monospace;="" word-break:="" normal;="" line-height:="" 1.5;="" tab-size:="" 4;="" hyphens:="" none;="" overflow:="" auto;="" position:="" relative;="" counter-reset:="" linenumber="" 0;"="" style="box-sizing: border-box; padding: 1em 1em 1em 3.8em; -webkit-tap-highlight-color: transparent; text-wrap: wrap; overflow-wrap: normal; outline: 0px; border: 0px; background-color: rgb(245, 242, 240); vertical-align: baseline; text-shadow: rgb(255, 255, 255) 0px 1px; font-family: Consolas, Monaco, ">class YOLODetector: DetectResult = List[ultralytics.engine.results.Results] def __init__(self) -> None: """ init YOLO model。 """ self.model_path = os.path.dirname(os.path.dirname(os.path.abspath(__file__))) + '/resources/yolo/best.pt' self.model = YOLO(self.model_path) self.predict_args = {"conf": 0.2} self.detected_name = None def get_radian(self, res: DetectResult): return 0 def detect(self, frame: np.ndarray): """ Perform object detection on input images. Args: frame (np.ndarray): Input image frame. Returns: List[DetectResult]: A list containing the detection results. """ res = self.model.predict(frame, **self.predict_args) res = list(filter(lambda x: len(x.boxes) != 0, res)) if len(res) == 0: return None else: names = self.get_names(res) self.detected_name = names return res def draw_result(self, frame: np.ndarray, res: List[DetectResult]): """ Draws the bounding box of the detection results on the image. Args: frame (np.ndarray): Input image frame. res (List[DetectResult]): List of detection results. """ res = list(filter(lambda x: len(x.boxes) != 0, res)) for r in res: boxes = r.boxes.xyxy.numpy() for box in boxes: x1, y1, x2, y2 = box.astype(int) cv2.rectangle(frame, (x1, y1), (x2, y2), color=(0, 255, 0), thickness=1) cv2.putText(frame, "Name: " + str(self.detected_name), (20, 80), cv2.FONT_HERSHEY_COMPLEX_SMALL, 1, (0, 0, 255)) # x1, y1, x2, y2 = np.squeeze(r.boxes.xyxy.numpy()).astype(int) # cv2.rectangle(frame, (x1, y1), (x2, y2), color=(0, 255, 0), thickness=1) def target_position(self, res: DetectResult) -> Tuple[int, int]: """ Extract the location information of the target from the detection results. Args: res (DetectResult): detection result. Returns: Tuple[int, int]: The position coordinates (x, y) of the target. """ boxes = res.boxes.xywh.numpy() boxs_list = [] for box in boxes: x, y, w, h = box.astype(int) boxs_list.append((x, y)) boxs_list = tuple(boxs_list) return boxs_list def get_rect(self, res: DetectResult): """ Obtain the bounding box coordinate information of the target from the detection result. Args: res (DetectResult): detection result. Returns: List[Tuple[int, int]]: The bounding box coordinate information of the target, including four vertex coordinates. """ boxes = res.boxes.xywh.numpy() box_list = [] for box in boxes: x, y, w, h = box.astype(int) size = 3 rect = [ [x - size, y - size], [x + size, y - size], [x + size, y + size], [x - size, y + size], ] box_list.append(rect) return box_list def get_names(self, res: DetectResult): """ Get the category name in the detection results Args: res (DetectResult): detection result. Returns: List[names]: A list category names. """ names_dict = { 0: 'jeep', 1: 'apple', 2: 'banana1', 3: 'bed', 4: 'grape', 5: 'laptop', 6: 'microwave', 7: 'orange', 8: 'pear', 9: 'refrigerator1', 10: 'refrigerator2', 11: 'sofa', 12: 'sofa2', 13: 'tv', 14: 'washing machine1' } ids = [int(cls) for cls in res[0].boxes.cls.numpy()] # Assuming you have only one result in the list names = [names_dict.get(id, 'Unknown') for id in ids] return names
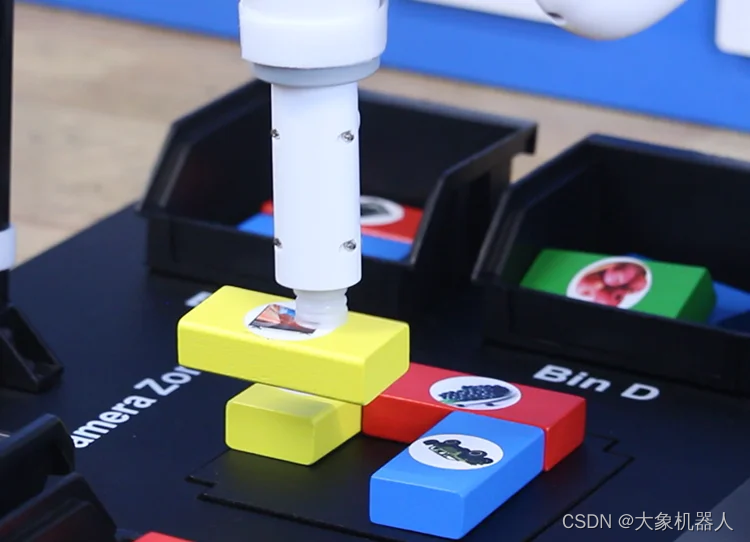
搭配上3D摄像头的特性,获取被识别的物体的高度实现拆码垛的demo,能够将他们像拆积木一样拆除。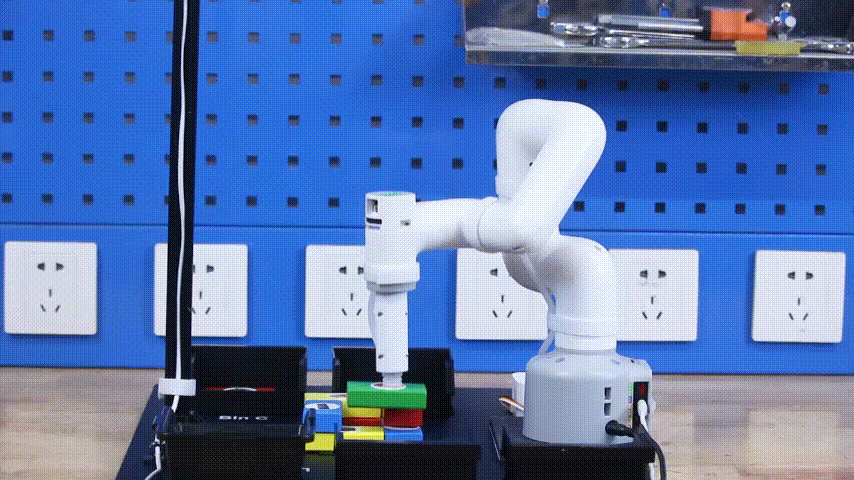
总结
我们的机械臂和深度摄像头套装不仅是一款产品,更是一个开启学习之门的机会。这个套装以用户友好的方式,提供了一个理想的平台,让初学者可以在实践中探索和学习机械臂操作和机器视觉的知识,更重要的是,它提供了一个独特的机会,让用户能够深入理解和掌握3D相机算法。
随着科技的进步,3D摄像头的应用正在迅速扩展到多个领域,包括但不限于制造、安全、娱乐和医疗。我们坚信,通过使用我们的套装,用户将能够把握这一技术趋势,为自己的未来学习和职业生涯奠定坚实的基础。


评论(0)
您还未登录,请登录后发表或查看评论