

EasyPR是一个很好的车牌识别开源系统,可做学习之用,也可在其基础之上做开发。我为了学习OpenCV,提升c++代码实现能力和锻炼项目能力,着手开始学习EasyPR,并通过博客发表源码解析,会持续更新,提升自己的总结能力,也方便日后查看。
关于颜色定位的简介,可以参考这两篇博客:http://www.cnblogs.com/freedomker/p/7229806.html,https://blog.csdn.net/taily_duan/article/details/51506776。本文仅对源码的实现进行剖析。
一、颜色定位
颜色定位的处理函数是 CPlateLocate 类的成员函数 plateColorLocate:
int CPlateLocate::plateColorLocate(Mat src, vector<CPlate> &candPlates,
                                   int index) {
  vector<RotatedRect> rects_color_blue;//旋转类容器(蓝色)
  rects_color_blue.reserve(64);//保留适当容量,避免内存重新分配
  vector<RotatedRect> rects_color_yellow;//旋转类容器(黄色)
  rects_color_yellow.reserve(64);

  vector<CPlate> plates_blue;//车牌类
  plates_blue.reserve(64);
  vector<CPlate> plates_yellow;
  plates_yellow.reserve(64);

  Mat src_clone = src.clone();

  Mat src_b_blue;
  Mat src_b_yellow;
#pragma omp parallel sections//并行计算
  {
#pragma omp section
    {
      colorSearch(src, BLUE, src_b_blue, rects_color_blue);//颜色定位
      deskew(src, src_b_blue, rects_color_blue, plates_blue, true, BLUE);
    }
#pragma omp section
    {
      colorSearch(src_clone, YELLOW, src_b_yellow, rects_color_yellow);
      deskew(src_clone, src_b_yellow, rects_color_yellow, plates_yellow, true, YELLOW);
    }
  }

  candPlates.insert(candPlates.end(), plates_blue.begin(), plates_blue.end());
  candPlates.insert(candPlates.end(), plates_yellow.begin(), plates_yellow.end());

  return 0;
}
这里首先创建RotateRect类的容器,用于存放由颜色定位出来的最小外接矩形(未经车牌角度矫正),再创建Cplate类的向量容器,用于存放经过角度矫正后的车牌图像(最终图像)。同时为了加快计算机的计算速率,采用了OpenMP技术,OpenMP是由OpenMP Architecture Review Board牵头提出的,并已被广泛接受,用于共享内存并行系统的多处理器程序设计的一套指导性编译处理方案。通过并行计算,分别进行蓝色和黄色车牌的处理。其中两个主要处理函数 colorSearch() 和 deskew()分别对图片进行颜色匹配和偏斜扭转。
颜色定位的具体实现是CPlateLocate 类的成员函数 colorSearch:
int CPlateLocate::colorSearch(const Mat &src, const Color r, Mat &out,   //颜色搜索
                              vector<RotatedRect> &outRects) {
  Mat match_grey;

  // width is important to the final results;
  const int color_morph_width = 10;
  const int color_morph_height = 2;

  colorMatch(src, match_grey, r, false);
  SHOW_IMAGE(match_grey, 0);//debug=0

  Mat src_threshold;
  threshold(match_grey, src_threshold, 0, 255,
            CV_THRESH_OTSU + CV_THRESH_BINARY);//二值化

  Mat element = getStructuringElement(
      MORPH_RECT, Size(color_morph_width, color_morph_height));
  morphologyEx(src_threshold, src_threshold, MORPH_CLOSE, element);//形态学闭操作

  //if (m_debug) {
  //  utils::imwrite("resources/image/tmp/color.jpg", src_threshold);
  //}

  src_threshold.copyTo(out);


  vector<vector<Point>> contours;

  findContours(src_threshold,
               contours,               // a vector of contours
               CV_RETR_EXTERNAL,       //取外部轮廓操作
               CV_CHAIN_APPROX_NONE);  // all pixels of each contours

  vector<vector<Point>>::iterator itc = contours.begin();//迭代器
  while (itc != contours.end()) {
    RotatedRect mr = minAreaRect(Mat(*itc));//寻找最小区域的外接旋转矩形

    if (!verifySizes(mr))  //车牌尺寸判断
      itc = contours.erase(itc); // 删除非车牌矩形
    else {
      ++itc;
      outRects.push_back(mr);
    }
  }

  return 0;
}
由代码可见,首先进行颜色匹配 colorMatch (颜色定位的核心),后面着重讲。然后将匹配所得的“车牌”图像进行二值化,用内核为一个 10X2矩形进行形态学闭操作,闭操作是为了让“车牌区域”成为一个连通域,方便后续的轮廓提取(所以内核的大小对最终的结果有很大的影响),内核过大会使不应该连在一起的区域连接,过小又不足以连成一个连通域。最后再取出轮廓,判断轮廓尺寸,调用 verifySizes,剔除非车牌矩形轮廓,保存尺寸符合的。
二、 colorMatch颜色匹配
colorMatch位于core_func.cpp文件下,该文件包含了全部的核心算法。
Mat colorMatch(const Mat &src, Mat &match, const Color r,
    const bool adaptive_minsv) {

    // if use adaptive_minsv
    // min value of s and v is adaptive to h
    const float max_sv = 255;//饱和度和亮度的最大值
    const float minref_sv = 64;//最小值

    const float minabs_sv = 95; //95;

    // H range of blue ,色调

    const int min_blue = 100;  // 100
    const int max_blue = 140;  // 140

    // H range of yellow,色调

    const int min_yellow = 15;  // 15
    const int max_yellow = 40;  // 40

    // H range of white,色调

    const int min_white = 0;   // 15
    const int max_white = 30;  // 40

    Mat src_hsv;

    // convert to HSV space
    cvtColor(src, src_hsv, CV_BGR2HSV);//颜色转换

    std::vector<cv::Mat> hsvSplit;
    split(src_hsv, hsvSplit);//分离颜色通道
    equalizeHist(hsvSplit[2], hsvSplit[2]);//饱和度直方图均衡
    merge(hsvSplit, src_hsv);//合并颜色通道

    // match to find the color

    int min_h = 0;
    int max_h = 0;
    switch (r) {
    case BLUE:
      min_h = min_blue;//蓝,色调(度)最小值
      max_h = max_blue;//蓝,色度最大值
      break;
    case YELLOW:
      min_h = min_yellow;//黄,色调(度)最小值
      max_h = max_yellow;//黄,色度最大值
      break;
    case WHITE:
      min_h = min_white;//白
      max_h = max_white;
      break;
    default:
      // Color::UNKNOWN
      break;
    }

    float diff_h = float((max_h - min_h) / 2);//??
    float avg_h = min_h + diff_h;//??

    int channels = src_hsv.channels(); //颜色通道数
    int nRows = src_hsv.rows;//图像行数

    // consider multi channel image
    int nCols = src_hsv.cols * channels;
    if (src_hsv.isContinuous()) { //判断是否是连续存储,若是,则图像可以看成是一个一维数组
      nCols *= nRows;
      nRows = 1;
    }

    int i, j;
    uchar* p;//无符号字符型指针
    float s_all = 0;
    float v_all = 0;
    float count = 0;
    for (i = 0; i < nRows; ++i) {  //一个一维数组
      p = src_hsv.ptr<uchar>(i);
      for (j = 0; j < nCols; j += 3) { //按列计算
        int H = int(p[j]);      // 0-180 色调
        int S = int(p[j + 1]);  // 0-255 饱合度
        int V = int(p[j + 2]);  // 0-255 亮度

        s_all += S; //S总值
        v_all += V; //V总值
        count++; //计数

        bool colorMatched = false; //匹配成功标志位 置为否

        if (H > min_h && H < max_h) {  //色度在最大值与最小值之间
          float Hdiff = 0;  //??
          if (H > avg_h)
            Hdiff = H - avg_h;
          else
            Hdiff = avg_h - H;

          float Hdiff_p = float(Hdiff) / diff_h; //

          float min_sv = 0;
          if (true == adaptive_minsv)
            min_sv =
            minref_sv -
            minref_sv / 2 *
            (1
              - Hdiff_p);  // inref_sv - minref_sv / 2 * (1 - Hdiff_p)
          else
            min_sv = minabs_sv;  // add

          if ((S > min_sv && S < max_sv) && (V > min_sv && V < max_sv))//饱和度和亮度在最大值与最小值之间
            colorMatched = true;//匹配成功标志位 置为成功
        }

        if (colorMatched == true) {//若成功,则将亮度置为255
          p[j] = 0;
          p[j + 1] = 0;
          p[j + 2] = 255;
        }
        else {  //否,置为0
          p[j] = 0;
          p[j + 1] = 0;
          p[j + 2] = 0;
        }
      }
    }

    // cout << "avg_s:" << s_all / count << endl;
    // cout << "avg_v:" << v_all / count << endl;

    // get the final binary

    Mat src_grey;
    std::vector<cv::Mat> hsvSplit_done;
    split(src_hsv, hsvSplit_done);
    src_grey = hsvSplit_done[2];

    match = src_grey;//返回颜色匹配结果

    return src_grey;
  }
一般对颜色空间的图像进行有效处理都是在HSV空间进行的,然后对于基本色中对应的HSV分量需要给定一个严格的范围,下面是通过实验计算的模糊范围(准确的范围在网上都没有给出):
该过程为在HSV颜色空间中根据H的值对S和V进行自适应变化:
step1:设定H、S、V的范围(min_h,max_h,minref_sv,max_sv);
step2:饱和度(s)直方图均衡;
step3:求H范围的中心值: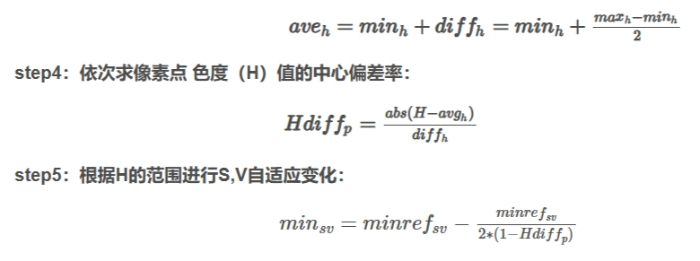
step6:若该像素点H,S,V的值均满足所设定的范围,则令H=0,S=0,V=255,不满足,则令H=0,S=0,V=0;
step7:是否到达最后一个像素点,否,返回step4;
step8:最终得出的“白色区域”即为车牌颜色区域。


评论(0)
您还未登录,请登录后发表或查看评论