
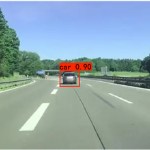
1.将detect.py运用到界面
要将 YOLOv5 的检测结果与 PyQt 界面结合,你需要进行一些额外的步骤。以下是一个简单的示例代码,展示如何使用 YOLOv5 进行目标检测并在 PyQt 界面中显示结果。
首先,确保你已经安装了必要的库:
pip install opencv-python PyQt5 torch
然后,使用以下代码作为 yolov5_detect_pyqt.py 假设你要用detect.py进行推理,你需要替换下面的detect函数,采取 f”python detect.py”即可:
import sys
import cv2
import torch
from PyQt5.QtWidgets import QApplication, QWidget, QLabel, QVBoxLayout, QPixmap
from PyQt5.QtGui import QImage, QPixmap
from yolov5.detect import detect  # 导入你的 YOLOv5 检测函数

class YOLOv5DetectApp(QWidget):
    def __init__(self):
        super().__init__()

        self.init_ui()

    def init_ui(self):
        self.setWindowTitle('YOLOv5 Object Detection with PyQt')
        self.setGeometry(100, 100, 800, 600)

        self.label = QLabel(self)
        self.label.setAlignment(Qt.AlignCenter)

        vbox = QVBoxLayout(self)
        vbox.addWidget(self.label)

        self.setLayout(vbox)

        self.timer = QTimer(self)
        self.timer.timeout.connect(self.update_frame)
        self.timer.start(1000)  # 设置定时器间隔,单位为毫秒

    def update_frame(self):
        # 执行目标检测
        image = cv2.imread('path/to/your/image.jpg')  # 替换成你的图像路径
        results = detect(image)  # 使用你的 YOLOv5 检测函数

        # 在图像上绘制检测结果
        for result in results:
            label = result['label']
            confidence = result['confidence']
            box = result['box']

            cv2.rectangle(image, (box[0], box[1]), (box[2], box[3]), (0, 255, 0), 2)
            cv2.putText(image, f"{label} {confidence:.2f}", (box[0], box[1] - 10),
                        cv2.FONT_HERSHEY_SIMPLEX, 0.5, (0, 255, 0), 2)

        # 将 OpenCV 图像转换为 PyQt 可显示的格式
        height, width, channel = image.shape
        bytes_per_line = 3 * width
        q_image = QImage(image.data, width, height, bytes_per_line, QImage.Format_RGB888)
        pixmap = QPixmap.fromImage(q_image)

        # 在 PyQt 界面上显示图像
        self.label.setPixmap(pixmap)

if __name__ == '__main__':
    app = QApplication(sys.argv)
    window = YOLOv5DetectApp()
    window.show()
    sys.exit(app.exec_())
请注意,上述代码中的 detect 函数是一个示例函数,你需要替换它为你的 YOLOv5 目标检测函数。确保你的目标检测函数返回一个包含检测结果的列表,每个结果是一个字典,包含标签、置信度和边界框信息。
这只是一个简单的示例,实际上,你可能需要对界面进行更多的优化和交互性。此外,如果你的检测过程很耗时,你可能需要考虑使用多线程来确保界面的响应性。
2.将发加载图片或视运用到界面
如果你想通过按钮触发加载图片或视频,你可以在 PyQt 窗口中添加按钮,并通过按钮的点击事件触发加载操作。下面是修改后的代码,其中添加了按钮用于加载图片:
import sys
import cv2
from PyQt5.QtWidgets import QApplication, QWidget, QLabel, QVBoxLayout, QPushButton, QFileDialog
from PyQt5.QtGui import QImage, QPixmap
from PyQt5.QtCore import Qt, QTimer
from yolov5.detect import detect  # 导入你的 YOLOv5 检测函数

class YOLOv5DetectApp(QWidget):
    def __init__(self):
        super().__init__()

        self.init_ui()

    def init_ui(self):
        self.setWindowTitle('YOLOv5 Object Detection with PyQt')
        self.setGeometry(100, 100, 800, 600)

        self.label = QLabel(self)
        self.label.setAlignment(Qt.AlignCenter)

        vbox = QVBoxLayout(self)
        vbox.addWidget(self.label)

        # 添加按钮用于加载图片
        self.load_image_button = QPushButton('Load Image', self)
        self.load_image_button.clicked.connect(self.load_image)
        vbox.addWidget(self.load_image_button)

        self.setLayout(vbox)

        self.timer = QTimer(self)
        self.timer.timeout.connect(self.update_frame)
        self.timer.start(1000)  # 设置定时器间隔,单位为毫秒

        self.image_path = None  # 用于存储当前加载的图像路径

    def load_image(self):
        options = QFileDialog.Options()
        options |= QFileDialog.DontUseNativeDialog
        file_name, _ = QFileDialog.getOpenFileName(self, "Open Image File", "", "Image Files (*.png *.jpg *.bmp);;All Files (*)", options=options)
        if file_name:
            self.image_path = file_name

    def update_frame(self):
        if self.image_path is not None:
            # 执行目标检测
            image = cv2.imread(self.image_path)
            results = detect(image)  # 使用你的 YOLOv5 检测函数

            # 在图像上绘制检测结果
            for result in results:
                label = result['label']
                confidence = result['confidence']
                box = result['box']

                cv2.rectangle(image, (box[0], box[1]), (box[2], box[3]), (0, 255, 0), 2)
                cv2.putText(image, f"{label} {confidence:.2f}", (box[0], box[1] - 10),
                            cv2.FONT_HERSHEY_SIMPLEX, 0.5, (0, 255, 0), 2)

            # 将 OpenCV 图像转换为 PyQt 可显示的格式
            height, width, channel = image.shape
            bytes_per_line = 3 * width
            q_image = QImage(image.data, width, height, bytes_per_line, QImage.Format_RGB888)
            pixmap = QPixmap.fromImage(q_image)

            # 在 PyQt 界面上显示图像
            self.label.setPixmap(pixmap)

if __name__ == '__main__':
    app = QApplication(sys.argv)
    window = YOLOv5DetectApp()
    window.show()
    sys.exit(app.exec_())
在这个例子中,通过添加 QPushButton 实例 load_image_button 和连接 clicked 信号到 load_image 方法,实现了通过按钮加载图像的功能。当按钮被点击时,将弹出文件对话框,允许用户选择要加载的图像文件。加载的图像路径存储在 self.image_path 中,并在定时器的 update_frame 方法中使用。


评论(0)
您还未登录,请登录后发表或查看评论