

1. 编译
cmake:根据CMakeList.txt的内容生成编译文件CMakeFiles
make:根据CMakeFiles以及源文件生成可执行文件
mkdir build
cd build
cmake ..
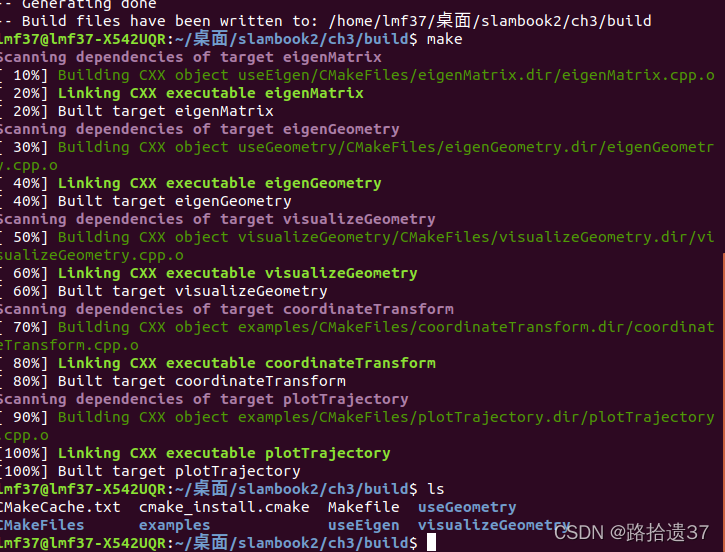
make
结果如下:
2. Eigen代码实践
2 .1运行use Eigen

代码及注释如下:
#include <iostream>

using namespace std;

#include <ctime>
// Eigen 核心部分
#include <Eigen/Core>
// 稠密矩阵的代数运算(逆,特征值等)
#include <Eigen/Dense>

using namespace Eigen;

#define MATRIX_SIZE 50

/****************************
* 本程序演示了 Eigen 基本类型的使用
****************************/

int main(int argc, char **argv) {
  // Eigen 中所有向量和矩阵都是Eigen::Matrix,它是一个模板类。它的前三个参数为:数据类型,行,列
  // 声明一个2*3的float矩阵
  Matrix<float, 2, 3> matrix_23;

  // 同时,Eigen 通过 typedef 提供了许多内置类型,不过底层仍是Eigen::Matrix
  // 例如 Vector3d 实质上是 Eigen::Matrix<double, 3, 1>,即三维向量
  Vector3d v_3d;
  // 这是一样的
  Matrix<float, 3, 1> vd_3d;

  // Matrix3d 实质上是 Eigen::Matrix<double, 3, 3>
  Matrix3d matrix_33 = Matrix3d::Zero(); //初始化为零
  // 如果不确定矩阵大小,可以使用动态大小的矩阵
  Matrix<double, Dynamic, Dynamic> matrix_dynamic;
  // 更简单的
  MatrixXd matrix_x;
  // 这种类型还有很多,我们不一一列举

  // 下面是对Eigen阵的操作
  // 输入数据(初始化)
  matrix_23 << 1, 2, 3, 4, 5, 6;
  // 输出
  cout << "matrix 2x3 from 1 to 6: \n" << matrix_23 << endl;

  // 用()访问矩阵中的元素
  cout << "print matrix 2x3: " << endl;
  for (int i = 0; i < 2; i++) {
    for (int j = 0; j < 3; j++) cout << matrix_23(i, j) << "\t";
    cout << endl;
  }

  // 矩阵和向量相乘(实际上仍是矩阵和矩阵)
  v_3d << 3, 2, 1;
  vd_3d << 4, 5, 6;

  // 但是在Eigen里你不能混合两种不同类型的矩阵,像这样是错的
  // Matrix<double, 2, 1> result_wrong_type = matrix_23 * v_3d;
  // 应该显式转换
  Matrix<double, 2, 1> result = matrix_23.cast<double>() * v_3d;//强制类型转换,matrix_23.cast<double>
  cout << "[1,2,3;4,5,6]*[3,2,1]=" << result.transpose() << endl;

  Matrix<float, 2, 1> result2 = matrix_23 * vd_3d;
  cout << "[1,2,3;4,5,6]*[4,5,6]: " << result2.transpose() << endl;

  // 同样你不能搞错矩阵的维度
  // 试着取消下面的注释,看看Eigen会报什么错
  // Eigen::Matrix<double, 2, 3> result_wrong_dimension = matrix_23.cast<double>() * v_3d;

  // 一些矩阵运算
  // 四则运算就不演示了,直接用+-*/即可。
  matrix_33 = Matrix3d::Random();      // 随机数矩阵
  cout << "random matrix: \n" << matrix_33 << endl;
  cout << "transpose: \n" << matrix_33.transpose() << endl;      // 转置
  cout << "sum: " << matrix_33.sum() << endl;            // 各元素和
  cout << "trace: " << matrix_33.trace() << endl;          // 迹
  cout << "times 10: \n" << 10 * matrix_33 << endl;               // 数乘
  cout << "inverse: \n" << matrix_33.inverse() << endl;        // 逆
  cout << "det: " << matrix_33.determinant() << endl;    // 行列式

  // 特征值
  // 实对称矩阵可以保证对角化成功
  //作用于一个有限维的内积空间,一个自伴算子(self-adjoint operator)等于自己的伴随算子;等价地说,在一组单位酉正交基下,表达自伴算子的矩阵是埃尔米特矩阵。
  //埃尔米特矩阵等于自己的共轭转置。根据有限维的谱定理,必定存在着一个正交归一基,可以表达自伴算子为一个实值的对角矩阵。

  SelfAdjointEigenSolver<Matrix3d> eigen_solver(matrix_33.transpose() * matrix_33);
  cout << "Eigen values = \n" << eigen_solver.eigenvalues() << endl;//特征值
  cout << "Eigen vectors = \n" << eigen_solver.eigenvectors() << endl;//特征向量


  // 解方程
  // 我们求解 matrix_NN * x = v_Nd 这个方程
  // N的大小在前边的宏里定义,它由随机数生成
  // 直接求逆自然是最直接的,但是求逆运算量大

  Matrix<double, MATRIX_SIZE, MATRIX_SIZE> matrix_NN
      = MatrixXd::Random(MATRIX_SIZE, MATRIX_SIZE);
  matrix_NN = matrix_NN * matrix_NN.transpose();  // 保证半正定
  Matrix<double, MATRIX_SIZE, 1> v_Nd = MatrixXd::Random(MATRIX_SIZE, 1);

  clock_t time_stt = clock(); // 计时
  // 直接求逆
  Matrix<double, MATRIX_SIZE, 1> x = matrix_NN.inverse() * v_Nd;
  cout << "time of normal inverse is "
       << 1000 * (clock() - time_stt) / (double) CLOCKS_PER_SEC << "ms" << endl;
  cout << "x = " << x.transpose() << endl;

  // 通常用矩阵分解来求,例如QR分解,速度会快很多
  time_stt = clock();
  x = matrix_NN.colPivHouseholderQr().solve(v_Nd);
  cout << "time of Qr decomposition is "
       << 1000 * (clock() - time_stt) / (double) CLOCKS_PER_SEC << "ms" << endl;
  cout << "x = " << x.transpose() << endl;

  // 对于正定矩阵,还可以用cholesky分解来解方程
  time_stt = clock();
  x = matrix_NN.ldlt().solve(v_Nd);
  cout << "time of ldlt decomposition is "
       << 1000 * (clock() - time_stt) / (double) CLOCKS_PER_SEC << "ms" << endl;
  cout << "x = " << x.transpose() << endl;

  return 0;
}
2.2. Eigen几何模块
代码及注释如下:
#include <iostream>
#include <cmath>
using namespace std;
#include <Eigen/Core>
#include <Eigen/Geometry>
using namespace Eigen;
// 本程序演示了 Eigen 几何模块的使用方法
int main(int argc, char **argv) {
// Eigen/Geometry 模块提供了各种旋转和平移的表示
// 3D 旋转矩阵直接使用 Matrix3d 或 Matrix3f
Matrix3d rotation_matrix = Matrix3d::Identity();//使用Identity()函数的作用:在定义变量时使用Eigen::Matrix4f x = Eigen::Matrix4f::Identity();即用单位矩阵对x变量进行了初始化。
// 旋转向量使用 AngleAxis, 它底层不直接是Matrix,但运算可以当作矩阵(因为重载了运算符)
AngleAxisd rotation_vector(M_PI / 4, Vector3d(0, 0, 1)); //沿 Z 轴旋转 45 度
cout.precision(3);//cout.precision()控制浮点数的输出精度,保留几位小数
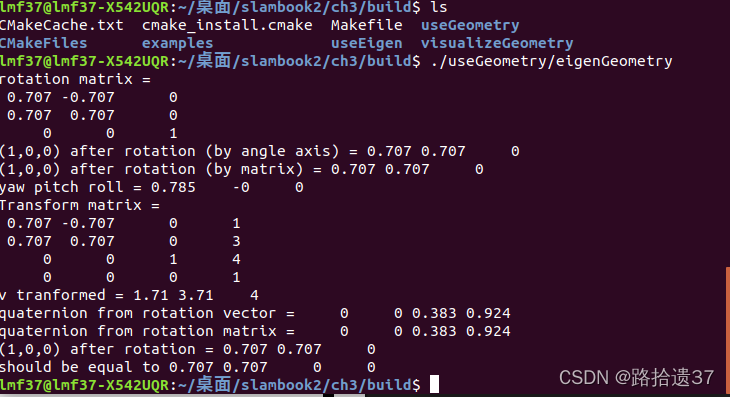
cout << "rotation matrix =\n" << rotation_vector.matrix() << endl; //用matrix()转换成矩阵
// 也可以直接赋值
rotation_matrix = rotation_vector.toRotationMatrix();
// 用 AngleAxis 可以进行坐标变换
Vector3d v(1, 0, 0);
Vector3d v_rotated = rotation_vector * v;
cout << "(1,0,0) after rotation (by angle axis) = " << v_rotated.transpose() << endl;
// 或者用旋转矩阵
v_rotated = rotation_matrix * v;
cout << "(1,0,0) after rotation (by matrix) = " << v_rotated.transpose() << endl;
// 欧拉角: 可以将旋转矩阵直接转换成欧拉角
Vector3d euler_angles = rotation_matrix.eulerAngles(2, 1, 0); // ZYX顺序,即yaw-pitch-roll顺序
cout << "yaw pitch roll = " << euler_angles.transpose() << endl;
// 欧氏变换矩阵使用 Eigen::Isometry
Isometry3d T = Isometry3d::Identity(); // 虽然称为3d,实质上是4*4的矩阵
T.rotate(rotation_vector); // 按照rotation_vector进行旋转
T.pretranslate(Vector3d(1, 3, 4)); // 把平移向量设成(1,3,4)
cout << "Transform matrix = \n" << T.matrix() << endl;
// 用变换矩阵进行坐标变换
Vector3d v_transformed = T * v; // 相当于R*v+t
cout << "v tranformed = " << v_transformed.transpose() << endl;
// 对于仿射和射影变换,使用 Eigen::Affine3d 和 Eigen::Projective3d 即可,略
// 四元数
// 可以直接把AngleAxis赋值给四元数,反之亦然
Quaterniond q = Quaterniond(rotation_vector);
cout << "quaternion from rotation vector = " << q.coeffs().transpose()
<< endl; // 请注意coeffs的顺序是(x,y,z,w),w为实部,前三者为虚部
// 也可以把旋转矩阵赋给它
q = Quaterniond(rotation_matrix);
cout << "quaternion from rotation matrix = " << q.coeffs().transpose() << endl;
// 使用四元数旋转一个向量,使用重载的乘法即可
v_rotated = q * v; // 注意数学上是qvq^{-1}
cout << "(1,0,0) after rotation = " << v_rotated.transpose() << endl;
// 用常规向量乘法表示,则应该如下计算
cout << "should be equal to " << (q * Quaterniond(0, 1, 0, 0) * q.inverse()).coeffs().transpose() << endl;
return 0;
}
2.3.当前焦点坐标位置
补充知识!!!
视觉SLAM十四讲实践之坐标系之间的欧式变换

代码及注释如下:
#include <iostream>
#include <vector>
#include <algorithm>
#include <Eigen/Core>
#include <Eigen/Geometry>

using namespace std;
using namespace Eigen;

int main(int argc, char** argv) {
  Quaterniond q1(0.35, 0.2, 0.3, 0.1), q2(-0.5, 0.4, -0.1, 0.2);
  q1.normalize();//可以看到归一化后数字的精度和大小都会发生变化
  q2.normalize();
  Vector3d t1(0.3, 0.1, 0.1), t2(-0.1, 0.5, 0.3);//平移向量
  Vector3d p1(0.5, 0, 0.2);    // R1坐标系下点p1的坐标

  Isometry3d T1w(q1), T2w(q2);//    位姿的四元数表示和平移向量转化为欧式变换矩阵
  T1w.pretranslate(t1);    // 输出位姿矩阵信息
  T2w.pretranslate(t2);

    // Trw 下标从左往右读是r坐标系变换到w坐标系
    // Trw 下标从右往左读是w坐标系下的坐标变换到r坐标系下的坐标

    // T1w.inverse() * p1 把R1坐标系的坐标p1转化为世界坐标系下的坐标
    // T2w * T1w.inverse() * p1 世界坐标系下面的坐标p1转化为R2坐标系下的坐标p2

  Vector3d p2 = T2w * T1w.inverse() * p1;
  cout << endl << p2.transpose() << endl;
  return 0;
}
2.4. 可视化显示

需要注意的是:
// path to trajectory file
string trajectory_file = "/home/lmf37/桌面/slambook2/ch3/examples/trajectory.txt";
//这里需要修改一下路径,因为新建了build文件,可以用绝对路径替代,这样出错率降低
代码及注释如下:
#include <pangolin/pangolin.h>
#include <Eigen/Core>
#include <unistd.h>

// 本例演示了如何画出一个预先存储的轨迹

using namespace std;
using namespace Eigen;

// path to trajectory file
string trajectory_file = "/home/lmf37/桌面/slambook2/ch3/examples/trajectory.txt";

void DrawTrajectory(vector<Isometry3d, Eigen::aligned_allocator<Isometry3d>>);

int main(int argc, char **argv) {

  vector<Isometry3d, Eigen::aligned_allocator<Isometry3d>> poses;
  ifstream fin(trajectory_file);
  if (!fin) {
    cout << "cannot find trajectory file at " << trajectory_file << endl;
    return 1;
  }

  while (!fin.eof()) {
    double time, tx, ty, tz, qx, qy, qz, qw;
    fin >> time >> tx >> ty >> tz >> qx >> qy >> qz >> qw;
    Isometry3d Twr(Quaterniond(qw, qx, qy, qz));//欧式变换矩阵Isometry(虽然称为3d,实质上是4*4的矩阵)
    Twr.pretranslate(Vector3d(tx, ty, tz));///设置平移向量,理解是加入这个平移向量
    poses.push_back(Twr);//函数将一个新的元素加到vector的最后面,位置为当前最后一个元素的下一个元素 push_back() 在Vector最后添加一个元素
  }
  cout << "read total " << poses.size() << " pose entries" << endl;

  // draw trajectory in pangolin
  DrawTrajectory(poses);
  return 0;
}

/*******************************************************************************************/
void DrawTrajectory(vector<Isometry3d, Eigen::aligned_allocator<Isometry3d>> poses) {
  // create pangolin window and plot the trajectory
  pangolin::CreateWindowAndBind("Trajectory Viewer", 1024, 768);//创建一个名叫"Trajectory Viewer"的GUI窗口用于显示,窗口的大小是640x480像素。
  glEnable(GL_DEPTH_TEST);//启动深度测试,开启这个功能之后,窗口中只会绘制面朝相机的那一面像素。一般如果你使用的3D可视化,就要打开这个功能。
  glEnable(GL_BLEND);//打开颜色混合,把某一像素位置原来的颜色和将要画上去的颜色,通过某种方式混在一起,从而实现特殊的效果。这个有点儿类似你透过红色玻璃看绿色物体的效果。
  glBlendFunc(GL_SRC_ALPHA, GL_ONE_MINUS_SRC_ALPHA);//使用glEnable(GL_BLEND);之后,后面紧跟着这行代码,表示两种颜色以怎么样的方式进行混合。

//创建一个相机的观察视图,相当于是模拟一个真实的相机去观测虚拟的三维世界,最终在GUI中呈现的图像就是通过这个设置的相机内外参得到的
  pangolin::OpenGlRenderState s_cam(
    pangolin::ProjectionMatrix(1024, 768, 500, 500, 512, 389, 0.1, 1000),//相机内参:参数依次为相机的图像高度、宽度、4个内参以及最近和最远视距
    pangolin::ModelViewLookAt(0, -0.1, -1.8, 0, 0, 0, 0.0, -1.0, 0.0)//前三个参数依次为相机所在的位置,第四到第六个参数相机所看的视点位置(一般会设置在原点),最后是相机轴的方向
  //可以用自己的脑袋当做例子,前三个参数告诉你脑袋在哪里,然后再告诉你看的东西在哪里,最后告诉你的头顶朝着哪里
  );
/*进行显示设置。SetBounds函数前四个参数依次表示视图在视窗中的范围(下、上、左、右),最后一个参数是显示的长宽比。(0.0, 1.0, 0.0, 1.0)
第一个参数0.0表示显示的拍摄窗口的下边在整个GUI中最下面,第二个参数1.0表示上边在GUI的最上面,以此类推。如果在中间就用0.5表示
*/
  pangolin::View &d_cam = pangolin::CreateDisplay()
    .SetBounds(0.0, 1.0, 0.0, 1.0, -1024.0f / 768.0f)
    .SetHandler(new pangolin::Handler3D(s_cam));

//检测是否关闭OpenGL窗口
  while (pangolin::ShouldQuit() == false) {
    glClear(GL_COLOR_BUFFER_BIT | GL_DEPTH_BUFFER_BIT);//清空颜色和深度缓存,每次都会刷新显示,不至于前后帧的颜信息相互干扰。
    d_cam.Activate(s_cam);//激活显示并设置状态矩阵,以下代码到Finish是显示内容
    glClearColor(1.0f, 1.0f, 1.0f, 1.0f);
    glLineWidth(2);
    for (size_t i = 0; i < poses.size(); i++) {
      // 画每个位姿的三个坐标轴
      Vector3d Ow = poses[i].translation();
      Vector3d Xw = poses[i] * (0.1 * Vector3d(1, 0, 0));
      Vector3d Yw = poses[i] * (0.1 * Vector3d(0, 1, 0));
      Vector3d Zw = poses[i] * (0.1 * Vector3d(0, 0, 1));
      glBegin(GL_LINES);
      glColor3f(1.0, 0.0, 0.0);
      glVertex3d(Ow[0], Ow[1], Ow[2]);
      glVertex3d(Xw[0], Xw[1], Xw[2]);
      glColor3f(0.0, 1.0, 0.0);
      glVertex3d(Ow[0], Ow[1], Ow[2]);
      glVertex3d(Yw[0], Yw[1], Yw[2]);
      glColor3f(0.0, 0.0, 1.0);
      glVertex3d(Ow[0], Ow[1], Ow[2]);
      glVertex3d(Zw[0], Zw[1], Zw[2]);
      glEnd();//结束
    }
    // 画出连线
    for (size_t i = 0; i < poses.size(); i++) {
      glColor3f(0.0, 0.0, 0.0);
      glBegin(GL_LINES);//绘制直线
      auto p1 = poses[i], p2 = poses[i + 1];
      glVertex3d(p1.translation()[0], p1.translation()[1], p1.translation()[2]);
      glVertex3d(p2.translation()[0], p2.translation()[1], p2.translation()[2]);
      glEnd();
    }
    pangolin::FinishFrame();//执行后期渲染,事件处理和帧交换,进行最终的显示
    usleep(5000);   // sleep 5 ms
  }
}
在尝试读懂代码的同时,又顺便补充了一下OpenGL中glVertex*函数知识
glVertex2d
glVertex2f
glVertex3d
glVertex3f
glVertex3fv
and so on
/*
数字代表维度,也是参数列表的个数

字母表示参数的类型
s 表示 16位整数(OpenGL 中将这个类型定义为GLshort),
i 表示32位整数(OpenGL 中将这个类型定义为 GLint 和GLsizei ),
f 表示32 位浮点数(OpenGL 中将这个类型定义为GLfloat 和GLclampf),
d 表示 64 位浮点数(OpenGL 中将这个类型定义为GLdouble 和GLclampd )。
v 表示传递的几个参数将使用指针的方式。
*/

//这些函数除了参数的类型和个数不同以外,功能是相同的。例如,以下五个代码段的功能是等效的:
glVertex2i ( 1, 3 );
glVertex2f ( 1.0f, 3.0f );
glVertex3f ( 1.0f, 3.0f, 0.0f );
glVertex4f ( 1.0f, 3.0f, 0.0f, 1.0f );
GLfloat VertexArr3[]  = {1.0f, 3.0f, 0.0f}; glVertex3fv ( VertexArr3 );
2.5. 显示相机的位姿
代码及注释如下:(这部分代码,还未完全啃透,留一个坑待填!!!)
#include <iostream>
#include <iomanip>
//io代表输入输出manipulator代表操纵器缩写,主要是对cin,cout之类的一些操纵运算子,eg,setfill,setw,setbase,setprecision等等
//dec置基数为10相当于"%d",hex"%x"16,oct"%o"8,setfill("c")设填充字符为c
using namespace std;
#include <Eigen/Core>
#include <Eigen/Geometry>
using namespace Eigen;
#include <pangolin/pangolin.h>
struct RotationMatrix {
Matrix3d matrix = Matrix3d::Identity();
};
//你想通过<< 这个操作符直接输出你所创建的类的实例(对象),
// 而<< 操作符属于iostream库,这个库无法识别你自己定义的类,因而需要对操作符<< 载重。
//重载<< 函数返回类型是一个流的引用, 第一个参数是流,第二个参数是以引用传递的方式的一个类的实例(并且只能对这个参数读操作)
ostream &operator<<(ostream &out, const RotationMatrix &r) {
out.setf(ios::fixed);
//按浮点数型格式输出
Matrix3d matrix = r.matrix;
out << '=';
out << "[" << setprecision(2) << matrix(0, 0) << "," << matrix(0, 1) << "," << matrix(0, 2) << "],"
<< "[" << matrix(1, 0) << "," << matrix(1, 1) << "," << matrix(1, 2) << "],"
<< "[" << matrix(2, 0) << "," << matrix(2, 1) << "," << matrix(2, 2) << "]";
return out;
}
istream &operator>>(istream &in, RotationMatrix &r) {
return in;
}
struct TranslationVector {
Vector3d trans = Vector3d(0, 0, 0);
};
ostream &operator<<(ostream &out, const TranslationVector &t) {
out << "=[" << t.trans(0) << ',' << t.trans(1) << ',' << t.trans(2) << "]";
return out;
}
istream &operator>>(istream &in, TranslationVector &t) {
return in;
}
struct QuaternionDraw {
Quaterniond q;
};
ostream &operator<<(ostream &out, const QuaternionDraw quat) {
auto c = quat.q.coeffs();
out << "=[" << c[0] << "," << c[1] << "," << c[2] << "," << c[3] << "]";
return out;
}
istream &operator>>(istream &in, const QuaternionDraw quat) {
return in;
}
int main(int argc, char **argv) {
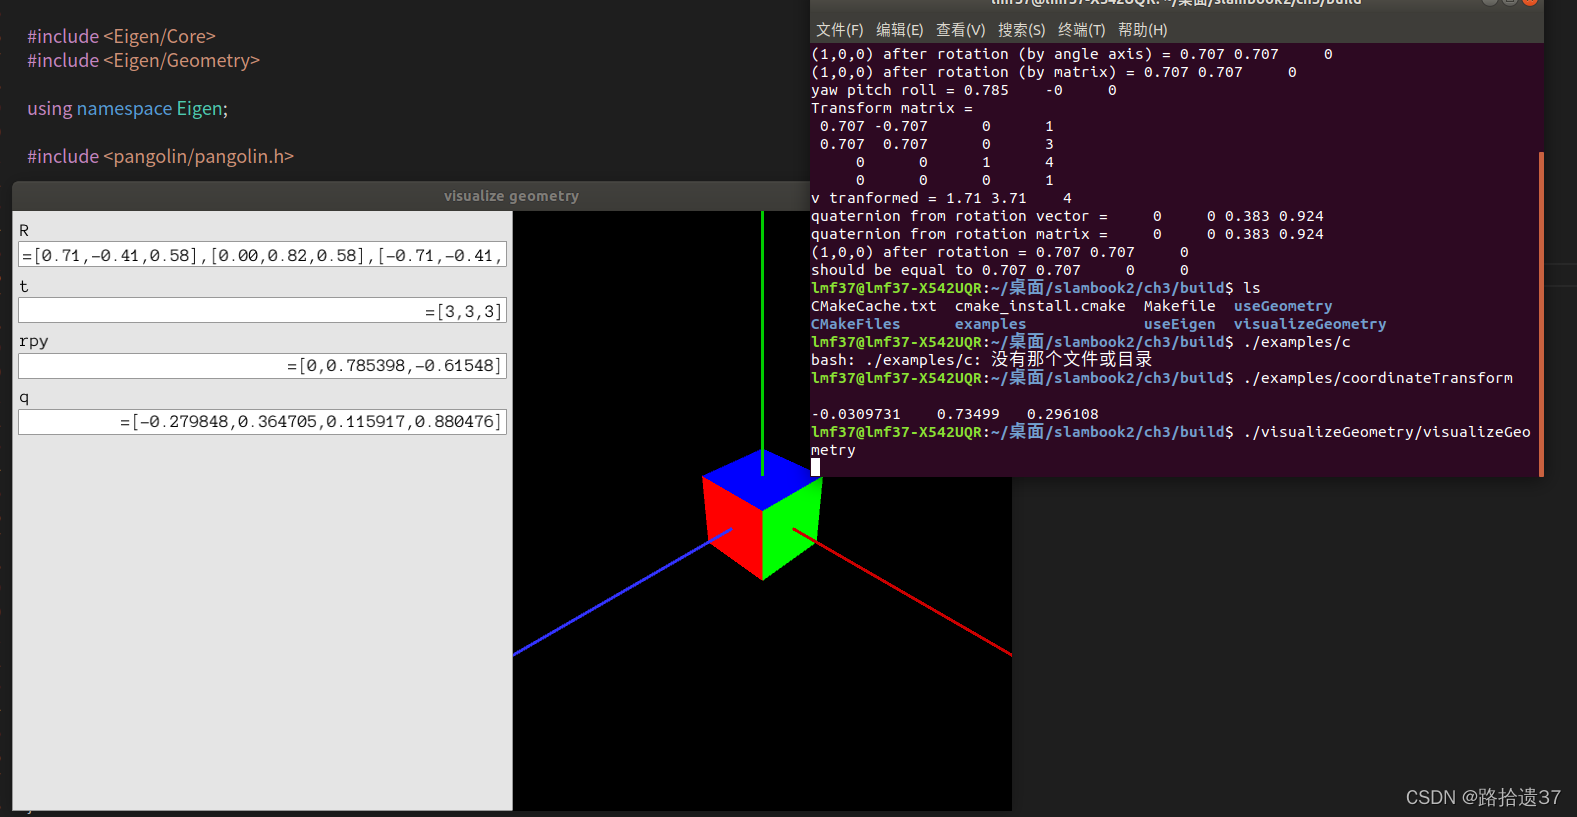
pangolin::CreateWindowAndBind("visualize geometry", 1000, 600);
//启用了之后,OpenGL在绘制的时候就会检查,当前像素前面是否有别的像素,如果别的像素挡道了它,
//那它就不会绘制,也就是说,OpenGL就只绘制最前面的一层
glEnable(GL_DEPTH_TEST);//定义投影和初始化模型视角矩阵
pangolin::OpenGlRenderState s_cam(
pangolin::ProjectionMatrix(1000, 600, 420, 420, 500, 300, 0.1, 1000),
pangolin::ModelViewLookAt(3, 3, 3, 0, 0, 0, pangolin::AxisY)
//对应的是gluLookAt,摄像机位置,参考点
);
const int UI_WIDTH = 500;
pangolin::View &d_cam = pangolin::CreateDisplay().
SetBounds(0.0, 1.0, pangolin::Attach::Pix(UI_WIDTH), 1.0, -1000.0f / 600.0f).
SetHandler(new pangolin::Handler3D(s_cam));
// ui
pangolin::Var<RotationMatrix> rotation_matrix("ui.R", RotationMatrix());
pangolin::Var<TranslationVector> translation_vector("ui.t", TranslationVector());
pangolin::Var<TranslationVector> euler_angles("ui.rpy", TranslationVector());
pangolin::Var<QuaternionDraw> quaternion("ui.q", QuaternionDraw());
pangolin::CreatePanel("ui").SetBounds(0.0, 1.0, 0.0, pangolin::Attach::Pix(UI_WIDTH));
while (!pangolin::ShouldQuit()) {
glClear(GL_COLOR_BUFFER_BIT | GL_DEPTH_BUFFER_BIT);
d_cam.Activate(s_cam);
pangolin::OpenGlMatrix matrix = s_cam.GetModelViewMatrix();
Matrix<double, 4, 4> m = matrix;
RotationMatrix R;
for (int i = 0; i < 3; i++)
for (int j = 0; j < 3; j++)
R.matrix(i, j) = m(j, i);
rotation_matrix = R;
TranslationVector t;
t.trans = Vector3d(m(0, 3), m(1, 3), m(2, 3));
t.trans = -R.matrix * t.trans;
translation_vector = t;
TranslationVector euler;
euler.trans = R.matrix.eulerAngles(2, 1, 0);
euler_angles = euler;
QuaternionDraw quat;
quat.q = Quaterniond(R.matrix);
quaternion = quat;
glColor3f(1.0, 1.0, 1.0);
pangolin::glDrawColouredCube();
// draw the original axis
glLineWidth(3);
glColor3f(0.8f, 0.f, 0.f);
glBegin(GL_LINES);
glVertex3f(0, 0, 0);
glVertex3f(10, 0, 0);
glColor3f(0.f, 0.8f, 0.f);
glVertex3f(0, 0, 0);
glVertex3f(0, 10, 0);
glColor3f(0.2f, 0.2f, 1.f);
glVertex3f(0, 0, 0);
glVertex3f(0, 0, 10);
glEnd();
pangolin::FinishFrame();
}
}
2.6 补充Pangolin库使用知识
Pangolin是对OpenGL进行封装的轻量级的OpenGL输入/输出和视频显示的库。可以用于3D视觉和3D导航的视觉图,可以输入各种类型的视频、并且可以保留视频和输入数据用于debug。
使用教程参考:
3D绘图程序库Pangolin安装以及快速入门,使用教程介绍详细
学习参考资料:
【1】Pangolin:
【2】Pangolin安装问题:
【3】examples
【4】Pangolin的使用:
【5】特性:
2.7章节总结
这一章内容讲的就是如何描述物体的刚体运动,也不严谨的描述为:如何描述相机在三维空间中的运动
首先提出了:运动由旋转+平移组成
拆开来看:
首先描述旋转:就提出了 旋转矩阵、旋转向量、欧拉角、四元数。这些方法都可以用来描述旋转
(所以,这四个表示方法之间也是可以相互转化的,尤其是编程下的相互转化,要掌握)
平移比较好描述,一个平移向量
那么,我们如何描述运动?
对一个坐标,先将其旋转(四种方法),再加上平移向量,就得到了其运动后的坐标。
但是,由于这里面要加上平移向量,所以就有一个问题,这个运动变化描述出来不是线性的
所以我们用一些数学技巧(齐次坐标),使得可以用一个矩阵来将旋转+平移包含在一起,这就是变换矩阵。
到此,本讲内容就结束了,我们用一个变换矩阵简洁的解决了描述物体运动的问题。
此部分需要的数学及理论知识转此学习
")


评论(0)
您还未登录,请登录后发表或查看评论