

【导读】
在这一系列的V-REP自学笔记中,我们定了一个小目标,完成一个Demo。使用官方提供的KUKA公司的YouBot机器人模型来实验机器人的感知和控制过程,控制机器人从A点抓取物品,然后移动到B点将物品放置在B点的工作台上,这其中涉及到V-REP环境中的机器人感知和控制过程。没有看过前期学习笔记的读者,可以在文末找到往期文章地址。
V-REP自学笔记是一个系列教程,发布在专栏:AI与机器人。
项目涉及到的代码都将发布到Github上,欢迎大家Mark:
在上一期的自学笔记中,我们讲解了通过Lua脚本来控制YouBot机器人的各个关节运动。在本期笔记中,我们将学习通过键盘来控制YouBot机器人的移动,建立键盘这个交互接口有助于后续的其他功能实现和算法的调试过程,话不多说,先放一个最终的效果视频:
【V-REP自学笔记(四)】键盘控制YouBot机器人 - 知乎 (zhihu.com)
1. 认识YouBot的底盘
在上一篇文章中,我们简单介绍了YouBot机器人底盘上的4个轮子,这里再简单回顾一下。
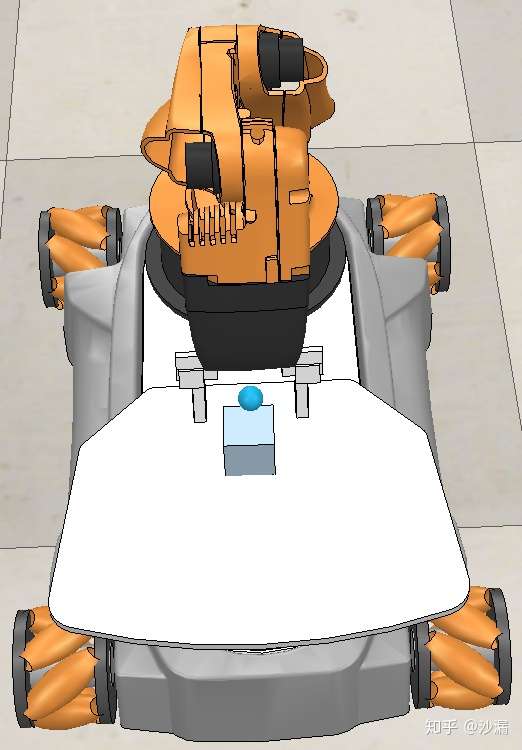
我们仔细观察一下就会发现,YouBot底盘上的四个轮子是不一样的,不是普通的轮子,这种轮子叫麦克纳姆轮,简称麦轮。麦轮与普通的固定轮不同,除了提供前后方向的移动还能提供左右方向的切向移动。
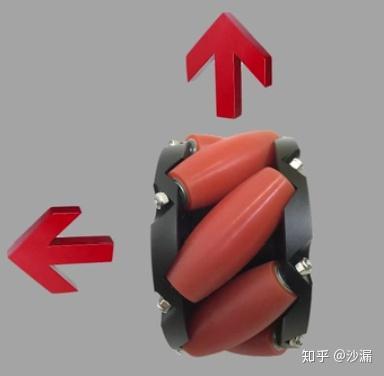
麦克纳姆轮分为A轮和B轮,上图所示为A轮,B轮与A轮的横向运动方向相反。当轮子向前运动时,A轮提供向前和向左的运动速度,B轮提供向前和向右的运动速度,因此,YouBot机器人底盘上的4个麦克纳姆轮分别为A-B-A-B的配置。

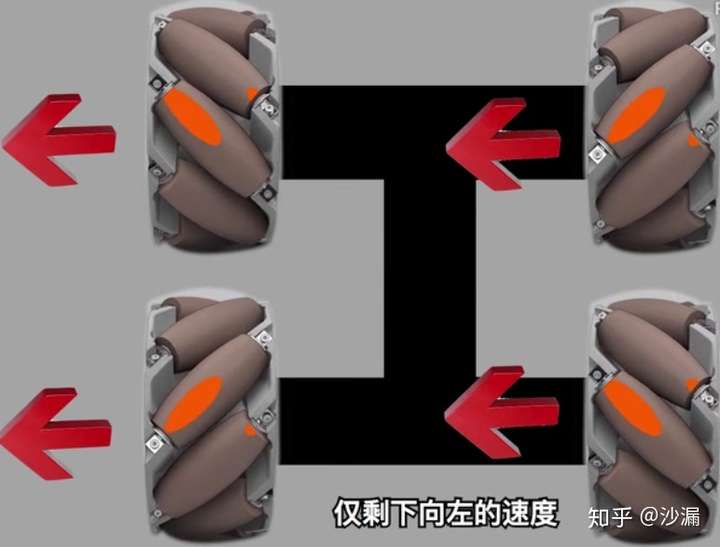
那么,当所有轮子都向前运动,则整个底盘的运动方向是向前运动的。
如果A轮正转,B轮反转,则前后方向的运动速度抵消,只剩下向左的运动速度。
我们通过控制各个A轮和B轮的运动方向就可以控制YouBot机器人的前进、后退、左移、右移、左转、右转和斜向45度移动等动作,这里不再一一例举各个轮子的旋转方向与底盘移动方向的关系,大家可以看一下这个视频。
【V-REP自学笔记(四)】键盘控制YouBot机器人 - 知乎 (zhihu.com)
视频出处:https://www.bilibili.com/video/av17229132/
2. 键盘控制YouBot移动
在上一期的自学笔记中我们已经介绍了在V-REP中使用Lua脚本来控制YouBot机器人的简单运动,这次我们将对底盘的运动方向做进一步的介绍,并实现一个键盘控制下的YouBot机器人移动控制。整个代码不是很多,主要包括一个键盘事件检测函数和一个轮子运动方向的控制函数。完整的代码已经推送到Github仓库,欢迎大家下载使用:https://github.com/chauby/V-REP-YouBot-Demo.git
-- Initialization for YouBot
function sysCall_init()
    -- Get YouBot Handle
    you_bot = sim.getObjectHandle('youBot')

    -- Prepare initial values for four wheels
    wheel_joints = {-1,-1,-1,-1} -- front left, rear left, rear right, front right
    wheel_joints[1] = sim.getObjectHandle('rollingJoint_fl')
    wheel_joints[2] = sim.getObjectHandle('rollingJoint_rl')
    wheel_joints[3] = sim.getObjectHandle('rollingJoint_rr')
    wheel_joints[4] = sim.getObjectHandle('rollingJoint_fr')

    -- Prepare initial values for five arm joints
    arm_joints = {-1,-1,-1,-1,-1} -- set default values
    for i=0,4,1 do
        arm_joints[i+1] = sim.getObjectHandle('youBotArmJoint'..i)
    end

    -- Desired joint positions for initialization
    desired_joint_angles = {180*math.pi/180, 30.91*math.pi/180, 52.42*math.pi/180, 72.68*math.pi/180, 0}

    -- Initialization all arm joints
    for i = 1,5,1 do
        sim.setJointPosition(arm_joints[i], desired_joint_angles[i])
    end

    -- Set the maximum joint velocities
    max_joint_velocity = 50*math.pi/180

    -- user customized variables, default as global variables
    move_direction = 1 -- 1:forward, 2:backward, 3:left, 4:right
    wheel_velocity = 0 -- Initialized velocity with zero value
end


function sysCall_cleanup()

end

function getKeyboardStatus()
    message,data,data2=simGetSimulatorMessage()
    if (message==sim_message_keypress) then
        if (data[1]==2007) then -- up key
            print("up")
            move_direction = 1
        elseif (data[1]==2008) then -- down key
            print("down")
            move_direction = 2
        elseif (data[1]==2009) then -- left key
            print("left")
            move_direction = 3
        elseif (data[1]==2010) then -- right key
            print("right")
            move_direction = 4
        elseif (data[1]==string.byte('q')) then -- q key
            print("q")
            move_direction = 5
        elseif (data[1]==string.byte('w')) then -- w key
            print("w")
            move_direction = 6
        end

        if (data[1]==string.byte(' ')) then -- space key
            wheel_velocity = 0
            print("stop")
        else
            wheel_velocity = 1
        end
    end
end

function setYouBotMovementDirection()
    -- Check movement direction
    if (move_direction == 1) then -- go forward
        lf_dire = -1
        rf_dire = -1
        lr_dire = -1
        rr_dire = -1
    elseif (move_direction == 2) then -- go backward
        lf_dire = 1
        rf_dire = 1
        lr_dire = 1
        rr_dire = 1
    elseif (move_direction == 3) then -- go left
        lf_dire = 1
        rf_dire = -1
        lr_dire = -1
        rr_dire = 1
    elseif (move_direction == 4) then -- go right
        lf_dire = -1
        rf_dire = 1
        lr_dire = 1
        rr_dire = -1
    elseif (move_direction == 5) then -- turn left
        lf_dire = 1
        rf_dire = -1
        lr_dire = 1
        rr_dire = -1
    elseif (move_direction == 6) then -- turn right
        lf_dire = -1
        rf_dire = 1
        lr_dire = -1
        rr_dire = 1
    end
end

-- Control joints of YouBot
function sysCall_actuation()
    -- Check keyboard press events
    getKeyboardStatus()
    setYouBotMovementDirection()

    -- Keep the arm status
    for i = 1,5,1 do
        sim.setJointPosition(arm_joints[i], desired_joint_angles[i])
    end

    -- Apply the desired wheel velocities
    sim.setJointTargetVelocity(wheel_joints[1], lf_dire*wheel_velocity)
    sim.setJointTargetVelocity(wheel_joints[2], lr_dire*wheel_velocity)
    sim.setJointTargetVelocity(wheel_joints[3], rr_dire*wheel_velocity)
    sim.setJointTargetVelocity(wheel_joints[4], rf_dire*wheel_velocity)
end
在本次的笔记中,我们自定义了一个键盘事件检测函数,用来检测键盘上哪些按键被按下了:
function getKeyboardStatus()
    message,data,data2=simGetSimulatorMessage()
    if (message==sim_message_keypress) then
        if (data[1]==2007) then -- up key
            print("up")
            move_direction = 1
        elseif (data[1]==2008) then -- down key
            print("down")
            move_direction = 2
        elseif (data[1]==2009) then -- left key
            print("left")
            move_direction = 3
        elseif (data[1]==2010) then -- right key
            print("right")
            move_direction = 4
        elseif (data[1]==string.byte('q')) then -- q key
            print("q")
            move_direction = 5
        elseif (data[1]==string.byte('w')) then -- w key
            print("w")
            move_direction = 6
        end

        if (data[1]==string.byte(' ')) then -- space key
            wheel_velocity = 0
            print("stop")
        else
            wheel_velocity = 1
        end
    end
end
检测的方式是调用V-REP官方提供的API接口simGetSimulatorMessage()这个函数来获取键盘的按下情况,并通过比对键盘码(例如2007表示方向上键,2009表示方向左键)来设定YouBot的运动方向。
这里我们提供了前进、后退、左移、右移、左旋、右旋和停止几个功能。在获得了键盘的信息以后,我们需要设定YouBot底盘上每个轮子的运动方向来实现上述的几个功能,这里自定义的函数如下:
function setYouBotMovementDirection()
    -- Check movement direction
    if (move_direction == 1) then -- go forward
        lf_dire = -1
        rf_dire = -1
        lr_dire = -1
        rr_dire = -1
    elseif (move_direction == 2) then -- go backward
        lf_dire = 1
        rf_dire = 1
        lr_dire = 1
        rr_dire = 1
    elseif (move_direction == 3) then -- go left
        lf_dire = 1
        rf_dire = -1
        lr_dire = -1
        rr_dire = 1
    elseif (move_direction == 4) then -- go right
        lf_dire = -1
        rf_dire = 1
        lr_dire = 1
        rr_dire = -1
    elseif (move_direction == 5) then -- turn left
        lf_dire = 1
        rf_dire = -1
        lr_dire = 1
        rr_dire = -1
    elseif (move_direction == 6) then -- turn right
        lf_dire = -1
        rf_dire = 1
        lr_dire = -1
        rr_dire = 1
    end
end
最后,就是在sysCall_actuation()这个函数接口里面调用我们刚刚自定义的2个函数来控制每个轮子的运动:
function sysCall_actuation()
    -- Check keyboard press events
    getKeyboardStatus()
    setYouBotMovementDirection()

    -- Keep the arm status
    for i = 1,5,1 do
        sim.setJointPosition(arm_joints[i], desired_joint_angles[i])
    end

    -- Apply the desired wheel velocities
    sim.setJointTargetVelocity(wheel_joints[1], lf_dire*wheel_velocity)
    sim.setJointTargetVelocity(wheel_joints[2], lr_dire*wheel_velocity)
    sim.setJointTargetVelocity(wheel_joints[3], rr_dire*wheel_velocity)
    sim.setJointTargetVelocity(wheel_joints[4], rf_dire*wheel_velocity)
end
到此为止,在V-REP软件中使用键盘来控制YouBot机器人的移动过程已经介绍完了,从下一篇笔记开始,我们将学习构建底盘的运动学模型,从而对机器人的移动过程做精确的路径规划。
【后记】
本文是自学笔记的第4篇,介绍了使用键盘来控制YouBot机器人的移动。本项目涉及到的代码都将发布在Github上,欢迎大家star和下载使用,项目地址:
作者知识有限,有不正确的地方还望读者能够指出来,大家共同学习和进步,不胜感激!想要获取更多文章,欢迎扫描下方二维码关注公众号:博士的沙漏。


评论(0)
您还未登录,请登录后发表或查看评论