

介绍
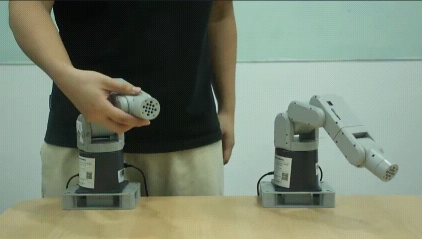
今天,我将向大家展示一个我独立设计并实现的机械臂模型。这个模型的核心功能是实现实时的手势追踪——只需用手轻轻拖拽,机械臂就能立即跟随你的动作进行移动。
我之所以想要创造这样一个模型,是因为在一些危险环境中,我们可以用机械臂来代替人工进行作业,从而避免人员的生命安全受到威胁。
你可能会问,为什么不直接使用远程的键盘控制、手柄控制或者APP控制,而要选择手动拖拽的方式呢?我觉得只有手动操作,才能最大程度上满足我们对动作精准度的需求。因此,我决定开始尝试制作这个模型,并初步完成了整个demo。
我希望,通过这个demo,我能向大家展示出机械臂的无限可能性,同时也希望能激发出大家对未来科技的无限憧憬。
机械臂设备
一款桌面型的仿工业结构的机械臂。
Project
介绍完基础的设备,我们就开始介绍我时如何制作这个demo过程的记录。
使用的环境
操作系统:windows11
编程语言:python3.9+
python lib:pymycobot,time
Code:
<pre class="line-numbers language-python" style="box-sizing: border-box; padding: 1em 1em 1em 3.8em; -webkit-tap-highlight-color: transparent; text-wrap: wrap; overflow-wrap: normal; outline: 0px; border: 0px; background-color: rgb(245, 242, 240); vertical-align: baseline; text-shadow: rgb(255, 255, 255) 0px 1px; font-family: Consolas, Monaco, " andale="" mono",="" "ubuntu="" monospace;="" word-break:="" normal;="" line-height:="" 1.5;="" tab-size:="" 4;="" hyphens:="" none;="" overflow:="" auto;="" position:="" relative;="" counter-reset:="" linenumber="" 0;"="">#Main methods used#Create objects to communicate with the robotic arm.MyCobot(serial,baud)# angles control robot,send_angles([list_angles],speed)# coords control robotsend_coords([list_coords],speed,mode)Example:import timefrom pymycobot.mycobot import MyCobot# create a objectmc = MyCobot("com7",115200)# angles controlmc.send_angles([0,0,0,0,0,0],100)time.sleep(1)mc.send_angles([90,90,90,90,90,90],100)time.sleep(1)
简单介绍了下如何使用python来控制mechArm,是不是很容易呢。
分析问题
开始项目之前要搭建框架,了解我们具体需要解决什么问题才能够实现。对此我做了一个项目的流程图。下面我将手动施教的机械臂简称为R1,跟随运动的机械臂简称为R2。
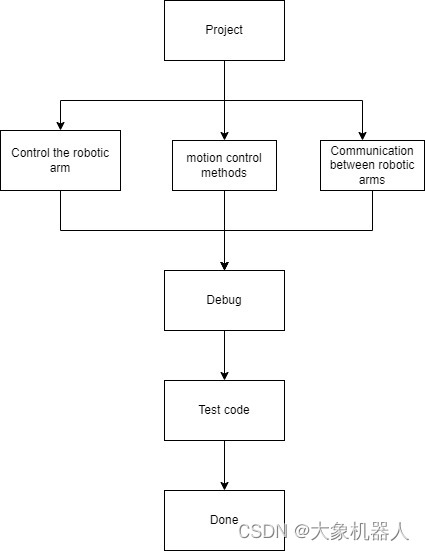
Control robotic arm:上边已经提到了如何控制机械臂,使用pymycobot库提供的方法就可以实现了。
Motion Control methods:R1机械臂可以用手拖动,时时刻刻返回当前机械臂的角度信息,R2机械臂接收R1的机械臂角度信息进行控制。
Communication between robotic arms:整个项目中这一步骤是比较重要的一步。建立好之后,机械臂能够发送信息就能够很轻易的实现了。
接下来主要讲解Motion Control methods和communication between robotic arms。
Motion Control methods
获取实时角度信息
pymycobot提供了”get_angles()”方法可以过去当前机械臂的角度信息。
<pre class="line-numbers language-python" style="box-sizing: border-box; padding: 1em 1em 1em 3.8em; -webkit-tap-highlight-color: transparent; text-wrap: wrap; overflow-wrap: normal; outline: 0px; border: 0px; background-color: rgb(245, 242, 240); vertical-align: baseline; text-shadow: rgb(255, 255, 255) 0px 1px; font-family: Consolas, Monaco, " andale="" mono",="" "ubuntu="" monospace;="" word-break:="" normal;="" line-height:="" 1.5;="" tab-size:="" 4;="" hyphens:="" none;="" overflow:="" auto;="" position:="" relative;="" counter-reset:="" linenumber="" 0;"=""># Can obtain the current angle information of the robotic arm in real timeget_angles()# exampleprint("real-time angles:",mc.get_anlges())result: real-time angles:[0,0,0,0,0,0]# Continuously obtain the current anglewhile True: angels = mc.get_angles() print(angles) time.sleep(0.1) #Go to the next step every 0.1s
机械臂的刷新模式设置
机械臂的刷新模式:主要分为两种插补模式和非插补模式,是指在运动轨迹规划中,控制机械臂末端执行器的移动方式。如果没有设置任何模式,机械臂可能无法正确执行预期的运动,并且可能导致以下后果:
运动不平滑
运动不准确
运动不连续
插补模式:插补模式可以实现平滑连续的轨迹规划,确保机械臂末端执行器的位置和姿态在运动过程中平滑过渡。
非插补模式:非插补模式是指机械臂在运动过程中只关注特定的目标点,而不进行插值计算。在非插补模式下,机械臂的位置和姿态会在关键点之间直接跳跃,而不会经过平滑的过渡。
在进行多个机械臂同时使用插补模式进行运动时,可能会出现等待或排队的情况,所以我们选择使用非插补模式。
<pre class="line-numbers language-python" style="box-sizing: border-box; padding: 1em 1em 1em 3.8em; -webkit-tap-highlight-color: transparent; text-wrap: wrap; overflow-wrap: normal; outline: 0px; border: 0px; background-color: rgb(245, 242, 240); vertical-align: baseline; text-shadow: rgb(255, 255, 255) 0px 1px; font-family: Consolas, Monaco, " andale="" mono",="" "ubuntu="" monospace;="" word-break:="" normal;="" line-height:="" 1.5;="" tab-size:="" 4;="" hyphens:="" none;="" overflow:="" auto;="" position:="" relative;="" counter-reset:="" linenumber="" 0;"="">#Set refresh modeset_fresh_mode(1/0) 1:no interpolation0:interpolation mc.set_fresh_mode(1)
我们将前面的整合在一起的代码如下
Code:
<pre class="line-numbers language-python" style="box-sizing: border-box; padding: 1em 1em 1em 3.8em; -webkit-tap-highlight-color: transparent; text-wrap: wrap; overflow-wrap: normal; outline: 0px; border: 0px; background-color: rgb(245, 242, 240); vertical-align: baseline; text-shadow: rgb(255, 255, 255) 0px 1px; font-family: Consolas, Monaco, " andale="" mono",="" "ubuntu="" monospace;="" word-break:="" normal;="" line-height:="" 1.5;="" tab-size:="" 4;="" hyphens:="" none;="" overflow:="" auto;="" position:="" relative;="" counter-reset:="" linenumber="" 0;"="">import timefrom pymycobot.mycobot import MyCobot mc = MyCobot("COM7", 115200) #release armmb = MyCobot("COM11", 115200) #move armmb.set_fresh_mode(1) #no interpolationtime.sleep(1)mc.release_all_servos() #release robottime.sleep(1)speed = 100while True: angles = mc.get_angles() #get release arm angles mb.send_angles(angles, speed) #send angles to move arm time.sleep(0.1)
Communication between robotic arms:
我们的方案是两台机械臂接入同一个PC,用串口连接的方式.
<pre class="line-numbers language-python" style="box-sizing: border-box; padding: 1em 1em 1em 3.8em; -webkit-tap-highlight-color: transparent; text-wrap: wrap; overflow-wrap: normal; outline: 0px; border: 0px; background-color: rgb(245, 242, 240); vertical-align: baseline; text-shadow: rgb(255, 255, 255) 0px 1px; font-family: Consolas, Monaco, " andale="" mono",="" "ubuntu="" monospace;="" word-break:="" normal;="" line-height:="" 1.5;="" tab-size:="" 4;="" hyphens:="" none;="" overflow:="" auto;="" position:="" relative;="" counter-reset:="" linenumber="" 0;"=""># build connectionfrom pymycobot.mycobot import MyCobot mc = MyCobot("COM7", 115200) mb = MyCobot("COM11", 115200)
用最基础的usb数据线进行连接,我们电脑上就有两个机械臂的串口号,可以对他们分别发送指令任务。
让我们一起来看看效果如何
总结
根据内容可以看出来虽然说是能够做到百分之七八十的同步。也会因为一些其他的因素所影响 ,造成了不小的延迟。造成延迟的原因可能有几个方面,比如说数据处理和传输的速度,机械臂的反应速度,软件的优化,硬件的性能等等,这些都是可能 产生延迟的因素。
除此之外,还有一个很大的局限性就是,它们的通信通过串口进行连接的,如果距离稍微远一点的话就没办法在用这种方法去使用,实用性不强,后期我会尝试使用蓝牙,WiFi等无限连接的方式来尝试控制。
本次记录就更新到这里,如果你有更好的想法,无论是优化的功能或者说是其他的建议欢迎在下方留言。


评论(0)
您还未登录,请登录后发表或查看评论