

前言
假如说你有一台机械臂的话,你会用它来干什么呢?简单的控制机械臂动一动;让它重复执行某个轨迹;还是让它能够在工业上代替人类去工作。在随着时代的进步,机器人频繁的出现在我们的周围,它们代替我们从事危险的工作,服务人类等。今天我们一起来看一下,机械臂是如何在一个放工业场景中进行工作的。
介绍
接下来我们简单了解一下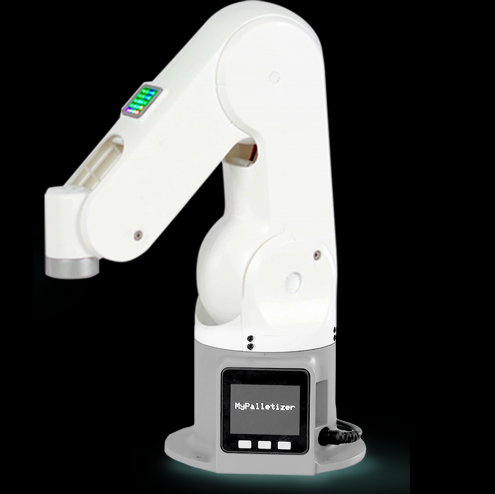

我们先来看个视频了解套装是如何跟这三款机械臂运行的。
内容
视频地址:https://youtu.be/9J2reiPYNxg
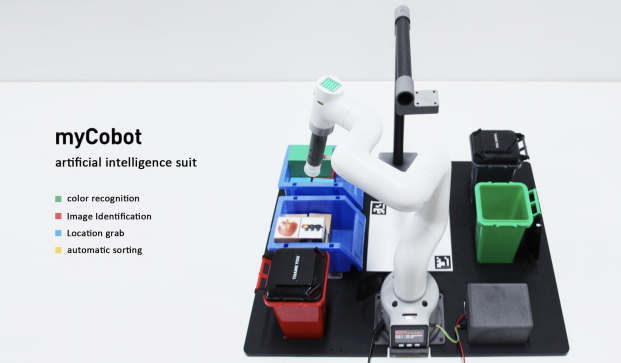
视频内容展现了,颜色识别和智能分拣功能,还有图像识别和智能分拣功能。
我们简单介绍一下 aikit 是如何实现的。(以颜色识别和智能分拣功能为例)
该人工智能项目主要运用到了两个模块
●视觉处理模块
●计算模块(处理eye to hand的之间的换算)
视觉处理模块:
OpenCV (Open Source Computer Vision) 是一个开源的计算机视觉库,用于开发计算机视觉应用程序。OpenCV 包含了大量用于图像处理、视频分析、基于深度学习的目标检测和识别等功能的函数和算法。

我们使用了OpenCV来对图像进行处理。从摄像头得到的视频进行处理,从而获取视频中的信息例如颜色,图像,视频中的平面坐标(x,y)等。将获取到的信息传递给处理器进行下一步的处理。
下面是处理图像的部分代码(颜色识别)
<pre class="line-numbers language-python" style="box-sizing: border-box; padding: 1em 1em 1em 3.8em; -webkit-tap-highlight-color: transparent; text-wrap: wrap; overflow-wrap: normal; outline: 0px; border: 0px; background-color: rgb(245, 242, 240); vertical-align: baseline; text-shadow: rgb(255, 255, 255) 0px 1px; font-family: Consolas, Monaco, " andale="" mono",="" "ubuntu="" monospace;="" word-break:="" normal;="" line-height:="" 1.5;="" tab-size:="" 4;="" hyphens:="" none;="" overflow:="" auto;="" position:="" relative;="" counter-reset:="" linenumber="" 0;"=""> while cv2.waitKey(1) < 0: # read camera _, frame = cap.read() # deal img frame = detect.transform_frame(frame) if _init_ > 0: _init_ -= 1 continue # calculate the parameters of camera clipping if init_num < 20: if detect.get_calculate_params(frame) is None: cv2.imshow("figure", frame) continue else: x1, x2, y1, y2 = detect.get_calculate_params(frame) detect.draw_marker(frame, x1, y1) detect.draw_marker(frame, x2, y2) detect.sum_x1 += x1 detect.sum_x2 += x2 detect.sum_y1 += y1 detect.sum_y2 += y2 init_num += 1 continue elif init_num == 20: detect.set_cut_params( (detect.sum_x1)/20.0, (detect.sum_y1)/20.0, (detect.sum_x2)/20.0, (detect.sum_y2)/20.0, ) detect.sum_x1 = detect.sum_x2 = detect.sum_y1 = detect.sum_y2 = 0 init_num += 1 continue # calculate params of the coords between cube and mycobot if nparams < 10: if detect.get_calculate_params(frame) is None: cv2.imshow("figure", frame) continue else: x1, x2, y1, y2 = detect.get_calculate_params(frame) detect.draw_marker(frame, x1, y1) detect.draw_marker(frame, x2, y2) detect.sum_x1 += x1 detect.sum_x2 += x2 detect.sum_y1 += y1 detect.sum_y2 += y2 nparams += 1 continue elif nparams == 10: nparams += 1 # calculate and set params of calculating real coord between cube and mycobot detect.set_params( (detect.sum_x1+detect.sum_x2)/20.0, (detect.sum_y1+detect.sum_y2)/20.0, abs(detect.sum_x1-detect.sum_x2)/10.0 + abs(detect.sum_y1-detect.sum_y2)/10.0 ) print ("ok") continue # get detect result detect_result = detect.color_detect(frame) if detect_result is None: cv2.imshow("figure", frame) continue else: x, y = detect_result # calculate real coord between cube and mycobot real_x, real_y = detect.get_position(x, y) if num == 20: detect.pub_marker(real_sx/20.0/1000.0, real_sy/20.0/1000.0) detect.decide_move(real_sx/20.0, real_sy/20.0, detect.color) num = real_sx = real_sy = 0 else: num += 1 real_sy += real_y real_sx += real_x
我们的项目是开源的可以在GitHub上找到
区别
在比较了视频和内容还有程序的代码,这三款机械臂的框架是一样的,只需要在数据上稍微作以修改就能够运行成功。
比较这三款机械臂有什么不同,大致有两点。
其一本质上就是来比较四轴和六轴的机械臂在实际的运用中有什么不同点。
我们来看一下四轴机械臂和六轴机械臂之间粗略的对比
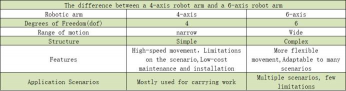
从视频中可以看出,不论是四轴机械臂还是六轴机械臂在人工智能套装所工作的范围都是足够的。
我们简单总结一下,在场景固定的情况下,我们在考虑如何选择机械臂的时候可以优先考虑机械臂的工作范围。在符合工作范围的机械臂的情况下,高效和稳定将是必要的条件。假如说现在有一个工业场景类似于我们的人工智能套装的话,四轴机械臂将会是优先选择。当然六轴机械臂可以在更大的空间范围内操作,并且可以实现更复杂的运动。它们可以在空间内进行回转运动,而四轴机械臂则无法做到这一点。
因此,六轴机械臂通常更适合用于需要精确操作、复杂运动的工业应用。
其二两款都是六轴机械臂,他们最主要的不同是结构的不同。
这里是这两款机械臂的参数规格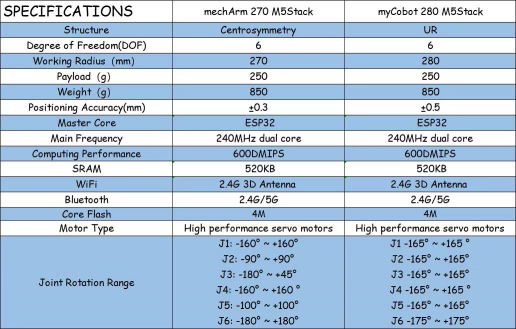
这两者的结构不同导致了它们运动的范围不一样。以这款机械臂为例,中心对称结构的机械臂是由三对相对的关节组成的,每对关节的运动方向相反。这种结构的机械臂具有较好的平衡性,能够抵消关节间的力矩,使机械臂保持稳定。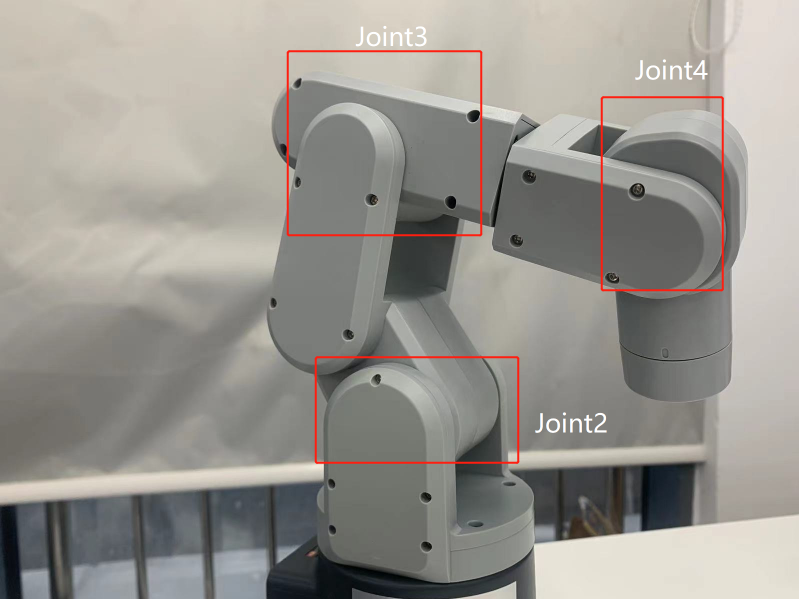 在视频中展示,在运行中也是比较稳定的。
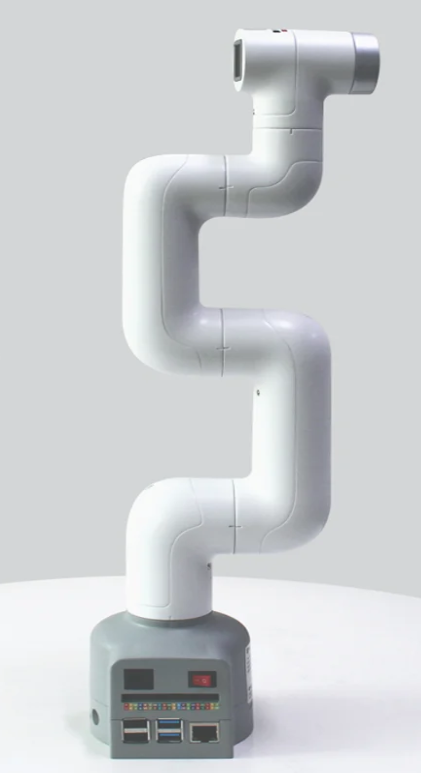
UR结构的机械臂更加灵活,能够实现更大范围的运动,适用于较大的应用场合。myCobot更重要的一点它是协作型机械臂,它具有较好的人机交互能力,能够与人类协作进行工作。六轴协作型机械臂通常用于生产线上的物流和装配工作,以及医疗、研究和教育等领域。
以上就是本篇文章的全部内容了,未来,机械臂技术将继续发展,为人类生产、工作、生活带来更多的便利。如果你喜欢这篇文章请给我们留言点赞!


评论(0)
您还未登录,请登录后发表或查看评论